> ## Documentation Index
> Fetch the complete documentation index at: https://learn.nexudus.com/llms.txt
> Use this file to discover all available pages before exploring further.
# Setting Up the Email Channel
> Step-by-step guide to enabling the AI assistant's email channel so members and prospects can interact with the AI by sending emails.
The email channel lets members and prospects interact with your AI assistant by sending an email. Instead of chatting through the portal widget, they write a regular email and receive a reply — with all the same AI capabilities running behind the scenes.
This guide walks through the full setup process: enabling the channel in Nexudus, configuring your inbox to forward messages, and verifying everything works.
## Before you start
Make sure the AI assistant is already enabled for your space. The email channel is an extension of the existing AI assistant — it will not work unless the base AI assistant is active.
You need:
* **Administrator access** to your Nexudus account.
* **Access to your email provider's settings** (Gmail, Outlook, or any provider that supports automatic forwarding).
No third-party accounts or additional subscriptions are required.
## How the email channel works
When you enable the email channel, Nexudus generates a dedicated **AI inbox address** for your space. Any email sent to this address (or forwarded to it) is processed by the AI assistant, which reads the message, runs the appropriate tools, and sends a reply email back to the sender.
The reply comes from your space's AI assistant, with your space name in the sender field, so members see a branded response rather than a generic system email.
 ## Step 1 — Enable the email channel in Nexudus
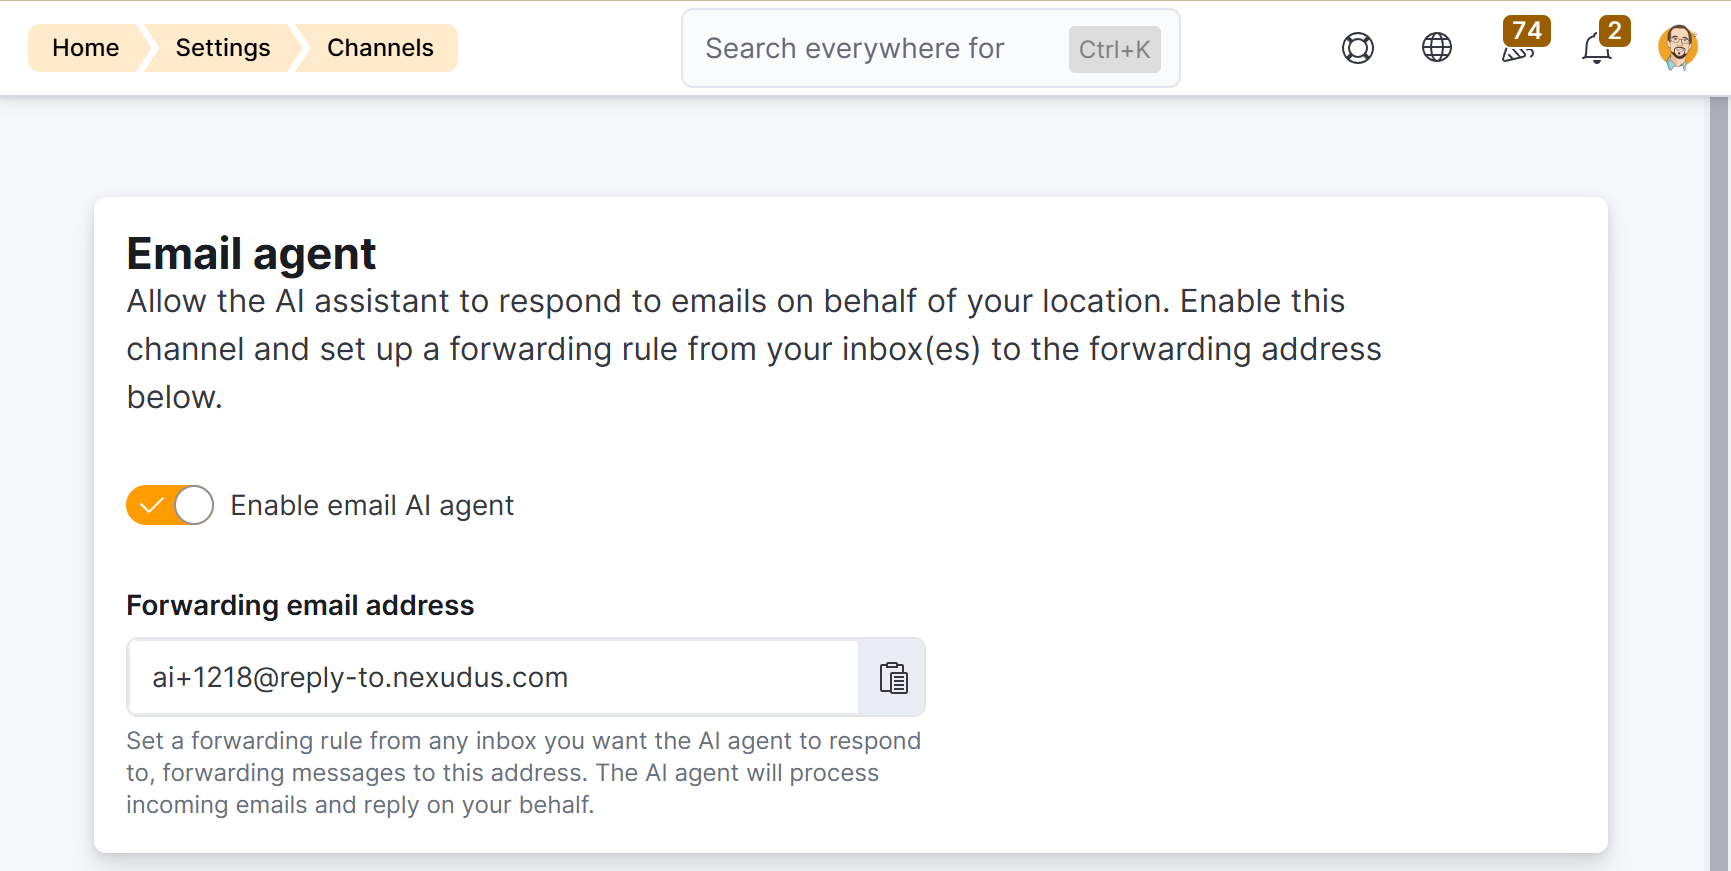
In the Nexudus administration panel, go to [**Settings > Channels > Email**](https://dashboard.nexudus.com/settings/5/0/1).
Toggle the **AI Email** setting to on. This activates the email channel for your space.
Once enabled, Nexudus displays your space's **AI inbox address**. This is the address you will forward emails to. It looks like:
```
ai+{your-business-id}@mail.nexudus.com
```
Copy this address — you will need it in the next step.
## Step 1 — Enable the email channel in Nexudus
In the Nexudus administration panel, go to [**Settings > Channels > Email**](https://dashboard.nexudus.com/settings/5/0/1).
Toggle the **AI Email** setting to on. This activates the email channel for your space.
Once enabled, Nexudus displays your space's **AI inbox address**. This is the address you will forward emails to. It looks like:
```
ai+{your-business-id}@mail.nexudus.com
```
Copy this address — you will need it in the next step.
 ## Step 2 — Set up email forwarding
The email channel works by forwarding emails from an address you control — such as `hello@yourspace.com` or `ai@yourspace.com` — to the Nexudus AI inbox address. You can use any email address you like; it does not need to be a specific format.
We recommend creating a **dedicated email address** for AI interactions (for example, `ai@yourspace.com` or `assistant@yourspace.com`) rather than forwarding your main inbox. This keeps AI conversations separate from your regular email and makes it clear to members where to write.
Choose your email provider below for specific forwarding instructions:
### Set up forwarding in Gmail
You can either forward **all incoming email** to the Nexudus AI inbox, or use a **filter** to forward only messages sent to a specific address (recommended if you are using a shared inbox).
In Gmail, click the **gear icon** in the top-right corner, then click **See all settings**.
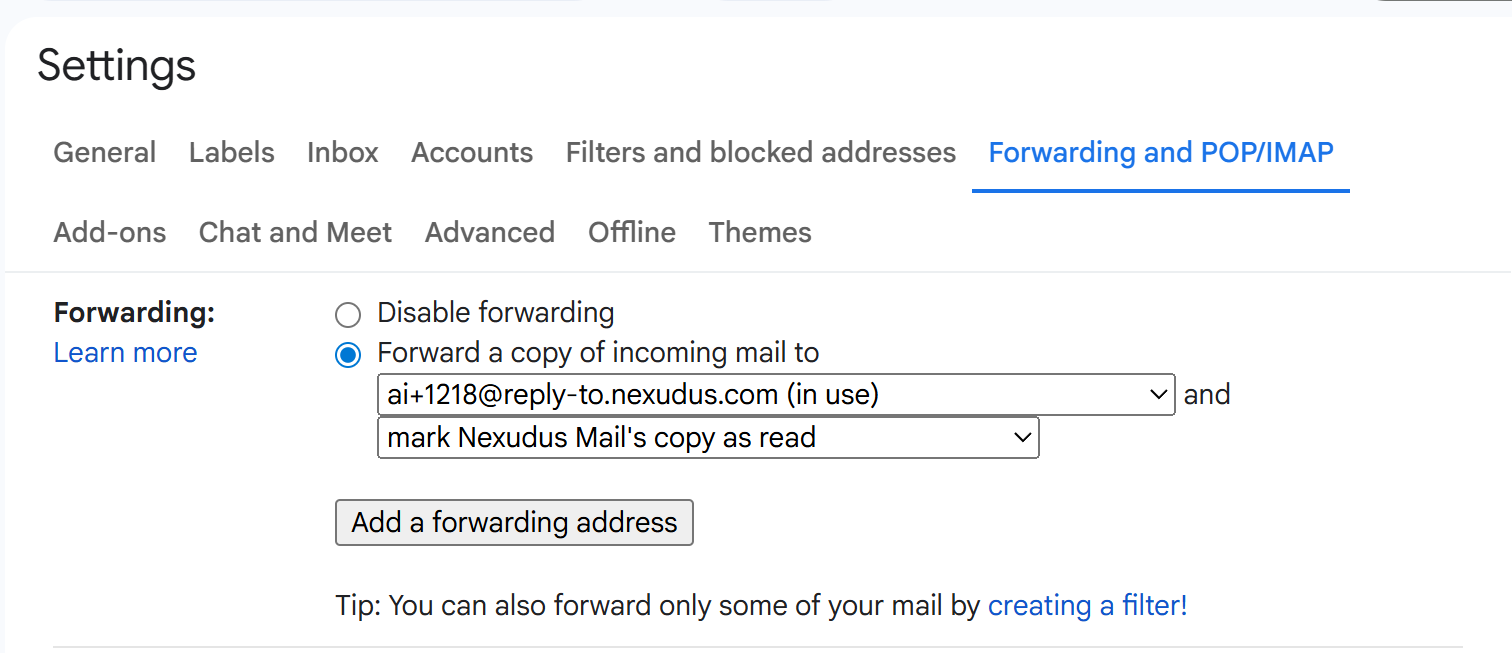
Click the **Forwarding and POP/IMAP** tab.
Click **Add a forwarding address** and paste your Nexudus AI inbox address (`ai+{your-business-id}@mail.nexudus.com`).
Google sends a confirmation email to the Nexudus address. Nexudus processes this automatically — no action is required on your part. The forwarding address will be confirmed within a few minutes.
If the address does not confirm automatically, check back after 5 minutes and refresh the page. The confirmation is handled by Nexudus's email infrastructure.
Select **Forward a copy of incoming mail to** and choose your Nexudus AI inbox address from the dropdown.
Choose **Keep Gmail's copy in the Inbox** so you retain a copy of every message.
Scroll down and click **Save Changes**.
This approach forwards everything that arrives in the inbox to the AI. It works well when the inbox is **dedicated to AI interactions** (for example, `ai@yourspace.com`).
Use a filter when the inbox also receives other email and you only want messages sent to a specific address to reach the AI — for example, forwarding only messages addressed to `ai@yourspace.com` while leaving other mail untouched.
In Gmail, click the **gear icon** in the top-right corner, then click **See all settings**.
Go to the **Forwarding and POP/IMAP** tab. Click **Add a forwarding address** and paste your Nexudus AI inbox address (`ai+{your-business-id}@mail.nexudus.com`).
Wait for the address to be confirmed (this happens automatically within a few minutes). You do **not** need to enable "Forward a copy of incoming mail" — the filter will handle forwarding selectively.
Click the **Filters and Blocked Addresses** tab, then click **Create a new filter**.
In the **To** field, enter the email address you want to use for AI interactions — for example, `ai@yourspace.com`.
Click **Create filter**.
Tick **Forward it to** and select your Nexudus AI inbox address from the dropdown.
Optionally, also tick **Skip the Inbox (Archive it)** if you do not want AI-bound messages cluttering the inbox, or leave it unticked to keep a copy visible.
Click **Create filter**.
The filter approach is ideal when you use a Google Workspace group or alias (for example, `ai@yourspace.com` as an alias on a shared inbox). Only messages addressed to that alias are forwarded to the AI, while everything else stays in the inbox as normal.
## Step 2 — Set up email forwarding
The email channel works by forwarding emails from an address you control — such as `hello@yourspace.com` or `ai@yourspace.com` — to the Nexudus AI inbox address. You can use any email address you like; it does not need to be a specific format.
We recommend creating a **dedicated email address** for AI interactions (for example, `ai@yourspace.com` or `assistant@yourspace.com`) rather than forwarding your main inbox. This keeps AI conversations separate from your regular email and makes it clear to members where to write.
Choose your email provider below for specific forwarding instructions:
### Set up forwarding in Gmail
You can either forward **all incoming email** to the Nexudus AI inbox, or use a **filter** to forward only messages sent to a specific address (recommended if you are using a shared inbox).
In Gmail, click the **gear icon** in the top-right corner, then click **See all settings**.
Click the **Forwarding and POP/IMAP** tab.
Click **Add a forwarding address** and paste your Nexudus AI inbox address (`ai+{your-business-id}@mail.nexudus.com`).
Google sends a confirmation email to the Nexudus address. Nexudus processes this automatically — no action is required on your part. The forwarding address will be confirmed within a few minutes.
If the address does not confirm automatically, check back after 5 minutes and refresh the page. The confirmation is handled by Nexudus's email infrastructure.
Select **Forward a copy of incoming mail to** and choose your Nexudus AI inbox address from the dropdown.
Choose **Keep Gmail's copy in the Inbox** so you retain a copy of every message.
Scroll down and click **Save Changes**.
This approach forwards everything that arrives in the inbox to the AI. It works well when the inbox is **dedicated to AI interactions** (for example, `ai@yourspace.com`).
Use a filter when the inbox also receives other email and you only want messages sent to a specific address to reach the AI — for example, forwarding only messages addressed to `ai@yourspace.com` while leaving other mail untouched.
In Gmail, click the **gear icon** in the top-right corner, then click **See all settings**.
Go to the **Forwarding and POP/IMAP** tab. Click **Add a forwarding address** and paste your Nexudus AI inbox address (`ai+{your-business-id}@mail.nexudus.com`).
Wait for the address to be confirmed (this happens automatically within a few minutes). You do **not** need to enable "Forward a copy of incoming mail" — the filter will handle forwarding selectively.
Click the **Filters and Blocked Addresses** tab, then click **Create a new filter**.
In the **To** field, enter the email address you want to use for AI interactions — for example, `ai@yourspace.com`.
Click **Create filter**.
Tick **Forward it to** and select your Nexudus AI inbox address from the dropdown.
Optionally, also tick **Skip the Inbox (Archive it)** if you do not want AI-bound messages cluttering the inbox, or leave it unticked to keep a copy visible.
Click **Create filter**.
The filter approach is ideal when you use a Google Workspace group or alias (for example, `ai@yourspace.com` as an alias on a shared inbox). Only messages addressed to that alias are forwarded to the AI, while everything else stays in the inbox as normal.
 For more detail, see Google's guides: [Automatically forward Gmail messages](https://support.google.com/mail/answer/10957) and [Create rules to filter your emails](https://support.google.com/mail/answer/6579).
### Set up forwarding in Microsoft 365
Go to [admin.microsoft.com](https://admin.microsoft.com) and sign in with your administrator account.
Go to **Admin centres > Exchange > Mail flow > Rules**.
Click **+ Add a rule > Create a new rule**.
* **Name:** AI Assistant Forwarding
* **Apply this rule if:** The recipient is `ai@yourspace.com` (or whichever address you are using)
* **Do the following:** Redirect the message to your Nexudus AI inbox address (`ai+{your-business-id}@mail.nexudus.com`)
Click **Save**. The rule takes effect within a few minutes.
For more detail, see Google's guides: [Automatically forward Gmail messages](https://support.google.com/mail/answer/10957) and [Create rules to filter your emails](https://support.google.com/mail/answer/6579).
### Set up forwarding in Microsoft 365
Go to [admin.microsoft.com](https://admin.microsoft.com) and sign in with your administrator account.
Go to **Admin centres > Exchange > Mail flow > Rules**.
Click **+ Add a rule > Create a new rule**.
* **Name:** AI Assistant Forwarding
* **Apply this rule if:** The recipient is `ai@yourspace.com` (or whichever address you are using)
* **Do the following:** Redirect the message to your Nexudus AI inbox address (`ai+{your-business-id}@mail.nexudus.com`)
Click **Save**. The rule takes effect within a few minutes.
 Alternatively, for a single mailbox, open **Outlook on the web > Settings > Mail > Forwarding** and enter the Nexudus AI inbox address. For more detail, see Microsoft's guide: [Configure email forwarding in Microsoft 365](https://learn.microsoft.com/en-us/microsoft-365/admin/email/configure-email-forwarding).
### General forwarding setup
Most email providers support automatic forwarding. The exact steps vary, but the general process is:
Look for **Forwarding**, **Auto-forward**, or **Mail flow rules** in your email provider's settings. This is sometimes under **Filters** or **Rules**.
Create a rule or forwarding configuration that sends a copy of all incoming messages (or messages to a specific address) to your Nexudus AI inbox address:
```
ai+{your-business-id}@mail.nexudus.com
```
If your provider offers the option, choose to keep a copy of forwarded messages in the original inbox.
Save the configuration and send a test email to verify it works (see Step 3 below).
If your email provider does not support automatic forwarding, contact your IT administrator or email hosting provider for assistance.
## Step 3 — Verify the setup
Once forwarding is configured, test the full flow to make sure everything works.
From a personal email address (not your forwarding address), send an email to the address you configured for AI interactions — for example, `ai@yourspace.com`. Use a simple question like:
> What are your opening hours?
Within a few minutes, you should receive a reply from the AI assistant. The reply comes from your space's AI assistant address and includes your space name in the sender field.
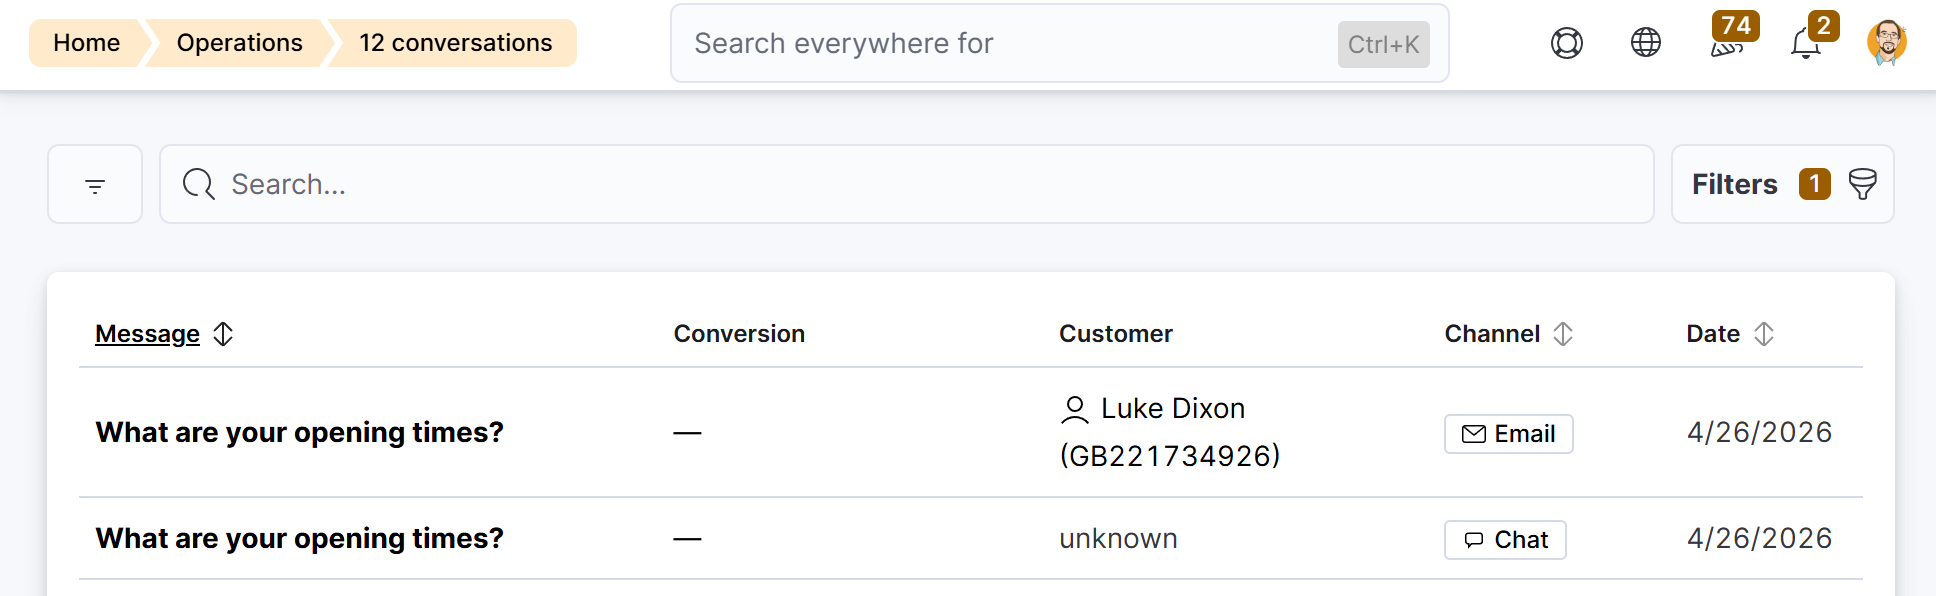
In the Nexudus administration panel, go to **Operations > AI Conversations**. You should see a new conversation with your test message. The **Channel** column will show **Email**.
Alternatively, for a single mailbox, open **Outlook on the web > Settings > Mail > Forwarding** and enter the Nexudus AI inbox address. For more detail, see Microsoft's guide: [Configure email forwarding in Microsoft 365](https://learn.microsoft.com/en-us/microsoft-365/admin/email/configure-email-forwarding).
### General forwarding setup
Most email providers support automatic forwarding. The exact steps vary, but the general process is:
Look for **Forwarding**, **Auto-forward**, or **Mail flow rules** in your email provider's settings. This is sometimes under **Filters** or **Rules**.
Create a rule or forwarding configuration that sends a copy of all incoming messages (or messages to a specific address) to your Nexudus AI inbox address:
```
ai+{your-business-id}@mail.nexudus.com
```
If your provider offers the option, choose to keep a copy of forwarded messages in the original inbox.
Save the configuration and send a test email to verify it works (see Step 3 below).
If your email provider does not support automatic forwarding, contact your IT administrator or email hosting provider for assistance.
## Step 3 — Verify the setup
Once forwarding is configured, test the full flow to make sure everything works.
From a personal email address (not your forwarding address), send an email to the address you configured for AI interactions — for example, `ai@yourspace.com`. Use a simple question like:
> What are your opening hours?
Within a few minutes, you should receive a reply from the AI assistant. The reply comes from your space's AI assistant address and includes your space name in the sender field.
In the Nexudus administration panel, go to **Operations > AI Conversations**. You should see a new conversation with your test message. The **Channel** column will show **Email**.
 If you do not receive a reply within 5 minutes, check that forwarding is active in your email provider's settings and that you copied the Nexudus AI inbox address correctly. Also confirm that the AI Email setting is still enabled in Nexudus.
## Step 4 — Share the email address with your members
Once the channel is working, share the email address with your members and prospects. Common ways to do this:
* Add it to your **website contact page** alongside your other contact methods.
* Include it in your **welcome email** to new members.
* Add it to your **email signature** or auto-reply messages.
* Display it on **physical signage** in your space.
You can also mention the email address in your FAQ articles. When members ask the chat assistant how to contact you by email, the AI can point them to the right address.
## How replies and threading work
When the AI replies to an email, the reply includes a special **Reply-To** address that embeds the session ID. This means:
* If the member replies to the AI's email, the reply is automatically routed to the same conversation session.
* The email thread in the member's inbox looks like a normal back-and-forth email conversation.
* After **48 hours** of inactivity, the session expires and the next email starts a fresh conversation.
* A new email with a different subject line also starts a new session.
The member does not need to know about any of this — threading is handled automatically.
## Frequently asked questions
Technically yes — any email forwarded to the Nexudus AI inbox address is processed by the AI. However, we recommend a dedicated address to keep AI conversations separate from your regular email.
The AI processes the text content of the email only. Attachments are noted in the conversation (the AI acknowledges they were sent) but cannot be read or processed. The AI will inform the sender that only text messages are supported.
The AI still replies — but capabilities that require an identified member (such as viewing or managing bookings) are unavailable. The AI will let the sender know what it can help with.
Yes. Switch off **AI Email** in your business settings. Forwarded emails will no longer be processed. You should also disable the forwarding rule in your email provider to avoid sending emails to an inactive inbox.
No. The email channel is included in the AI assistant feature. There are no additional charges for email-based conversations.
If you do not receive a reply within 5 minutes, check that forwarding is active in your email provider's settings and that you copied the Nexudus AI inbox address correctly. Also confirm that the AI Email setting is still enabled in Nexudus.
## Step 4 — Share the email address with your members
Once the channel is working, share the email address with your members and prospects. Common ways to do this:
* Add it to your **website contact page** alongside your other contact methods.
* Include it in your **welcome email** to new members.
* Add it to your **email signature** or auto-reply messages.
* Display it on **physical signage** in your space.
You can also mention the email address in your FAQ articles. When members ask the chat assistant how to contact you by email, the AI can point them to the right address.
## How replies and threading work
When the AI replies to an email, the reply includes a special **Reply-To** address that embeds the session ID. This means:
* If the member replies to the AI's email, the reply is automatically routed to the same conversation session.
* The email thread in the member's inbox looks like a normal back-and-forth email conversation.
* After **48 hours** of inactivity, the session expires and the next email starts a fresh conversation.
* A new email with a different subject line also starts a new session.
The member does not need to know about any of this — threading is handled automatically.
## Frequently asked questions
Technically yes — any email forwarded to the Nexudus AI inbox address is processed by the AI. However, we recommend a dedicated address to keep AI conversations separate from your regular email.
The AI processes the text content of the email only. Attachments are noted in the conversation (the AI acknowledges they were sent) but cannot be read or processed. The AI will inform the sender that only text messages are supported.
The AI still replies — but capabilities that require an identified member (such as viewing or managing bookings) are unavailable. The AI will let the sender know what it can help with.
Yes. Switch off **AI Email** in your business settings. Forwarded emails will no longer be processed. You should also disable the forwarding rule in your email provider to avoid sending emails to an inactive inbox.
No. The email channel is included in the AI assistant feature. There are no additional charges for email-based conversations.