> ## Documentation Index
> Fetch the complete documentation index at: https://learn.nexudus.com/llms.txt
> Use this file to discover all available pages before exploring further.
# RADIUS
> Connect business Wi-Fi from vendors such as Cisco Meraki, Ubiquiti, Aruba, and Ruckus to Nexudus through a RADIUS licence powered by IronWiFi.
## Overview
The **RADIUS** integration connects most business Wi-Fi systems to Nexudus. Customers sign in to your Wi-Fi through a splash page with their Nexudus details, or a [Wi-Fi access code](/platform/operations/access-tokens), and Nexudus decides whether to let them online based on their [passes](/platform/access-control/wifi#who-can-connect). It also checks them in when their Wi-Fi session starts and out when it ends.
Nexudus provides RADIUS through **IronWiFi**, so your Wi-Fi controller must be one IronWiFi supports. Supported vendors include Cisco and Meraki, Ubiquiti, Aruba, Ruckus, Fortinet FortiGate, MikroTik, TP-Link EAP, Peplink, pfSense, SonicWall, Extreme, Aerohive, and others.
## Licence and pricing
You need a RADIUS licence from Nexudus for each location that uses the integration. The licence costs a minimum of **£65 a month for up to 5 access points**, plus **£6 a month for each additional access point** (shown in your currency in the integration settings). Charges start as soon as the licence is issued.
To get a licence, contact Nexudus support with the number of access points at the location and your Wi-Fi controller's vendor. To cancel some access points or the whole licence, contact support too.
## Setting up RADIUS
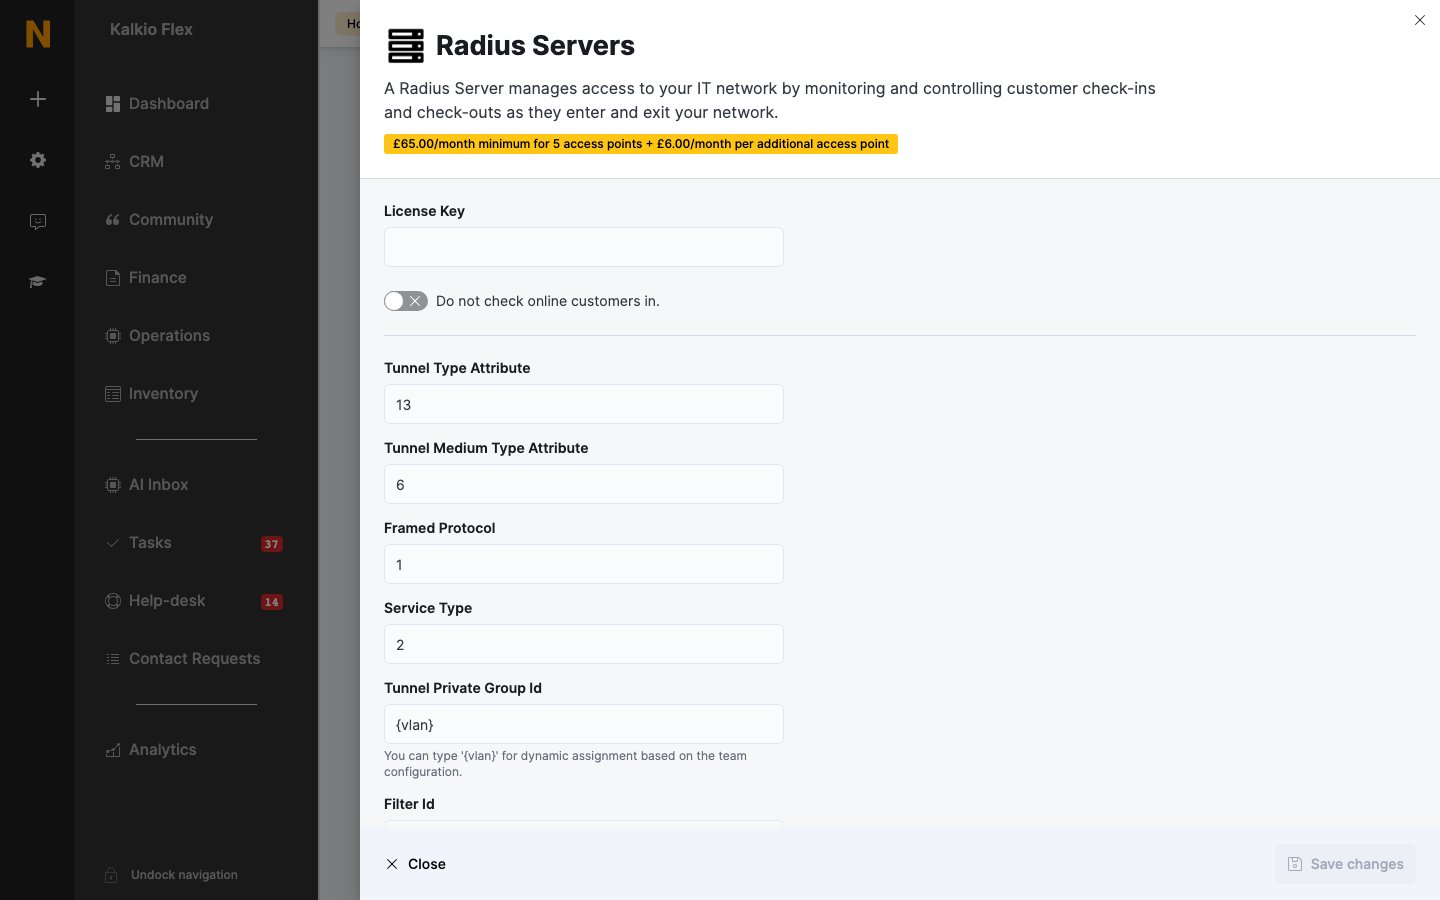
Once support issues your licence, go to **Settings → Integrations → Radius Servers**. Your **License Key** and RADIUS server appear there.
In the **Radius servers** list at the bottom of the settings, select **Configuration sheet** next to your server. It opens IronWiFi's step-by-step instructions for your controller's vendor. Follow them in your controller.
On each pass that should include Wi-Fi, turn on **Allow customers holding this pass to connect to your IT network.** See [Who can connect](/platform/access-control/wifi#who-can-connect).
Sign in to your Wi-Fi as a customer with a valid pass and check you get online and appear as checked in.
 ## Settings
| Setting | What it does |
| - | - |
| **License Key** | Your RADIUS licence, issued by Nexudus. |
| **Do not check online customers in.** | Lets customers online without checking them in. Use it if you track check-ins another way, such as door access. |
| **Tunnel Type Attribute**, **Tunnel Medium Type Attribute**, **Framed Protocol**, **Service Type** | RADIUS attributes sent to your controller. Leave the defaults unless your network installer tells you otherwise. |
| **Tunnel Private Group Id** | The VLAN customers are placed on. Enter `{vlan}` to use each team's own VLAN (see below). |
| **Filter Id** | A filter or policy name sent to your controller. Also accepts `{vlan}`. |
| **Default Tunnel Private Group Id** | The VLAN used for customers whose team doesn't have its own. |
| **Default Idle-Timeout amount** | How long a customer's session can be idle before the controller disconnects them. |
Each server in the **Radius servers** list has a **Name**, **Vendor**, and **Status** (**Active** or not). Open a server to change its name or vendor.
### A private network for each team
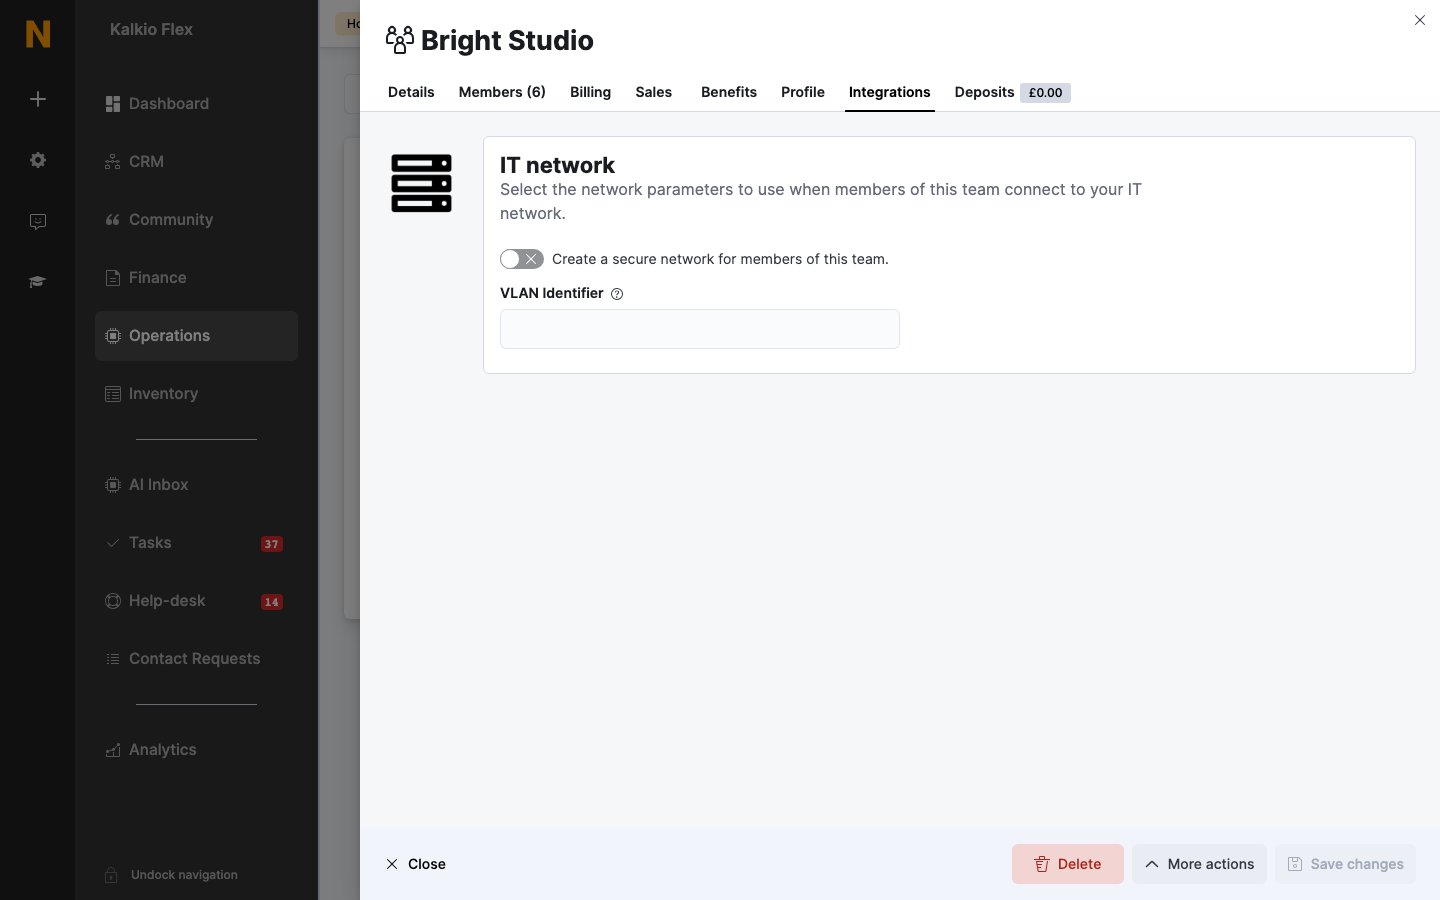
To put a company's devices on their own network, open the team, go to its **Integrations** tab, and under **IT network** turn on **Create a secure network for members of this team.** and enter its **VLAN Identifier**. With `{vlan}` in **Tunnel Private Group Id**, team members are placed on that VLAN when they connect.
## Settings
| Setting | What it does |
| - | - |
| **License Key** | Your RADIUS licence, issued by Nexudus. |
| **Do not check online customers in.** | Lets customers online without checking them in. Use it if you track check-ins another way, such as door access. |
| **Tunnel Type Attribute**, **Tunnel Medium Type Attribute**, **Framed Protocol**, **Service Type** | RADIUS attributes sent to your controller. Leave the defaults unless your network installer tells you otherwise. |
| **Tunnel Private Group Id** | The VLAN customers are placed on. Enter `{vlan}` to use each team's own VLAN (see below). |
| **Filter Id** | A filter or policy name sent to your controller. Also accepts `{vlan}`. |
| **Default Tunnel Private Group Id** | The VLAN used for customers whose team doesn't have its own. |
| **Default Idle-Timeout amount** | How long a customer's session can be idle before the controller disconnects them. |
Each server in the **Radius servers** list has a **Name**, **Vendor**, and **Status** (**Active** or not). Open a server to change its name or vendor.
### A private network for each team
To put a company's devices on their own network, open the team, go to its **Integrations** tab, and under **IT network** turn on **Create a secure network for members of this team.** and enter its **VLAN Identifier**. With `{vlan}` in **Tunnel Private Group Id**, team members are placed on that VLAN when they connect.
 ## Customising the splash page
The splash page is what customers see before they get online, where they enter their email and PIN or a Wi-Fi access code. To change its design, ask Nexudus support for access to the IronWiFi console, then edit the **Splash Page** of your captive portal under **Network → Captive Portals**. Test it by signing in as a customer afterwards.
## Ruckus controllers
Ruckus controllers need some extra steps beyond the configuration sheet: a captive portal in IronWiFi using the Ruckus vendor, a WISPr (third-party captive portal) network in Ruckus pointing at your splash page, and a walled garden that lets customers reach your members portal (`.spaces.nexudus.com`) before they sign in. Contact Nexudus support for the current addresses to add to the walled garden.
## Related
* [Wi-Fi](/platform/access-control/wifi) — who can connect, check-ins, and troubleshooting
* [Wi-Fi access codes](/platform/operations/access-tokens) — temporary Wi-Fi access for visitors
* [Teams](/platform/operations/teams) — company accounts and their settings
This documentation is built and hosted on [Mintlify](https://mintlify.com), a developer documentation platform.
## Customising the splash page
The splash page is what customers see before they get online, where they enter their email and PIN or a Wi-Fi access code. To change its design, ask Nexudus support for access to the IronWiFi console, then edit the **Splash Page** of your captive portal under **Network → Captive Portals**. Test it by signing in as a customer afterwards.
## Ruckus controllers
Ruckus controllers need some extra steps beyond the configuration sheet: a captive portal in IronWiFi using the Ruckus vendor, a WISPr (third-party captive portal) network in Ruckus pointing at your splash page, and a walled garden that lets customers reach your members portal (`.spaces.nexudus.com`) before they sign in. Contact Nexudus support for the current addresses to add to the walled garden.
## Related
* [Wi-Fi](/platform/access-control/wifi) — who can connect, check-ins, and troubleshooting
* [Wi-Fi access codes](/platform/operations/access-tokens) — temporary Wi-Fi access for visitors
* [Teams](/platform/operations/teams) — company accounts and their settings
This documentation is built and hosted on [Mintlify](https://mintlify.com), a developer documentation platform.