> ## Documentation Index
> Fetch the complete documentation index at: https://learn.nexudus.com/llms.txt
> Use this file to discover all available pages before exploring further.
# Configuring Agents
> Step-by-step guide to enabling agents, setting confidence thresholds, configuring rate limits, and customizing message behavior.
 ## Overview
Once you've identified which proactive AI agents are right for your space, the next step is configuring each one to match your operational needs. The configuration panel lets you control **when** an agent acts, **how often**, **through which channel**, and **what tone** its messages use.
This page walks you through every setting available in the **Agent Configuration** panel, from enabling an agent to testing voice calls.
**Route:** [Configure Agents](https://dashboard.nexudus.com/operations/configureAgents) (click any agent card to open its configuration)
Detailed guide to all available agents, what they do, and recommended settings.
Review and manage proposed actions from your agents.
***
## Enabling an Agent
Before you can configure an agent, you need to enable it.
1. Navigate to **Operations > AI Agents**
2. Find the agent you want to enable in the grid
3. Click the **toggle switch** on the agent card
4. The status badge changes from **Inactive** (grey) to **Active** (green)
When you enable an agent for the first time, Nexudus automatically creates a configuration with **default settings** specific to that agent. These defaults are a safe starting point — you can customize them after enabling.
> **Tip:** Enable one agent at a time. This lets you understand how each agent behaves before adding more.
***
## Opening the Configuration Panel
After enabling an agent (or if it's already enabled), click anywhere on the agent card to open its **Configuration Panel**. The panel is organized into three sections:
1. **Basic Settings** — Enable/disable and view agent description
2. **Execution & Behavior** — Auto-execute, confidence threshold, cooldown, and rate limits
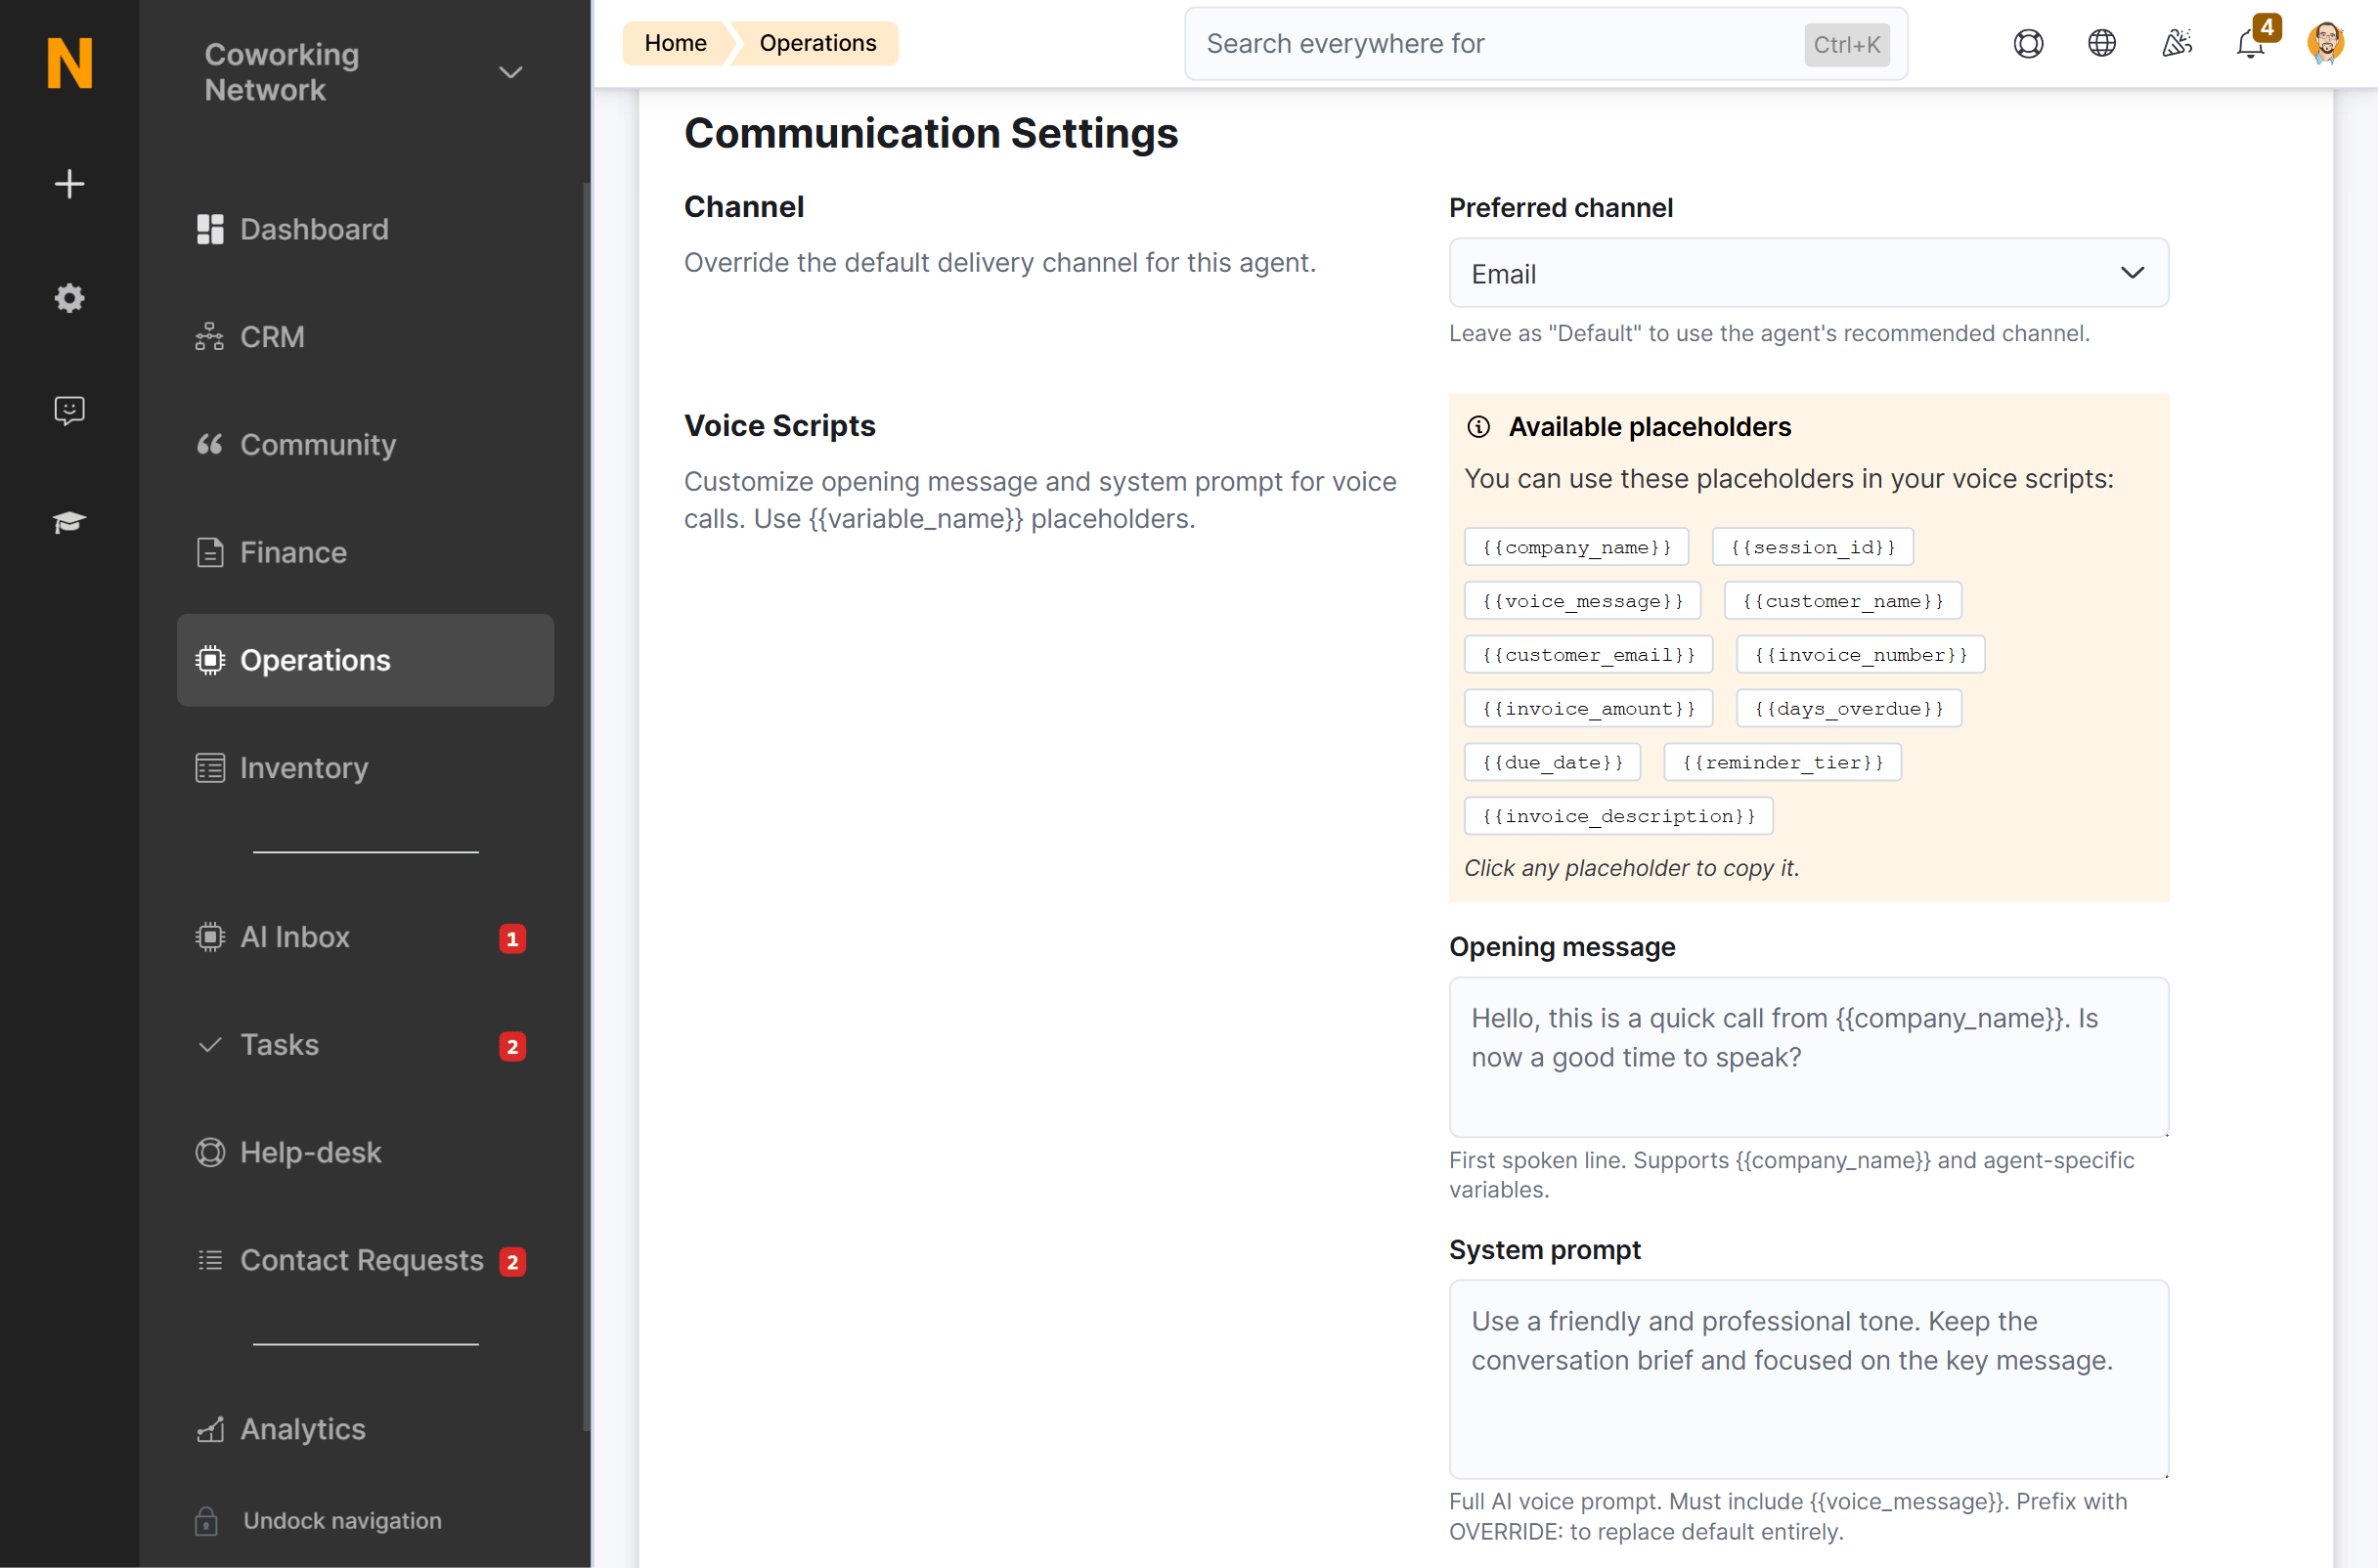
3. **Communication Settings** — Channel, voice scripts, and custom instructions (outbound agents only)
At the bottom of the panel, you'll also find a **Test Configuration** section for verifying voice call quality.
***
## Basic Settings
### Enable / Disable
The master switch for the agent. When disabled, the agent stops evaluating criteria and proposing actions immediately. Re-enabling it resumes monitoring from that point forward.
* **Active** (green badge) — Agent is monitoring and proposing actions
* **Inactive** (grey badge) — Agent is paused
> **Note:** Disabling an agent does **not** delete your configuration. All your custom settings are preserved and will be applied when you re-enable it.
***
## Execution & Behavior
These settings control **when** and **how often** the agent takes action. They appear once the agent is enabled.
### Auto-Execution
Auto-execute allows high-confidence actions to be sent automatically without waiting for your manual approval in the AI Inbox. This is useful for routine, low-risk actions where you trust the AI's judgment.
**How it works:**
1. The agent detects a pattern and calculates a confidence score (0–100%)
2. If auto-execute is enabled and the score meets or exceeds your threshold, the action is sent immediately
3. Actions below the threshold still appear in your AI Inbox for manual review
**When to enable auto-execute:**
**Good candidates:**
* Payment reminders (factual, expected communication)
* Contract renewal outreach (timely, relationship-building)
* Onboarding nudges (helpful, low-risk)
**Keep manual review for:**
* At-risk member detection (needs personal context)
* Support pattern outreach (requires understanding of issue severity)
* Any agent where the message tone needs your personal touch
**Minimum Confidence Threshold**
When auto-execute is enabled, a slider appears allowing you to set the minimum confidence level required for automatic sending.
| Threshold | What it means |
| ----------- | ---------------------------------------------------------------------------------------- |
| **50%** | Very permissive — half of all detected patterns are auto-executed |
| **75%** | Moderate — only reasonably confident actions are sent automatically |
| **85%–90%** | Conservative — only high-confidence actions are auto-executed (recommended for starting) |
| **100%** | No auto-execute — all actions require manual review |
**Recommended approach:**
1. Start with auto-execute **disabled** while you learn how the agent behaves
2. After 1–2 weeks of manual review, enable auto-execute at **85%**
3. Adjust up or down based on how many actions you're approving vs. rejecting
Enable auto-execute only after testing with manual review for 1–2 weeks.
Higher confidence thresholds mean fewer auto-executions but higher quality.
### Rate Limiting
Rate limiting prevents your agents from over-communicating with customers. Two settings control this:
#### Cooldown Period (Hours)
The minimum number of hours that must pass before the same agent can act on the **same customer** again.
* **Range:** 1–720 hours (1 hour to 30 days)
* **Default:** Varies by agent (e.g., 48 hours for Due Invoice Reminders, 72 hours for Contract Renewal)
**How it works:** If the Due Invoice Reminders agent sends a reminder to a customer at 10:00 AM on Monday with a 48-hour cooldown, it won't propose another action for that same customer until 10:00 AM on Wednesday — even if new patterns are detected.
**Recommended cooldowns by scenario:**
| Scenario | Recommended Cooldown |
| ------------------ | ----------------------- |
| Payment reminders | 24–48 hours |
| Contract renewals | 72–168 hours (3–7 days) |
| Onboarding nudges | 24 hours |
| At-risk detection | 168 hours (1 week) |
| Support follow-ups | 168 hours (1 week) |
#### Maximum Actions Per Day
The upper limit on how many actions this agent can propose across **all customers** in a single day.
* **Range:** 1–1,000
* **Default:** Varies by agent (e.g., 20 for Due Invoice Reminders, 10 for Contract Renewal)
* **Leave empty** for unlimited (not recommended for most agents)
**Why set a limit?** Without a cap, a single event (like a payment processing outage) could trigger hundreds of reminder actions at once. A daily limit ensures your communication stays controlled and prevents message fatigue.
**Recommended daily limits:**
| Agent Volume | Recommended Max Actions/Day |
| ------------------------------------ | --------------------------- |
| High-volume (payment reminders) | 20–50 |
| Medium-volume (renewals, follow-ups) | 10–20 |
| Low-volume (at-risk, upsell) | 5–10 |
***
## Communication Settings
These settings appear only for agents that send **outbound messages** (email, WhatsApp, or voice). Internal-only agents (like FAQ Gap Detection) skip this section entirely.
### Preferred Channel
Override the default communication channel for this agent.
| Option | When to Use |
| ------------ | ------------------------------------------------------------------------------------- |
| **Default** | Let the agent use its recommended channel (recommended for most cases) |
| **Email** | Force all actions to be sent as email, even for agents that support voice or WhatsApp |
| **WhatsApp** | Force all actions to be sent via WhatsApp messages |
| **Voice** | Force all actions to be sent as AI voice calls |
**When to use WhatsApp:**
* Customers who prefer instant messaging over email
* Mobile-first communication for quick engagement
* Time-sensitive messages that need immediate attention
* Personal, conversational touch for relationship-building
* Requires WhatsApp channel configuration on your location
* Subject to WhatsApp Business API 24-hour messaging window rules
**When to use Voice:**
* High-priority, urgent matters (e.g., tour reminders before an appointment)
* Personal touch for VIP or long-term customers
* After email attempts have not been acknowledged
* Requires voice channel configuration on your location
> **Note:** Not all agents support all channels. The channel badge on each agent card shows its default channel. WhatsApp messages follow Business API rules: free-form messages can only be sent within 24 hours of the customer's last message; otherwise, a pre-approved template is sent to initiate the conversation.
### Available Placeholders
When configuring voice scripts, you'll see a list of **placeholders** specific to this agent. These are dynamic variables that get replaced with actual customer data when the message is sent.
To copy a placeholder, click on it. It will be copied to your clipboard and show a green checkmark briefly.
Common placeholders include:
| Placeholder | Example Value |
| ----------------------- | --------------------------------------------------------- |
| `{{customer_name}}` | "John Smith" |
| `{{company_name}}` | "Acme Workspace" |
| `{{invoice_number}}` | "INV-2026-0042" |
| `{{invoice_amount}}` | "€149.00" |
| `{{contract_end_date}}` | "July 15, 2026" |
| `{{payment_link}}` | "[https://pay.nexudus.com/](https://pay.nexudus.com/)..." |
> **Tip:** Each agent type has different available placeholders. The list shown in the configuration panel is specific to the agent you're configuring.
### Opening Message
> **Voice only** — This setting applies exclusively to agents that send voice calls. It has no effect on email or other channels.
The first line spoken when the voice call is delivered. This overrides the AI's default greeting.
* **Maximum length:** 500 characters
* **Supports placeholders:** Yes (e.g., `{{company_name}}`, `{{customer_name}}`)
**Example:**
> Hello `{{customer_name}}`, this is a quick call from `{{company_name}}`. I noticed your invoice is a few days overdue — is now a good time to speak?
### System Prompt
> **Voice only** — This setting applies exclusively to agents that send voice calls. It has no effect on email or other channels.
Full AI instructions for generating the voice message content. This gives you fine-grained control over tone, structure, and content.
* **Maximum length:** 2,000 characters
* **Must include:** The `{{voice_message}}` placeholder (required when using OVERRIDE mode)
**Standard usage:** Leave blank to use the agent's default system prompt. The AI already knows the right tone and structure for each agent type.
**Advanced usage — Override mode:**
If you prefix your system prompt with `OVERRIDE:`, it replaces the entire default prompt. This is for advanced users who want complete control.
> **Important:** When using `OVERRIDE:` in a voice agent's system prompt, you **must** include the `{{voice_message}}` placeholder. If you don't, the save will be rejected with an error.
**Example override:**
> OVERRIDE: You are a friendly receptionist at a coworking space. Be warm, conversational, and brief. Never exceed 30 seconds of speaking time. Always end with a question that invites a response. `{{voice_message}}`
### Custom Prompt Instructions
Additional instructions that are **appended** to the agent's default prompt (rather than replacing it). This is the easiest way to customize message behavior across **all agents** — email, WhatsApp, and voice — without risking breaking the agent.
* **Maximum length:** 2,000 characters
* **Applies to:** All outbound agents (email, WhatsApp, and voice)
* **Safe to use:** Yes, for most operators
* **Tip:** Prefix with `OVERRIDE:` to replace the entire prompt instead of appending
**Example:**
> Always address the customer by their first name. Use a friendly but professional tone. Never sound pushy about payments.
**Best practices for custom prompts:**
1. Start with small, specific instructions rather than rewriting the entire prompt
2. Test the result by reviewing approved actions before enabling auto-execute
3. Keep tone consistent with your location's brand voice
4. Avoid conflicting instructions (e.g., "be brief" + "include full invoice details")
***
## Test Configuration
Once your configuration is saved, you can verify how it works in practice.
### Test Voice Call
For agents that support voice calls, you can initiate a test call to hear exactly what your customers will hear.
1. Save your configuration first (unsaved changes prevent testing)
2. Enter your phone number in the **Phone number** field (include country code, e.g., `+44123456789`)
3. Click **Test Voice Call**
4. You'll receive a phone call using your current agent configuration
**What to verify during the test:**
* Voice quality and clarity
* Opening message sounds natural
* Tone matches your location's brand
* The call handles gracefully (you can hang up, respond to questions)
* Placeholders are replaced with real sample data
After the test call, you'll see a success or error message indicating whether the call was initiated successfully.
***
## Saving Your Configuration
Changes are saved by clicking the **Save** button in the bottom bar of the configuration panel. A green confirmation message appears briefly when the save is successful.
> **Important:** If you have unsaved changes and try to initiate a test voice call, you'll be prompted to save first. The test uses your **saved** configuration, not your in-progress changes.
***
## Recommended Configuration Workflow
Follow this workflow when setting up a new agent:
### Phase 1: Enable and Observe (Week 1–2)
1. Toggle the agent **on**
2. Leave **auto-execute disabled**
3. Use **default** cooldown and daily limits
4. Use **default** channel and prompts
5. Review proposed actions in your AI Inbox daily
6. Note patterns: which actions do you approve? Which do you reject or edit?
### Phase 2: Tune (Week 3–4)
1. Adjust **cooldown** if you're seeing too many or too few actions for the same customer
2. Adjust **max actions per day** if your inbox is overwhelmed or underutilized
3. If the agent is sending through the wrong channel, switch it
4. Tweak **custom prompt instructions** to improve tone or add specific details
### Phase 3: Automate (Week 5+)
1. If your approval rate is high (80%+), consider enabling **auto-execute**
2. Set the confidence threshold to **85%** initially
3. Monitor for 1–2 more weeks
4. Adjust the threshold based on the quality of auto-executed actions
***
## Quick Reference: All Settings
| Setting | Location | Default | Range | Notes |
| ---------------------- | ---------------------- | -------------- | ---------------------------------- | ------------------------------------------------------------------- |
| **Enabled** | Basic Settings | — | On/Off | Master switch |
| **Auto-execute** | Execution & Behavior | Off | On/Off | Not available for internal-only agents |
| **Min. confidence** | Execution & Behavior | 80% | 50%–100% | Only visible when auto-execute is on |
| **Cooldown hours** | Execution & Behavior | Agent-specific | 1–720 | Per-customer frequency |
| **Max actions/day** | Execution & Behavior | Agent-specific | 1–1,000 or unlimited | Per-agent global limit |
| **Channel preference** | Communication Settings | Default | Default / Email / WhatsApp / Voice | Not shown for internal-only agents |
| **Opening message** | Communication Settings | (empty) | 0–500 chars | Voice only — greeting for voice calls |
| **System prompt** | Communication Settings | (empty) | 0–2,000 chars | Voice only — must include `{{voice_message}}` for overrides |
| **Custom prompt** | Communication Settings | (empty) | 0–2,000 chars | All agents — appended to default prompt for email, WhatsApp & voice |
***
## What's Next?
* Browse the [Agent Types Reference](/platform/ai/agent-types) for detailed information on each agent's behavior and recommended settings
* Review and manage [suggested actions](/platform/ai/inbox) in the AI Inbox
* View [AI Conversations](/platform/ai/ai-conversations) to see two-way conversations with customers
## Overview
Once you've identified which proactive AI agents are right for your space, the next step is configuring each one to match your operational needs. The configuration panel lets you control **when** an agent acts, **how often**, **through which channel**, and **what tone** its messages use.
This page walks you through every setting available in the **Agent Configuration** panel, from enabling an agent to testing voice calls.
**Route:** [Configure Agents](https://dashboard.nexudus.com/operations/configureAgents) (click any agent card to open its configuration)
Detailed guide to all available agents, what they do, and recommended settings.
Review and manage proposed actions from your agents.
***
## Enabling an Agent
Before you can configure an agent, you need to enable it.
1. Navigate to **Operations > AI Agents**
2. Find the agent you want to enable in the grid
3. Click the **toggle switch** on the agent card
4. The status badge changes from **Inactive** (grey) to **Active** (green)
When you enable an agent for the first time, Nexudus automatically creates a configuration with **default settings** specific to that agent. These defaults are a safe starting point — you can customize them after enabling.
> **Tip:** Enable one agent at a time. This lets you understand how each agent behaves before adding more.
***
## Opening the Configuration Panel
After enabling an agent (or if it's already enabled), click anywhere on the agent card to open its **Configuration Panel**. The panel is organized into three sections:
1. **Basic Settings** — Enable/disable and view agent description
2. **Execution & Behavior** — Auto-execute, confidence threshold, cooldown, and rate limits
3. **Communication Settings** — Channel, voice scripts, and custom instructions (outbound agents only)
At the bottom of the panel, you'll also find a **Test Configuration** section for verifying voice call quality.
***
## Basic Settings
### Enable / Disable
The master switch for the agent. When disabled, the agent stops evaluating criteria and proposing actions immediately. Re-enabling it resumes monitoring from that point forward.
* **Active** (green badge) — Agent is monitoring and proposing actions
* **Inactive** (grey badge) — Agent is paused
> **Note:** Disabling an agent does **not** delete your configuration. All your custom settings are preserved and will be applied when you re-enable it.
***
## Execution & Behavior
These settings control **when** and **how often** the agent takes action. They appear once the agent is enabled.
### Auto-Execution
Auto-execute allows high-confidence actions to be sent automatically without waiting for your manual approval in the AI Inbox. This is useful for routine, low-risk actions where you trust the AI's judgment.
**How it works:**
1. The agent detects a pattern and calculates a confidence score (0–100%)
2. If auto-execute is enabled and the score meets or exceeds your threshold, the action is sent immediately
3. Actions below the threshold still appear in your AI Inbox for manual review
**When to enable auto-execute:**
**Good candidates:**
* Payment reminders (factual, expected communication)
* Contract renewal outreach (timely, relationship-building)
* Onboarding nudges (helpful, low-risk)
**Keep manual review for:**
* At-risk member detection (needs personal context)
* Support pattern outreach (requires understanding of issue severity)
* Any agent where the message tone needs your personal touch
**Minimum Confidence Threshold**
When auto-execute is enabled, a slider appears allowing you to set the minimum confidence level required for automatic sending.
| Threshold | What it means |
| ----------- | ---------------------------------------------------------------------------------------- |
| **50%** | Very permissive — half of all detected patterns are auto-executed |
| **75%** | Moderate — only reasonably confident actions are sent automatically |
| **85%–90%** | Conservative — only high-confidence actions are auto-executed (recommended for starting) |
| **100%** | No auto-execute — all actions require manual review |
**Recommended approach:**
1. Start with auto-execute **disabled** while you learn how the agent behaves
2. After 1–2 weeks of manual review, enable auto-execute at **85%**
3. Adjust up or down based on how many actions you're approving vs. rejecting
Enable auto-execute only after testing with manual review for 1–2 weeks.
Higher confidence thresholds mean fewer auto-executions but higher quality.
### Rate Limiting
Rate limiting prevents your agents from over-communicating with customers. Two settings control this:
#### Cooldown Period (Hours)
The minimum number of hours that must pass before the same agent can act on the **same customer** again.
* **Range:** 1–720 hours (1 hour to 30 days)
* **Default:** Varies by agent (e.g., 48 hours for Due Invoice Reminders, 72 hours for Contract Renewal)
**How it works:** If the Due Invoice Reminders agent sends a reminder to a customer at 10:00 AM on Monday with a 48-hour cooldown, it won't propose another action for that same customer until 10:00 AM on Wednesday — even if new patterns are detected.
**Recommended cooldowns by scenario:**
| Scenario | Recommended Cooldown |
| ------------------ | ----------------------- |
| Payment reminders | 24–48 hours |
| Contract renewals | 72–168 hours (3–7 days) |
| Onboarding nudges | 24 hours |
| At-risk detection | 168 hours (1 week) |
| Support follow-ups | 168 hours (1 week) |
#### Maximum Actions Per Day
The upper limit on how many actions this agent can propose across **all customers** in a single day.
* **Range:** 1–1,000
* **Default:** Varies by agent (e.g., 20 for Due Invoice Reminders, 10 for Contract Renewal)
* **Leave empty** for unlimited (not recommended for most agents)
**Why set a limit?** Without a cap, a single event (like a payment processing outage) could trigger hundreds of reminder actions at once. A daily limit ensures your communication stays controlled and prevents message fatigue.
**Recommended daily limits:**
| Agent Volume | Recommended Max Actions/Day |
| ------------------------------------ | --------------------------- |
| High-volume (payment reminders) | 20–50 |
| Medium-volume (renewals, follow-ups) | 10–20 |
| Low-volume (at-risk, upsell) | 5–10 |
***
## Communication Settings
These settings appear only for agents that send **outbound messages** (email, WhatsApp, or voice). Internal-only agents (like FAQ Gap Detection) skip this section entirely.
### Preferred Channel
Override the default communication channel for this agent.
| Option | When to Use |
| ------------ | ------------------------------------------------------------------------------------- |
| **Default** | Let the agent use its recommended channel (recommended for most cases) |
| **Email** | Force all actions to be sent as email, even for agents that support voice or WhatsApp |
| **WhatsApp** | Force all actions to be sent via WhatsApp messages |
| **Voice** | Force all actions to be sent as AI voice calls |
**When to use WhatsApp:**
* Customers who prefer instant messaging over email
* Mobile-first communication for quick engagement
* Time-sensitive messages that need immediate attention
* Personal, conversational touch for relationship-building
* Requires WhatsApp channel configuration on your location
* Subject to WhatsApp Business API 24-hour messaging window rules
**When to use Voice:**
* High-priority, urgent matters (e.g., tour reminders before an appointment)
* Personal touch for VIP or long-term customers
* After email attempts have not been acknowledged
* Requires voice channel configuration on your location
> **Note:** Not all agents support all channels. The channel badge on each agent card shows its default channel. WhatsApp messages follow Business API rules: free-form messages can only be sent within 24 hours of the customer's last message; otherwise, a pre-approved template is sent to initiate the conversation.
### Available Placeholders
When configuring voice scripts, you'll see a list of **placeholders** specific to this agent. These are dynamic variables that get replaced with actual customer data when the message is sent.
To copy a placeholder, click on it. It will be copied to your clipboard and show a green checkmark briefly.
Common placeholders include:
| Placeholder | Example Value |
| ----------------------- | --------------------------------------------------------- |
| `{{customer_name}}` | "John Smith" |
| `{{company_name}}` | "Acme Workspace" |
| `{{invoice_number}}` | "INV-2026-0042" |
| `{{invoice_amount}}` | "€149.00" |
| `{{contract_end_date}}` | "July 15, 2026" |
| `{{payment_link}}` | "[https://pay.nexudus.com/](https://pay.nexudus.com/)..." |
> **Tip:** Each agent type has different available placeholders. The list shown in the configuration panel is specific to the agent you're configuring.
### Opening Message
> **Voice only** — This setting applies exclusively to agents that send voice calls. It has no effect on email or other channels.
The first line spoken when the voice call is delivered. This overrides the AI's default greeting.
* **Maximum length:** 500 characters
* **Supports placeholders:** Yes (e.g., `{{company_name}}`, `{{customer_name}}`)
**Example:**
> Hello `{{customer_name}}`, this is a quick call from `{{company_name}}`. I noticed your invoice is a few days overdue — is now a good time to speak?
### System Prompt
> **Voice only** — This setting applies exclusively to agents that send voice calls. It has no effect on email or other channels.
Full AI instructions for generating the voice message content. This gives you fine-grained control over tone, structure, and content.
* **Maximum length:** 2,000 characters
* **Must include:** The `{{voice_message}}` placeholder (required when using OVERRIDE mode)
**Standard usage:** Leave blank to use the agent's default system prompt. The AI already knows the right tone and structure for each agent type.
**Advanced usage — Override mode:**
If you prefix your system prompt with `OVERRIDE:`, it replaces the entire default prompt. This is for advanced users who want complete control.
> **Important:** When using `OVERRIDE:` in a voice agent's system prompt, you **must** include the `{{voice_message}}` placeholder. If you don't, the save will be rejected with an error.
**Example override:**
> OVERRIDE: You are a friendly receptionist at a coworking space. Be warm, conversational, and brief. Never exceed 30 seconds of speaking time. Always end with a question that invites a response. `{{voice_message}}`
### Custom Prompt Instructions
Additional instructions that are **appended** to the agent's default prompt (rather than replacing it). This is the easiest way to customize message behavior across **all agents** — email, WhatsApp, and voice — without risking breaking the agent.
* **Maximum length:** 2,000 characters
* **Applies to:** All outbound agents (email, WhatsApp, and voice)
* **Safe to use:** Yes, for most operators
* **Tip:** Prefix with `OVERRIDE:` to replace the entire prompt instead of appending
**Example:**
> Always address the customer by their first name. Use a friendly but professional tone. Never sound pushy about payments.
**Best practices for custom prompts:**
1. Start with small, specific instructions rather than rewriting the entire prompt
2. Test the result by reviewing approved actions before enabling auto-execute
3. Keep tone consistent with your location's brand voice
4. Avoid conflicting instructions (e.g., "be brief" + "include full invoice details")
***
## Test Configuration
Once your configuration is saved, you can verify how it works in practice.
### Test Voice Call
For agents that support voice calls, you can initiate a test call to hear exactly what your customers will hear.
1. Save your configuration first (unsaved changes prevent testing)
2. Enter your phone number in the **Phone number** field (include country code, e.g., `+44123456789`)
3. Click **Test Voice Call**
4. You'll receive a phone call using your current agent configuration
**What to verify during the test:**
* Voice quality and clarity
* Opening message sounds natural
* Tone matches your location's brand
* The call handles gracefully (you can hang up, respond to questions)
* Placeholders are replaced with real sample data
After the test call, you'll see a success or error message indicating whether the call was initiated successfully.
***
## Saving Your Configuration
Changes are saved by clicking the **Save** button in the bottom bar of the configuration panel. A green confirmation message appears briefly when the save is successful.
> **Important:** If you have unsaved changes and try to initiate a test voice call, you'll be prompted to save first. The test uses your **saved** configuration, not your in-progress changes.
***
## Recommended Configuration Workflow
Follow this workflow when setting up a new agent:
### Phase 1: Enable and Observe (Week 1–2)
1. Toggle the agent **on**
2. Leave **auto-execute disabled**
3. Use **default** cooldown and daily limits
4. Use **default** channel and prompts
5. Review proposed actions in your AI Inbox daily
6. Note patterns: which actions do you approve? Which do you reject or edit?
### Phase 2: Tune (Week 3–4)
1. Adjust **cooldown** if you're seeing too many or too few actions for the same customer
2. Adjust **max actions per day** if your inbox is overwhelmed or underutilized
3. If the agent is sending through the wrong channel, switch it
4. Tweak **custom prompt instructions** to improve tone or add specific details
### Phase 3: Automate (Week 5+)
1. If your approval rate is high (80%+), consider enabling **auto-execute**
2. Set the confidence threshold to **85%** initially
3. Monitor for 1–2 more weeks
4. Adjust the threshold based on the quality of auto-executed actions
***
## Quick Reference: All Settings
| Setting | Location | Default | Range | Notes |
| ---------------------- | ---------------------- | -------------- | ---------------------------------- | ------------------------------------------------------------------- |
| **Enabled** | Basic Settings | — | On/Off | Master switch |
| **Auto-execute** | Execution & Behavior | Off | On/Off | Not available for internal-only agents |
| **Min. confidence** | Execution & Behavior | 80% | 50%–100% | Only visible when auto-execute is on |
| **Cooldown hours** | Execution & Behavior | Agent-specific | 1–720 | Per-customer frequency |
| **Max actions/day** | Execution & Behavior | Agent-specific | 1–1,000 or unlimited | Per-agent global limit |
| **Channel preference** | Communication Settings | Default | Default / Email / WhatsApp / Voice | Not shown for internal-only agents |
| **Opening message** | Communication Settings | (empty) | 0–500 chars | Voice only — greeting for voice calls |
| **System prompt** | Communication Settings | (empty) | 0–2,000 chars | Voice only — must include `{{voice_message}}` for overrides |
| **Custom prompt** | Communication Settings | (empty) | 0–2,000 chars | All agents — appended to default prompt for email, WhatsApp & voice |
***
## What's Next?
* Browse the [Agent Types Reference](/platform/ai/agent-types) for detailed information on each agent's behavior and recommended settings
* Review and manage [suggested actions](/platform/ai/inbox) in the AI Inbox
* View [AI Conversations](/platform/ai/ai-conversations) to see two-way conversations with customers