> ## Documentation Index
> Fetch the complete documentation index at: https://learn.nexudus.com/llms.txt
> Use this file to discover all available pages before exploring further.
# Operator Takeover
> Take control of proposed AI actions by choosing different delivery channels — send via AI assisted email, WhatsApp, voice, Email Messages, or help desk while maintaining conversation continuity.
## What is Operator Takeover?
Operator Takeover lets you change how a proposed AI action is delivered to the customer. When you review an action in the [AI Inbox](/platform/ai/inbox), you're not limited to the AI's suggested channel — you can choose:
* **Email (AI assisted)** — The AI-composed email sent through the AI email system
* **Voice** — AI-powered phone call using text-to-speech
* **Email** — Email sent through your connected email account or business default SMTP
* **Help Desk** — Creates a trackable support ticket and sends the customer a help desk notification
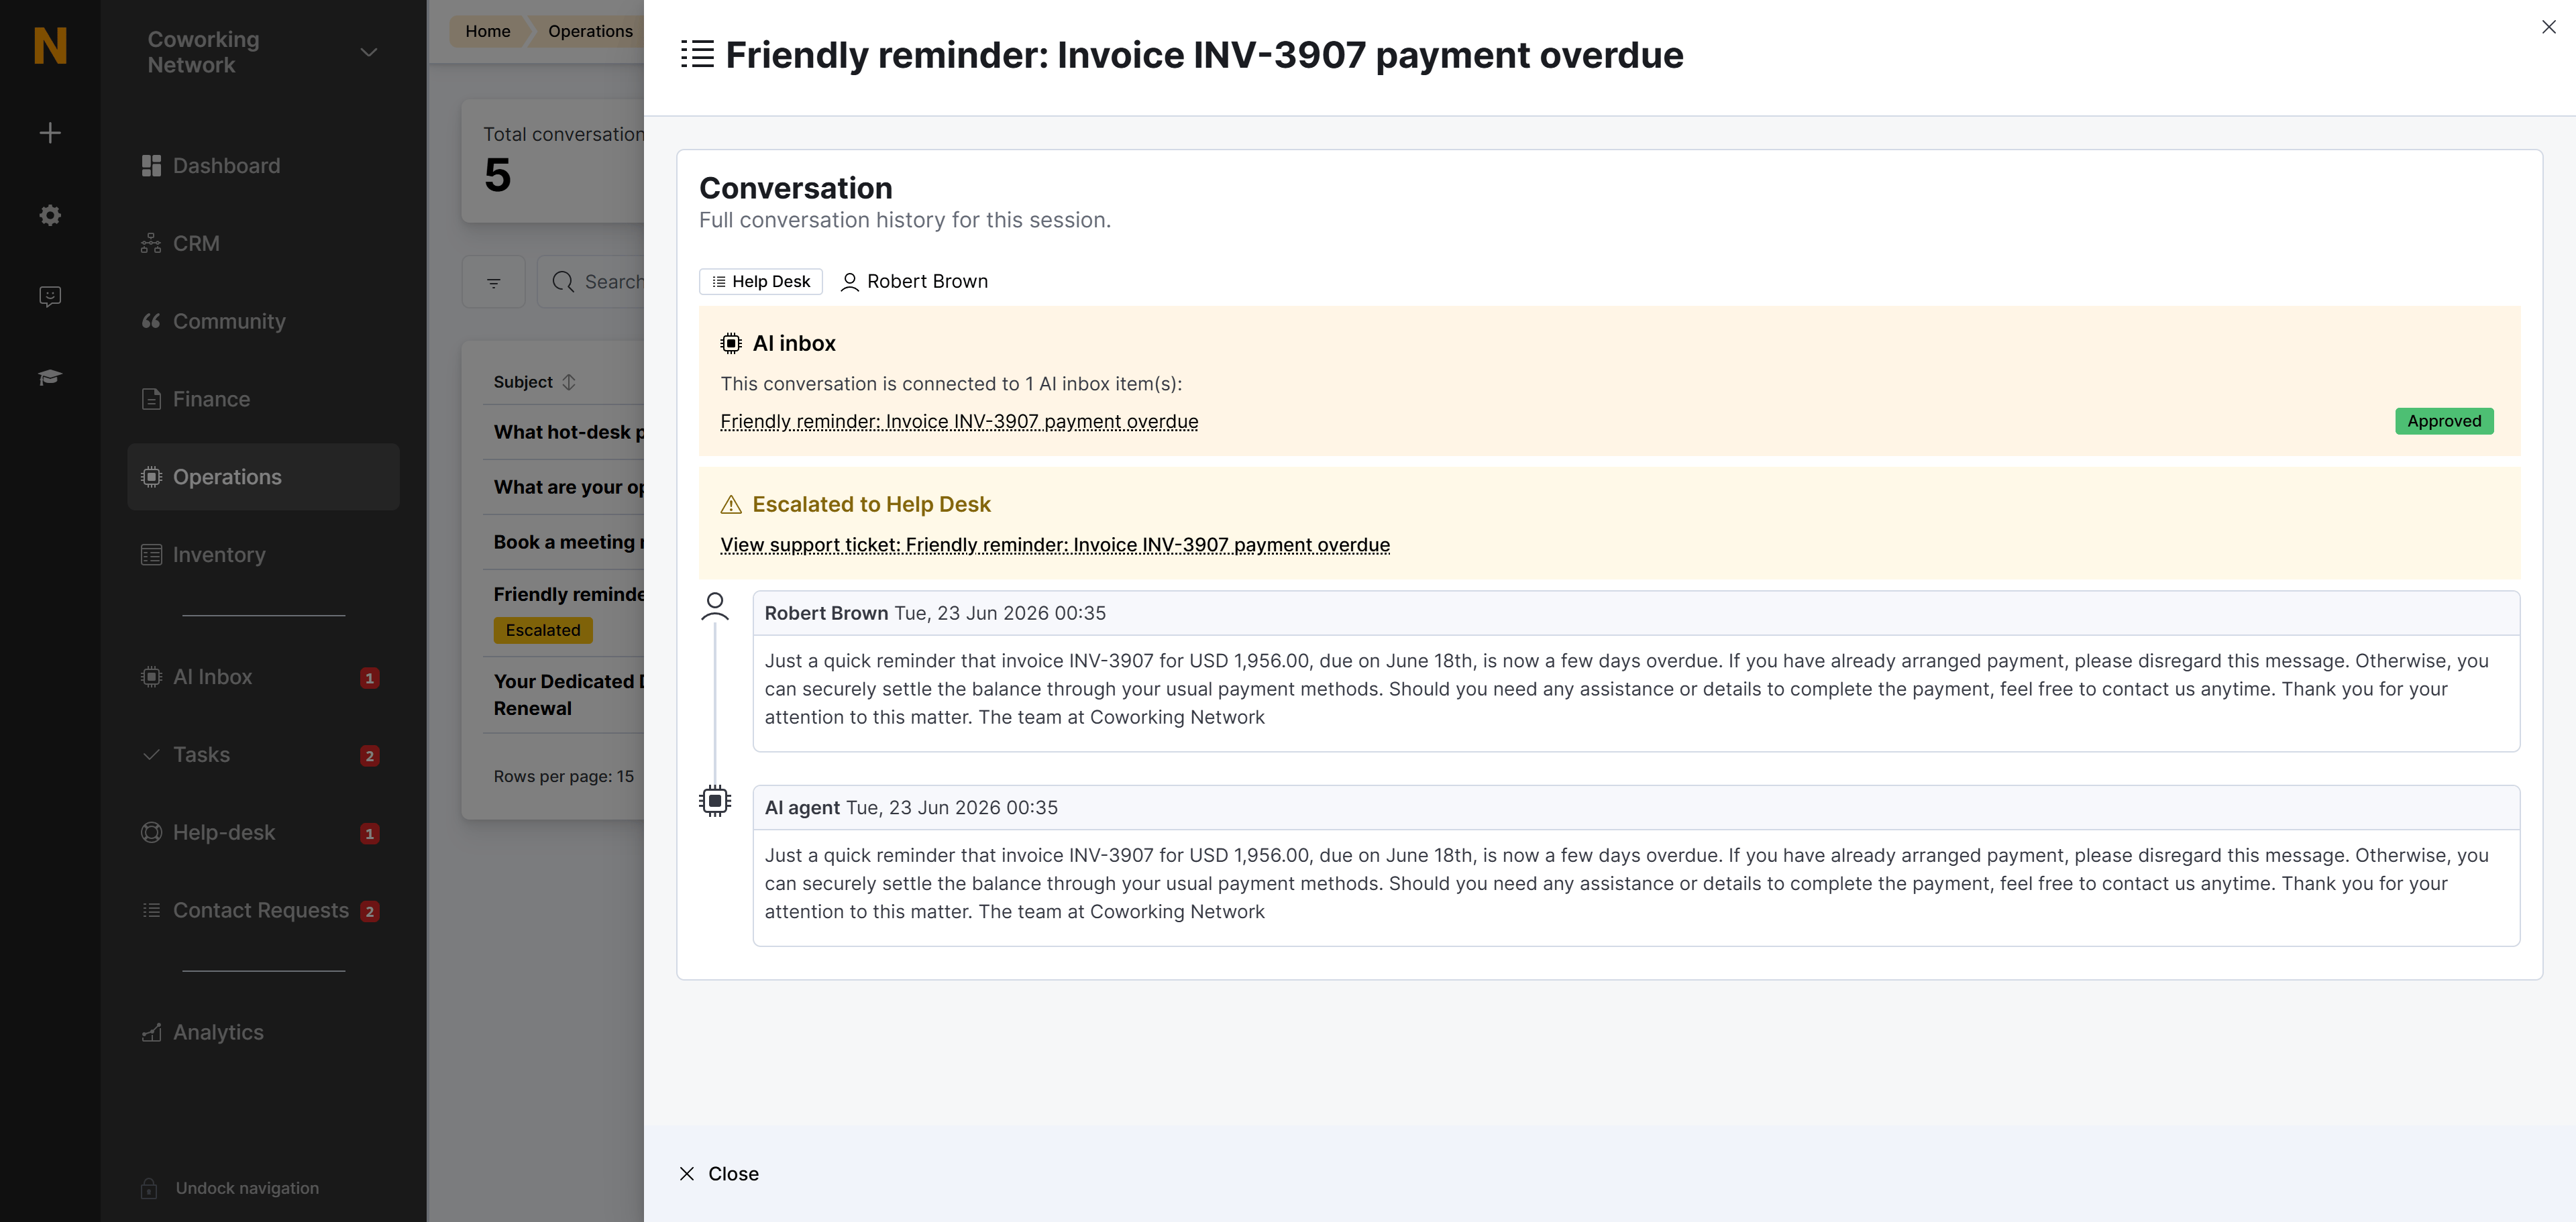
All messages — regardless of channel — are logged in the conversation timeline in [AI Conversations](/platform/ai/ai-conversations), so you can see the full case history in one place.
 ## When to Use Each Channel
| Channel | Best For | Reply Tracking |
| --------------------- | ------------------------------------------------------------------------------------------------------------- | ------------------------------------ |
| **AI assisted Email** | AI-composed outbound where no operator involvement is needed | ✅ Automatic |
| **Voice** | Urgent matters requiring immediate attention via phone call | ✅ Automatic |
| **Email Message** | When you want to send from a specific sender identity (billing@, support@) or track replies in your own inbox | ⚠️ Only with connected email account |
| **Help Desk** | Issues requiring formal tracking, team assignment, or escalation to support | ✅ Automatic |
## How to Change the Delivery Channel
### Step 1: Open a Proposed Action
1. Go to **Operations** → **AI Assistant** → **AI Inbox**
2. Click on any pending proposed action to open the detail panel
3. Review the customer context and the AI-drafted message
### Step 2: Select a Channel
In the **Delivery channel** section:
1. Click the **Channel** dropdown
2. Select one of the available options:
* **AI assisted Email**
* **Voice**
* **Email message**
* **Help desk**
The form updates to show channel-specific options.
### Step 3: Configure Channel Options
#### For Voice Channel
**What you'll see:**
* ⚠️ **Business hours warning** (if enabled): "Voice messages are only sent during business hours. This action will be automatically deferred until the next available business hours window."
* 🚫 **Invalid phone number error**: "The customer does not have a mobile phone number" or "The customer's phone number is not in a valid international format."
* 🚫 **Voice not enabled error**: "The Voice AI agent is not enabled for this location."
**Requirements:**
* Customer must have a valid mobile phone number in international format (`+XX...`)
* Voice channel must be [enabled in Settings](/member-portal/ai/setup-voice)
* If business hours enforcement is enabled, the call will be deferred to the next business hours window
#### For Email Message Channel
**What you'll see:**
* **Send from email account** dropdown
* First option: "Location default (no reply tracking)"
* Other options: Your connected email accounts (e.g., [billing@yourspace.com](mailto:billing@yourspace.com), [support@yourspace.com](mailto:support@yourspace.com))
**Reply tracking warning:**
If you select "Location default," you'll see a warning:
> "Replies cannot be automatically tracked without a connected email account. Customer replies will land in your normal inbox and will not appear in the AI conversation timeline."
**How reply tracking works:**
When you send via a connected email account:
1. The message includes a unique identifier in the email headers
2. When the customer replies, their email client includes this in the `In-Reply-To` header (standard email threading)
3. Nexudus syncs the reply from your connected inbox and matches it via the identifier
4. The reply appears in the [AI Conversations](/platform/ai/ai-conversations) timeline with a "Replied via email" indicator
**To set up connected email accounts:**
1. Go to **CRM** → **Email Accounts**
2. Click **Add email account**
3. Choose your provider (Google Workspace, Office 365, or IMAP)
4. Authenticate and grant access
5. The account will appear in the "Send from" dropdown
#### For Help Desk Channel
**What you'll see:**
* **Department** dropdown (optional) — Assign to a specific support department
* **Priority** dropdown — Low, Normal, High, or Critical
* **Internal notes** text area (optional) — Notes visible only to admins, not the customer
**What happens when you escalate:**
1. A new help desk message is created
2. The customer receives your standard help desk notification email
3. The ticket is linked to the AI conversation
4. All future help desk comments are logged in the conversation timeline
### Step 4: Edit the Message (Optional)
You can edit the subject line and message body before sending:
* **Subject field** — Edit the subject line (editable for pending/snoozed actions)
* **Message body** — Full rich text editor with HTML formatting
* Variables like `{{customer_name}}` and `{{invoice_number}}` are automatically replaced
### Step 5: Approve and Send
1. Review your channel selection and message
2. Optionally add **review notes** (internal notes for your team, not sent to customer)
3. Click **Approve and send message**
4. Confirm in the modal that appears
**What happens next:**
* The message is sent immediately via the selected channel (or deferred if using Voice during non-business hours)
* The action status changes to **Approved**
* The message is logged in the [AI Conversations](/platform/ai/ai-conversations) timeline with the appropriate channel indicator
* Customer replies are automatically captured back into the conversation (depending on channel)
## Reply Routing by Channel
| Channel | How Replies Are Captured |
| --------------------------------------------- | ------------------------------------------------------------------------------------------------------------------- |
| **Email (AI)** | Customer replies to the AI email address. Reply is automatically logged in conversation timeline. |
| **Voice** | Customer can reply during the call or hang up. Call transcript is logged in timeline. |
| **Email Message (with connected account)** | Reply arrives in your connected email inbox. Nexudus syncs it via RFC Message-ID threading and logs it in timeline. |
| **Email Message (without connected account)** | Reply arrives in your business default inbox. NOT automatically logged in timeline. |
| **Help Desk** | Customer replies via help desk system. All comments are logged in timeline. |
## Viewing the Conversation Timeline
After sending via any channel, you can view the full conversation:
1. Go to **Operations** → **AI Assistant** → **AI Conversations**
2. Find the conversation (search by customer name or subject)
3. Open the conversation to see the timeline with all messages
Each message shows:
* **Sender avatar** — AI, operator, or customer
* **Channel indicator** — Email icon, Help Desk icon, etc.
* **Message content** — Full text with formatting
* **Link to source** — Click to view the Email Message or Help-desk detail
## Use Cases
### Use Case 1: Sending from a Department Email
**Scenario:** The AI proposes a payment reminder. You want it to come from [billing@yourspace.com](mailto:billing@yourspace.com) instead of the AI email address.
**Flow:**
1. Open the proposed action in the AI Inbox
2. Change **Channel** to **Email Message**
3. Select **[billing@yourspace.com](mailto:billing@yourspace.com)** from the "Send from" dropdown
4. Edit the message if needed
5. Click **Approve and send**
6. Customer receives the email from [billing@yourspace.com](mailto:billing@yourspace.com)
7. When they reply, the response appears in your billing@ inbox AND the AI conversation timeline
### Use Case 2: Escalating a Technical Issue
**Scenario:** The AI detects a member hasn't checked in for two weeks and proposes a re-engagement email. You realize this might be a technical access issue that needs support team attention.
**Flow:**
1. Open the proposed action in the AI Inbox
2. Change **Channel** to **Help desk**
3. Select **Facilities** from the Department dropdown
4. Set Priority to **High**
5. Edit the message: "We noticed you haven't been in lately. Is there an issue with your access card?"
6. Add internal notes: "Potential door access issue"
7. Click **Approve and send**
8. A help desk ticket is created and assigned to Facilities
9. Customer receives the help desk notification
10. Support team sees the ticket with full AI conversation context
### Use Case 3: Urgent Voice Follow-Up
**Scenario:** A high-value customer has an overdue invoice. The AI proposes an email, but you want to call them directly.
**Flow:**
1. Open the proposed action in the AI Inbox
2. Change **Channel** to **Voice**
3. Review the warning: "This will be deferred until business hours" (if outside hours)
4. Verify the customer has a valid mobile number
5. Edit the voice script if needed
6. Click **Approve and send**
7. The AI places a voice call to the customer during business hours
8. Call transcript is logged in the conversation timeline
## Troubleshooting
### Cannot Send via Voice
**Symptoms:**
* "Voice channel not enabled" error message
* "Invalid or missing phone number" error
**Solutions:**
* ✅ [Enable Voice in Settings](/member-portal/ai/setup-voice)
* ✅ Verify customer has a mobile phone number
* ✅ Ensure phone number is in international format (+XX...)
* ✅ Edit the customer record to add or fix the phone number
### Replies Not Appearing in Timeline (Email Message)
**Symptoms:**
* Customer replies but they don't show up in AI Conversations
**Causes:**
* You selected "Location default (no reply tracking)" instead of a connected email account
* The email account is disconnected or not syncing
**Solutions:**
* ✅ Use a connected email account instead of "Location default"
* ✅ Check **CRM** → **Email Accounts** to verify the account is connected and syncing
* ✅ Ensure the customer used "Reply" (not "Forward" or new email)
### Email Account Not Listed
**Symptoms:**
* Your email account doesn't appear in the "Send from" dropdown
**Solutions:**
* ✅ Connect the email account in **CRM** → **Email Accounts**
* ✅ Verify your user role has the `emailAccount` permission
* ✅ Confirm the email account belongs to the same location as the customer
## Best Practices
* **Use connected email accounts for Email Message** — Always select a connected account to enable reply tracking
* **Match channel to urgency** — Use Voice for urgent matters, Help Desk for complex issues, Email message for personal touch
* **Edit messages thoughtfully** — The AI's draft is a good starting point, but personalize for sensitive situations
* **Add internal notes** — Use review notes or help desk internal notes to document why you chose a specific channel
* **Monitor conversation timelines** — Check [AI Conversations](/platform/ai/ai-conversations) to see how customers respond to different channels
## Related Documentation
View all AI conversations with full timelines
Review and approve proposed actions from proactive agents
Configure connected email accounts for reply tracking
Using the help desk system for support tickets
## When to Use Each Channel
| Channel | Best For | Reply Tracking |
| --------------------- | ------------------------------------------------------------------------------------------------------------- | ------------------------------------ |
| **AI assisted Email** | AI-composed outbound where no operator involvement is needed | ✅ Automatic |
| **Voice** | Urgent matters requiring immediate attention via phone call | ✅ Automatic |
| **Email Message** | When you want to send from a specific sender identity (billing@, support@) or track replies in your own inbox | ⚠️ Only with connected email account |
| **Help Desk** | Issues requiring formal tracking, team assignment, or escalation to support | ✅ Automatic |
## How to Change the Delivery Channel
### Step 1: Open a Proposed Action
1. Go to **Operations** → **AI Assistant** → **AI Inbox**
2. Click on any pending proposed action to open the detail panel
3. Review the customer context and the AI-drafted message
### Step 2: Select a Channel
In the **Delivery channel** section:
1. Click the **Channel** dropdown
2. Select one of the available options:
* **AI assisted Email**
* **Voice**
* **Email message**
* **Help desk**
The form updates to show channel-specific options.
### Step 3: Configure Channel Options
#### For Voice Channel
**What you'll see:**
* ⚠️ **Business hours warning** (if enabled): "Voice messages are only sent during business hours. This action will be automatically deferred until the next available business hours window."
* 🚫 **Invalid phone number error**: "The customer does not have a mobile phone number" or "The customer's phone number is not in a valid international format."
* 🚫 **Voice not enabled error**: "The Voice AI agent is not enabled for this location."
**Requirements:**
* Customer must have a valid mobile phone number in international format (`+XX...`)
* Voice channel must be [enabled in Settings](/member-portal/ai/setup-voice)
* If business hours enforcement is enabled, the call will be deferred to the next business hours window
#### For Email Message Channel
**What you'll see:**
* **Send from email account** dropdown
* First option: "Location default (no reply tracking)"
* Other options: Your connected email accounts (e.g., [billing@yourspace.com](mailto:billing@yourspace.com), [support@yourspace.com](mailto:support@yourspace.com))
**Reply tracking warning:**
If you select "Location default," you'll see a warning:
> "Replies cannot be automatically tracked without a connected email account. Customer replies will land in your normal inbox and will not appear in the AI conversation timeline."
**How reply tracking works:**
When you send via a connected email account:
1. The message includes a unique identifier in the email headers
2. When the customer replies, their email client includes this in the `In-Reply-To` header (standard email threading)
3. Nexudus syncs the reply from your connected inbox and matches it via the identifier
4. The reply appears in the [AI Conversations](/platform/ai/ai-conversations) timeline with a "Replied via email" indicator
**To set up connected email accounts:**
1. Go to **CRM** → **Email Accounts**
2. Click **Add email account**
3. Choose your provider (Google Workspace, Office 365, or IMAP)
4. Authenticate and grant access
5. The account will appear in the "Send from" dropdown
#### For Help Desk Channel
**What you'll see:**
* **Department** dropdown (optional) — Assign to a specific support department
* **Priority** dropdown — Low, Normal, High, or Critical
* **Internal notes** text area (optional) — Notes visible only to admins, not the customer
**What happens when you escalate:**
1. A new help desk message is created
2. The customer receives your standard help desk notification email
3. The ticket is linked to the AI conversation
4. All future help desk comments are logged in the conversation timeline
### Step 4: Edit the Message (Optional)
You can edit the subject line and message body before sending:
* **Subject field** — Edit the subject line (editable for pending/snoozed actions)
* **Message body** — Full rich text editor with HTML formatting
* Variables like `{{customer_name}}` and `{{invoice_number}}` are automatically replaced
### Step 5: Approve and Send
1. Review your channel selection and message
2. Optionally add **review notes** (internal notes for your team, not sent to customer)
3. Click **Approve and send message**
4. Confirm in the modal that appears
**What happens next:**
* The message is sent immediately via the selected channel (or deferred if using Voice during non-business hours)
* The action status changes to **Approved**
* The message is logged in the [AI Conversations](/platform/ai/ai-conversations) timeline with the appropriate channel indicator
* Customer replies are automatically captured back into the conversation (depending on channel)
## Reply Routing by Channel
| Channel | How Replies Are Captured |
| --------------------------------------------- | ------------------------------------------------------------------------------------------------------------------- |
| **Email (AI)** | Customer replies to the AI email address. Reply is automatically logged in conversation timeline. |
| **Voice** | Customer can reply during the call or hang up. Call transcript is logged in timeline. |
| **Email Message (with connected account)** | Reply arrives in your connected email inbox. Nexudus syncs it via RFC Message-ID threading and logs it in timeline. |
| **Email Message (without connected account)** | Reply arrives in your business default inbox. NOT automatically logged in timeline. |
| **Help Desk** | Customer replies via help desk system. All comments are logged in timeline. |
## Viewing the Conversation Timeline
After sending via any channel, you can view the full conversation:
1. Go to **Operations** → **AI Assistant** → **AI Conversations**
2. Find the conversation (search by customer name or subject)
3. Open the conversation to see the timeline with all messages
Each message shows:
* **Sender avatar** — AI, operator, or customer
* **Channel indicator** — Email icon, Help Desk icon, etc.
* **Message content** — Full text with formatting
* **Link to source** — Click to view the Email Message or Help-desk detail
## Use Cases
### Use Case 1: Sending from a Department Email
**Scenario:** The AI proposes a payment reminder. You want it to come from [billing@yourspace.com](mailto:billing@yourspace.com) instead of the AI email address.
**Flow:**
1. Open the proposed action in the AI Inbox
2. Change **Channel** to **Email Message**
3. Select **[billing@yourspace.com](mailto:billing@yourspace.com)** from the "Send from" dropdown
4. Edit the message if needed
5. Click **Approve and send**
6. Customer receives the email from [billing@yourspace.com](mailto:billing@yourspace.com)
7. When they reply, the response appears in your billing@ inbox AND the AI conversation timeline
### Use Case 2: Escalating a Technical Issue
**Scenario:** The AI detects a member hasn't checked in for two weeks and proposes a re-engagement email. You realize this might be a technical access issue that needs support team attention.
**Flow:**
1. Open the proposed action in the AI Inbox
2. Change **Channel** to **Help desk**
3. Select **Facilities** from the Department dropdown
4. Set Priority to **High**
5. Edit the message: "We noticed you haven't been in lately. Is there an issue with your access card?"
6. Add internal notes: "Potential door access issue"
7. Click **Approve and send**
8. A help desk ticket is created and assigned to Facilities
9. Customer receives the help desk notification
10. Support team sees the ticket with full AI conversation context
### Use Case 3: Urgent Voice Follow-Up
**Scenario:** A high-value customer has an overdue invoice. The AI proposes an email, but you want to call them directly.
**Flow:**
1. Open the proposed action in the AI Inbox
2. Change **Channel** to **Voice**
3. Review the warning: "This will be deferred until business hours" (if outside hours)
4. Verify the customer has a valid mobile number
5. Edit the voice script if needed
6. Click **Approve and send**
7. The AI places a voice call to the customer during business hours
8. Call transcript is logged in the conversation timeline
## Troubleshooting
### Cannot Send via Voice
**Symptoms:**
* "Voice channel not enabled" error message
* "Invalid or missing phone number" error
**Solutions:**
* ✅ [Enable Voice in Settings](/member-portal/ai/setup-voice)
* ✅ Verify customer has a mobile phone number
* ✅ Ensure phone number is in international format (+XX...)
* ✅ Edit the customer record to add or fix the phone number
### Replies Not Appearing in Timeline (Email Message)
**Symptoms:**
* Customer replies but they don't show up in AI Conversations
**Causes:**
* You selected "Location default (no reply tracking)" instead of a connected email account
* The email account is disconnected or not syncing
**Solutions:**
* ✅ Use a connected email account instead of "Location default"
* ✅ Check **CRM** → **Email Accounts** to verify the account is connected and syncing
* ✅ Ensure the customer used "Reply" (not "Forward" or new email)
### Email Account Not Listed
**Symptoms:**
* Your email account doesn't appear in the "Send from" dropdown
**Solutions:**
* ✅ Connect the email account in **CRM** → **Email Accounts**
* ✅ Verify your user role has the `emailAccount` permission
* ✅ Confirm the email account belongs to the same location as the customer
## Best Practices
* **Use connected email accounts for Email Message** — Always select a connected account to enable reply tracking
* **Match channel to urgency** — Use Voice for urgent matters, Help Desk for complex issues, Email message for personal touch
* **Edit messages thoughtfully** — The AI's draft is a good starting point, but personalize for sensitive situations
* **Add internal notes** — Use review notes or help desk internal notes to document why you chose a specific channel
* **Monitor conversation timelines** — Check [AI Conversations](/platform/ai/ai-conversations) to see how customers respond to different channels
## Related Documentation
View all AI conversations with full timelines
Review and approve proposed actions from proactive agents
Configure connected email accounts for reply tracking
Using the help desk system for support tickets