> ## Documentation Index
> Fetch the complete documentation index at: https://learn.nexudus.com/llms.txt
> Use this file to discover all available pages before exploring further.
# Equipment
> Track physical items such as desks, chairs, monitors and keys, record where they are and which customers have them, and list them in documents.
## Overview
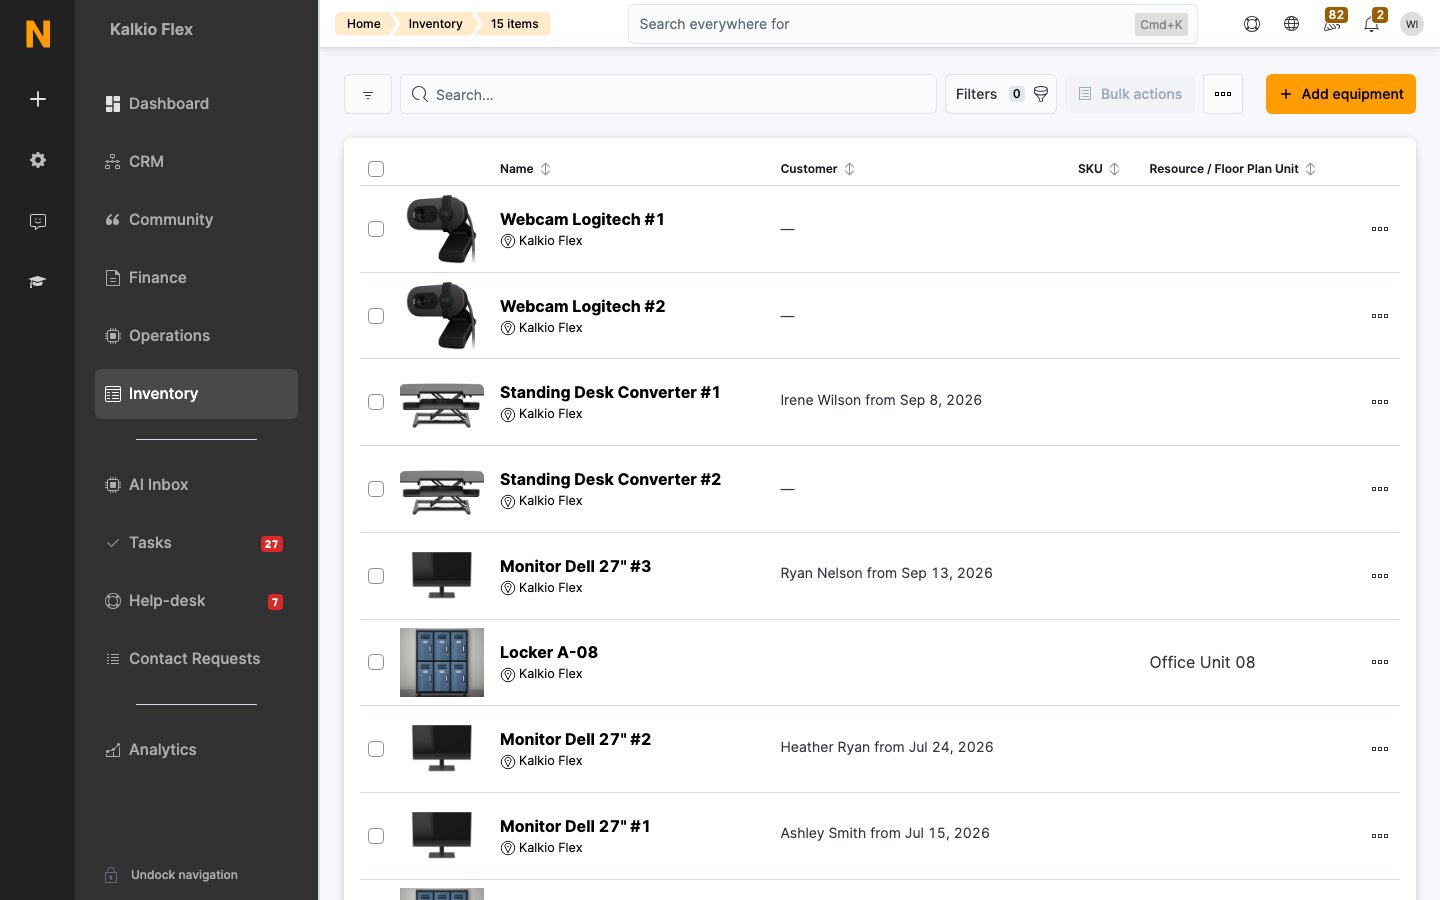
**Equipment** is an inventory of the physical items in your space: furniture, screens, chargers, keys, fobs and anything else you want to keep track of. Each item can be tied to a location, a resource or a floor plan unit, and lent to a customer for a period of time, so you always know where things are and who has them.
Equipment isn't sold: customers are never charged for items you assign to them.
## How to access
Go to **Inventory → Desks and Offices → Equipment**.
 ## Key concepts
| Term | Meaning |
| - | - |
| **Equipment item** | One physical item, with its own SKU. Several items can share a name. |
| **SKU** | A unique reference for the item, such as `DSK-1`. No two items can share a SKU. |
| **Value** | What the item is worth, for your records. It's never charged to customers. |
| **Assign to** | Where the item lives: a location, a resource or a floor plan unit. |
| **Assignment** | A period during which a customer has the item. |
## Add equipment
1. Select **Add equipment**.
2. Under **Equipment details**, enter the **Name**, **Notes**, a unique **SKU**, its **Value** and, optionally, an **Image**.
3. Under **Assign to**, choose where the item lives:
* **Available at location**, then the **Location**.
* **Available for a specific resource**, then the **Resource**, for items such as the screen in a meeting room.
* **Available for a specific floor plan unit**, then the **Unit**, for items such as the desk and chair in a private office.
4. Save.
### Add many identical items
To add, say, 100 identical chairs, create one item first, then copy it:
1. Tick the item in the equipment list.
2. Select **Bulk actions** above the list, then **Create in bulk**.
3. Enter how many copies to create and confirm.
Copies are numbered from the original's SKU: copies of `DSK-1` become `DSK-2`, `DSK-3` and so on.
## Assign equipment to a resource
Assign an item to a resource when it belongs to a bookable space rather than to a customer, such as the screen or speakerphone in a meeting room.
1. Open the item, or select **Add equipment** to create one.
2. Under **Assign to**, select **Available for a specific resource**.
3. Choose the **Resource** and save.
To see everything assigned to a resource, go to **Inventory → Resources**, open the resource and go to its **Equipment** tab. You can also add items from that tab. See [Resources](/platform/billing/resources).
## Assign equipment to a floor plan unit
Assign an item to a floor plan unit when it stays with a specific desk or office, such as the desk, chair and pedestal in a private office. Whoever books or rents that unit then uses the items in it.
1. Open the item, or select **Add equipment** to create one.
2. Under **Assign to**, select **Available for a specific floor plan unit**.
3. Choose the **Unit** and save.
To see everything assigned to a unit, go to **Inventory → Floor Plans**, open the floor plan, open the unit and go to its **Equipment** tab. See [Floor Plans](/platform/billing/floor-plans).
In the equipment list, the **Resource / Floor Plan Unit** column shows where each item is assigned.
## Assign equipment to a customer
1. Open the item and go to its assignments.
2. Select **Assign equipment**.
3. Choose the **Customer** and add **Notes** if needed.
4. Set **Assigned from** and **Assigned until**.
5. Save.
The item then appears on the customer's **CRM → Equipment** tab.
Assigning an item to a floor plan unit doesn't assign it to the customer whose contract includes that unit. For a furnished office, assign the furniture to the unit and to the customer.
When a customer returns an item, set **Assigned until** to the return date so it's free for the next customer.
## Cover damage with a deposit
Customers aren't charged for equipment, but you can protect yourself against damage or loss with a refundable deposit. For example, if the furniture in each office is worth £2,000, add a refundable deposit of £2,000 to your furnished office plan, then refund all or part of it at the end of the contract depending on the condition of the furniture. See [Deposits](/platform/finance/deposits).
## List equipment in documents
Document templates can list the equipment assigned to a customer, for example in a check-in inventory for a new office. Use the **Assets** merge block rather than single merge fields: the block lists every item assigned to the customer, while a merge field only shows one. Useful columns include the item's name, SKU, value, notes, and the **Assigned From** and **Assigned To** dates. See [Documents](/platform/crm/documents).
## Export equipment
To download your equipment list, for example for an audit or for insurance purposes:
1. Go to **Inventory → Desks and Offices → Equipment**.
2. Optionally, search or apply **Filters** to narrow the list.
3. Select the **⋯** (More actions) button next to **Bulk actions**, then **Export records**.
The export includes every item that matches your current search and filters, not only the page you're viewing, and downloads as a spreadsheet.
From the same menu, select **Import records from CSV** to add many different items at once.
## Delete equipment
Delete an item when it's no longer part of your inventory, for example because it's been sold, thrown away or lost.
1. Tick the items you want to delete in the equipment list.
2. Select **Bulk actions**, then **Delete**.
3. Confirm.
Deleting equipment is permanent and can't be undone. If you want to keep a record of the items, export the list first.
When a customer returns an item, don't delete it. Set **Assigned until** on their assignment instead, so the item stays in your inventory and is free for the next customer.
## Related
* [Floor Plans](/platform/billing/floor-plans)
* [Resources](/platform/billing/resources)
* [Deposits](/platform/finance/deposits)
* [Customer profile reference](/platform/operations/members/customer-profile)
This documentation is built and hosted on [Mintlify](https://mintlify.com), a developer documentation platform.
## Key concepts
| Term | Meaning |
| - | - |
| **Equipment item** | One physical item, with its own SKU. Several items can share a name. |
| **SKU** | A unique reference for the item, such as `DSK-1`. No two items can share a SKU. |
| **Value** | What the item is worth, for your records. It's never charged to customers. |
| **Assign to** | Where the item lives: a location, a resource or a floor plan unit. |
| **Assignment** | A period during which a customer has the item. |
## Add equipment
1. Select **Add equipment**.
2. Under **Equipment details**, enter the **Name**, **Notes**, a unique **SKU**, its **Value** and, optionally, an **Image**.
3. Under **Assign to**, choose where the item lives:
* **Available at location**, then the **Location**.
* **Available for a specific resource**, then the **Resource**, for items such as the screen in a meeting room.
* **Available for a specific floor plan unit**, then the **Unit**, for items such as the desk and chair in a private office.
4. Save.
### Add many identical items
To add, say, 100 identical chairs, create one item first, then copy it:
1. Tick the item in the equipment list.
2. Select **Bulk actions** above the list, then **Create in bulk**.
3. Enter how many copies to create and confirm.
Copies are numbered from the original's SKU: copies of `DSK-1` become `DSK-2`, `DSK-3` and so on.
## Assign equipment to a resource
Assign an item to a resource when it belongs to a bookable space rather than to a customer, such as the screen or speakerphone in a meeting room.
1. Open the item, or select **Add equipment** to create one.
2. Under **Assign to**, select **Available for a specific resource**.
3. Choose the **Resource** and save.
To see everything assigned to a resource, go to **Inventory → Resources**, open the resource and go to its **Equipment** tab. You can also add items from that tab. See [Resources](/platform/billing/resources).
## Assign equipment to a floor plan unit
Assign an item to a floor plan unit when it stays with a specific desk or office, such as the desk, chair and pedestal in a private office. Whoever books or rents that unit then uses the items in it.
1. Open the item, or select **Add equipment** to create one.
2. Under **Assign to**, select **Available for a specific floor plan unit**.
3. Choose the **Unit** and save.
To see everything assigned to a unit, go to **Inventory → Floor Plans**, open the floor plan, open the unit and go to its **Equipment** tab. See [Floor Plans](/platform/billing/floor-plans).
In the equipment list, the **Resource / Floor Plan Unit** column shows where each item is assigned.
## Assign equipment to a customer
1. Open the item and go to its assignments.
2. Select **Assign equipment**.
3. Choose the **Customer** and add **Notes** if needed.
4. Set **Assigned from** and **Assigned until**.
5. Save.
The item then appears on the customer's **CRM → Equipment** tab.
Assigning an item to a floor plan unit doesn't assign it to the customer whose contract includes that unit. For a furnished office, assign the furniture to the unit and to the customer.
When a customer returns an item, set **Assigned until** to the return date so it's free for the next customer.
## Cover damage with a deposit
Customers aren't charged for equipment, but you can protect yourself against damage or loss with a refundable deposit. For example, if the furniture in each office is worth £2,000, add a refundable deposit of £2,000 to your furnished office plan, then refund all or part of it at the end of the contract depending on the condition of the furniture. See [Deposits](/platform/finance/deposits).
## List equipment in documents
Document templates can list the equipment assigned to a customer, for example in a check-in inventory for a new office. Use the **Assets** merge block rather than single merge fields: the block lists every item assigned to the customer, while a merge field only shows one. Useful columns include the item's name, SKU, value, notes, and the **Assigned From** and **Assigned To** dates. See [Documents](/platform/crm/documents).
## Export equipment
To download your equipment list, for example for an audit or for insurance purposes:
1. Go to **Inventory → Desks and Offices → Equipment**.
2. Optionally, search or apply **Filters** to narrow the list.
3. Select the **⋯** (More actions) button next to **Bulk actions**, then **Export records**.
The export includes every item that matches your current search and filters, not only the page you're viewing, and downloads as a spreadsheet.
From the same menu, select **Import records from CSV** to add many different items at once.
## Delete equipment
Delete an item when it's no longer part of your inventory, for example because it's been sold, thrown away or lost.
1. Tick the items you want to delete in the equipment list.
2. Select **Bulk actions**, then **Delete**.
3. Confirm.
Deleting equipment is permanent and can't be undone. If you want to keep a record of the items, export the list first.
When a customer returns an item, don't delete it. Set **Assigned until** on their assignment instead, so the item stays in your inventory and is free for the next customer.
## Related
* [Floor Plans](/platform/billing/floor-plans)
* [Resources](/platform/billing/resources)
* [Deposits](/platform/finance/deposits)
* [Customer profile reference](/platform/operations/members/customer-profile)
This documentation is built and hosted on [Mintlify](https://mintlify.com), a developer documentation platform.