> ## Documentation Index
> Fetch the complete documentation index at: https://learn.nexudus.com/llms.txt
> Use this file to discover all available pages before exploring further.
# Files, Documents and Messages
> Add files to a customer's record, create documents from templates, share them for e-signature and message customers from Nexudus.
## Overview
Each customer record has a **Files** area for documents such as signed contracts, ID copies or welcome packs. You can keep files internal, share them with the customer in the Members Portal, or send them out for electronic signature. You can also message customers directly from their record.
## How to access
Go to **Operations → Members & contacts**, open the customer, then open **CRM → Files** or **CRM → Messages**.
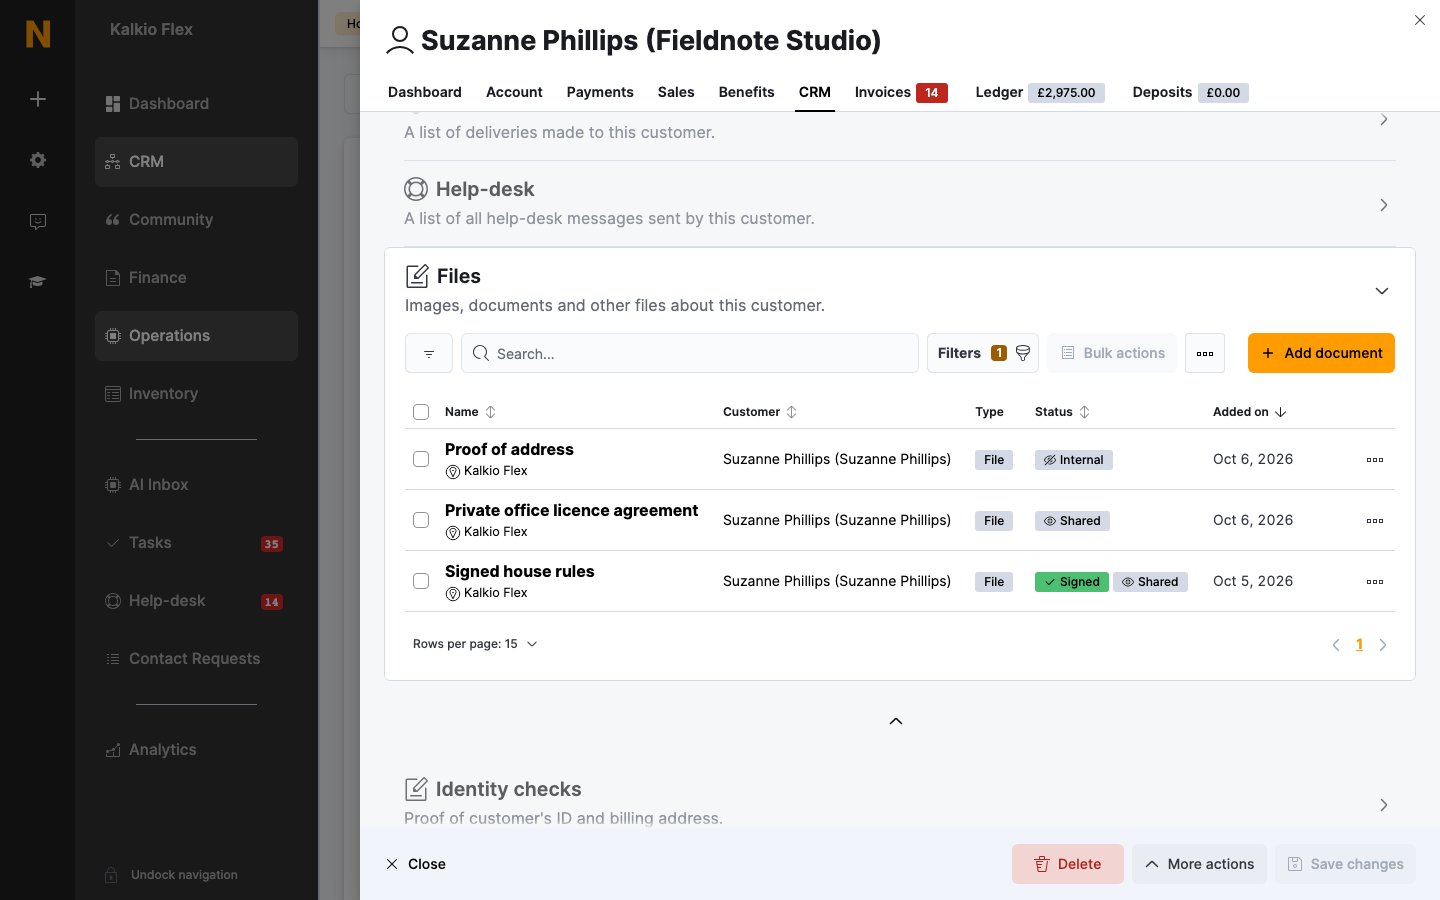 Each file shows whether it's **Internal** or **Shared** with the customer, and whether it's been **Signed**.
## Add a file to a customer
1. Open the customer and go to **CRM → Files**.
2. Select **Add document**.
3. Under **Document details**, choose **Create the document by uploading a file**, then select the file.
4. Add **Notes** if needed. If you share the file, the notes are included in the email the customer receives.
5. To let the customer see the file, turn on **Share this document with the customer**.
6. To ask the customer to sign it, turn on **Request the customer to e-sign this document** (see [Request an e-signature](#request-an-e-signature)).
7. Save.
Shared files appear in the customer's Members Portal account. The first time you share a file, the customer gets an email with a link to it.
## Create a document from a template
Document templates turn customer and contract details into a finished document, such as a membership agreement. Create your templates first under **CRM → Documents → Document templates**.
### For a customer with a contract
1. Open the customer and go to **CRM → Files**.
2. Select **Add document**.
3. Under **Document details**, choose **Create the document by using a Contract Template**.
4. Choose the **Contract name** and the **Document template to use**.
5. Preview the document to check it looks right.
6. Choose whether to share it and whether to request an e-signature, then save.
### For any customer, from the list
1. Go to **Operations → Members & contacts**.
2. Open the actions menu next to the customer and select **Create document**.
3. Choose the **Document template to use**.
4. Choose what happens to the file:
* Turn on **Attach this file to the customer account instead of downloading it** to save it to the customer's **Files**. Turn it off to download a copy now.
* Turn on **Request the customer to digitally sign this document** to send it for signature straight away.
5. Confirm.
Use **Create document** for customers without a contract, such as a contact who needs a quote. It also works in bulk: tick several customers and run **Create document** from the bulk actions menu.
## Request an e-signature
E-signatures use Dropbox Sign. Turn on the Dropbox Sign integration under **Settings → Integrations** first. The customer also needs [portal access](/platform/operations/members#portal-and-app-access) to sign.
When you turn on **Request the customer to e-sign this document**, you can also add:
* **Additional customer signatures**, for other people who must sign, such as a second company director.
* **Counter e-signature(s) recipients**, for people on your side who sign after the customer.
Each recipient gets an email with a link to sign. Once everyone has signed, a signed copy is stored with the document. The [Documents](/platform/crm/documents) list under **CRM** shows the signature status of every document: **Out for signature**, **Signed electronically** or **Signed manually**.
You can't edit a document's file or notes once it's been sent for signature.
If the customer signed a paper copy, turn on **This document has been signed (manual override)** instead.
## Send a file to a customer
To share a file that's currently internal, open it from **CRM → Files**, turn on **Share this document with the customer** and save. The customer receives an email with a link and can download the file from their Members Portal account.
## Message a customer
1. Open the customer and go to **CRM → Messages**.
2. Select **Send message**.
3. Choose the **Email account** to send from. See [Email accounts](/platform/crm/email-accounts).
4. Enter a **Subject** and **Message**, or pick a **Message macro** to start from and edit it.
5. Select **Send message**.
The customer receives the message by email within a few minutes. The list shows every message sent to the customer, and replies they've sent back if you've connected an email account, so the whole team can see the conversation.
## Related
* [Members & contacts](/platform/operations/members)
* [Customer profile reference](/platform/operations/members/customer-profile)
* [Documents](/platform/crm/documents)
* [Message macros](/platform/crm/message-macros)
This documentation is built and hosted on [Mintlify](https://mintlify.com), a developer documentation platform.
Each file shows whether it's **Internal** or **Shared** with the customer, and whether it's been **Signed**.
## Add a file to a customer
1. Open the customer and go to **CRM → Files**.
2. Select **Add document**.
3. Under **Document details**, choose **Create the document by uploading a file**, then select the file.
4. Add **Notes** if needed. If you share the file, the notes are included in the email the customer receives.
5. To let the customer see the file, turn on **Share this document with the customer**.
6. To ask the customer to sign it, turn on **Request the customer to e-sign this document** (see [Request an e-signature](#request-an-e-signature)).
7. Save.
Shared files appear in the customer's Members Portal account. The first time you share a file, the customer gets an email with a link to it.
## Create a document from a template
Document templates turn customer and contract details into a finished document, such as a membership agreement. Create your templates first under **CRM → Documents → Document templates**.
### For a customer with a contract
1. Open the customer and go to **CRM → Files**.
2. Select **Add document**.
3. Under **Document details**, choose **Create the document by using a Contract Template**.
4. Choose the **Contract name** and the **Document template to use**.
5. Preview the document to check it looks right.
6. Choose whether to share it and whether to request an e-signature, then save.
### For any customer, from the list
1. Go to **Operations → Members & contacts**.
2. Open the actions menu next to the customer and select **Create document**.
3. Choose the **Document template to use**.
4. Choose what happens to the file:
* Turn on **Attach this file to the customer account instead of downloading it** to save it to the customer's **Files**. Turn it off to download a copy now.
* Turn on **Request the customer to digitally sign this document** to send it for signature straight away.
5. Confirm.
Use **Create document** for customers without a contract, such as a contact who needs a quote. It also works in bulk: tick several customers and run **Create document** from the bulk actions menu.
## Request an e-signature
E-signatures use Dropbox Sign. Turn on the Dropbox Sign integration under **Settings → Integrations** first. The customer also needs [portal access](/platform/operations/members#portal-and-app-access) to sign.
When you turn on **Request the customer to e-sign this document**, you can also add:
* **Additional customer signatures**, for other people who must sign, such as a second company director.
* **Counter e-signature(s) recipients**, for people on your side who sign after the customer.
Each recipient gets an email with a link to sign. Once everyone has signed, a signed copy is stored with the document. The [Documents](/platform/crm/documents) list under **CRM** shows the signature status of every document: **Out for signature**, **Signed electronically** or **Signed manually**.
You can't edit a document's file or notes once it's been sent for signature.
If the customer signed a paper copy, turn on **This document has been signed (manual override)** instead.
## Send a file to a customer
To share a file that's currently internal, open it from **CRM → Files**, turn on **Share this document with the customer** and save. The customer receives an email with a link and can download the file from their Members Portal account.
## Message a customer
1. Open the customer and go to **CRM → Messages**.
2. Select **Send message**.
3. Choose the **Email account** to send from. See [Email accounts](/platform/crm/email-accounts).
4. Enter a **Subject** and **Message**, or pick a **Message macro** to start from and edit it.
5. Select **Send message**.
The customer receives the message by email within a few minutes. The list shows every message sent to the customer, and replies they've sent back if you've connected an email account, so the whole team can see the conversation.
## Related
* [Members & contacts](/platform/operations/members)
* [Customer profile reference](/platform/operations/members/customer-profile)
* [Documents](/platform/crm/documents)
* [Message macros](/platform/crm/message-macros)
This documentation is built and hosted on [Mintlify](https://mintlify.com), a developer documentation platform.