> ## Documentation Index
> Fetch the complete documentation index at: https://learn.nexudus.com/llms.txt
> Use this file to discover all available pages before exploring further.
# Handle Virtual Office Deliveries
> Follow each virtual office customer's handling preferences step by step, from receiving an item to scanning, forwarding, storing or shredding it, and charge for each step.
## Overview
A virtual office customer chooses what should happen to each kind of item they receive, for example scan and forward their mail, but store parcels for collection. When you register a delivery for them, Nexudus applies their preference and shows the steps to follow. You mark each step as done, attach scans or receipts, and charge for the work.
You register virtual office deliveries the same way as any other. See [Register a delivery](/platform/operations/deliveries#register-a-delivery).
## Handling preferences
Each customer has one handling preference for each delivery type their plan covers: **Mail**, **Parcel**, **Checks** and **Publicity**. They choose them during onboarding, from the options on their [plan](/platform/virtual-offices/plans#delivery-handling), and can change them in the Members Portal.
To see or change them, open the customer's virtual office contract and go to **Delivery handling**.
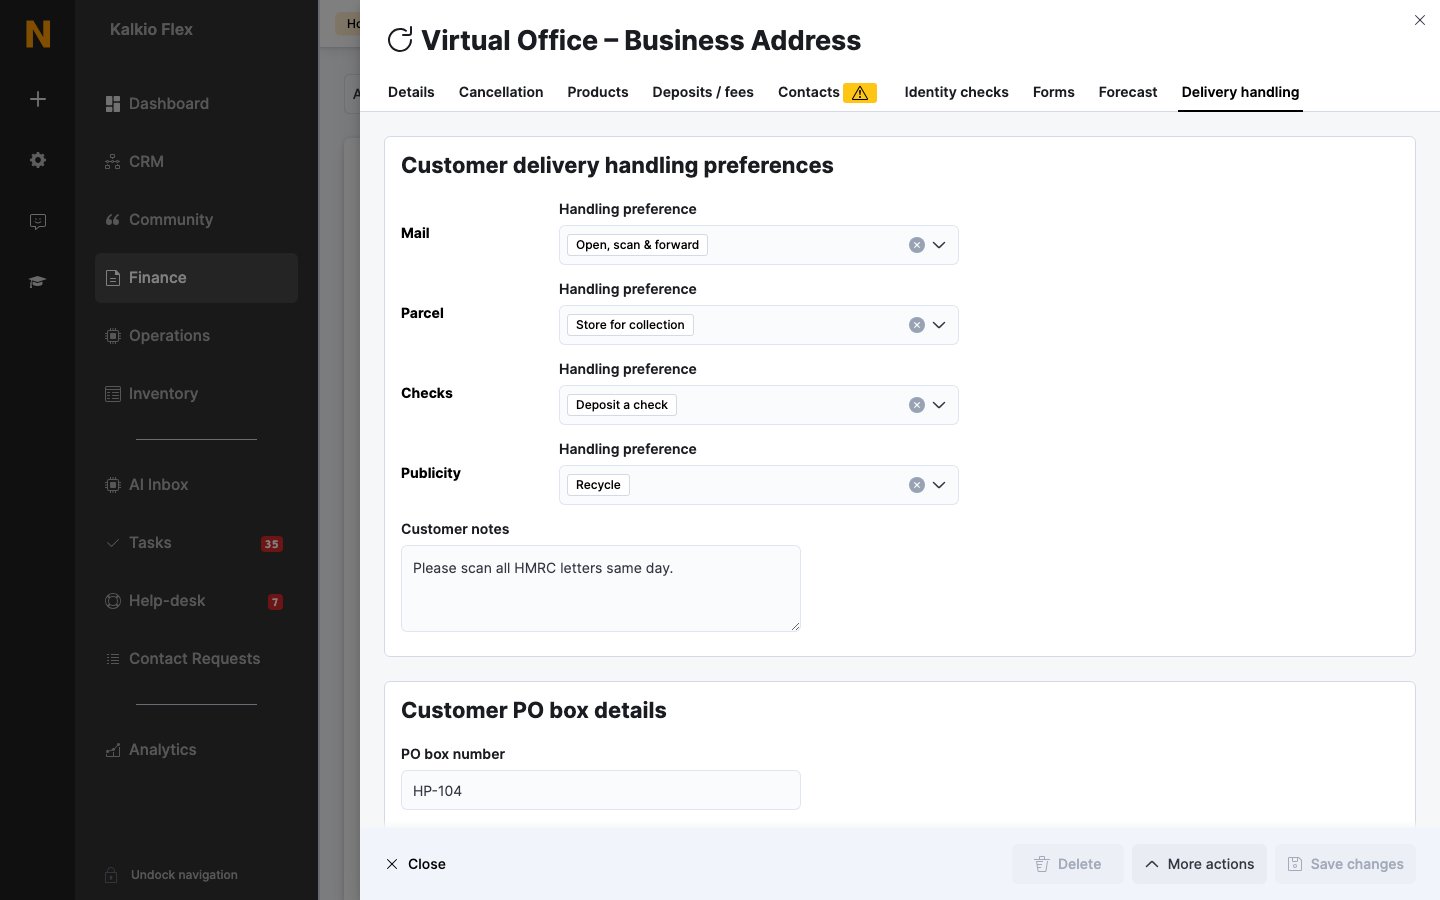 Under **Customer delivery handling preferences**, choose a **Handling preference** for each type. You can also add **Customer notes** with delivery instructions, and their **PO box number**.
When you register a delivery for the customer:
* It takes the customer's preference for that delivery type. If they haven't set one, it's stored for collection.
* It's sent to their default forwarding address, if they have one.
## Register and identify the recipient
When you search for the recipient, you can find a virtual office customer by the name of any of their [nominated recipients](/platform/virtual-offices/onboarding-and-compliance#the-contracts-virtual-office-tabs), as well as the customer's own name. Virtual office customers and recipients are marked with a badge in the results. The delivery is assigned to the customer who pays for the virtual office.
Before you save, the delivery shows the customer's details:
* The **Recipient name** and **Forwarding address**, with buttons to copy them for a forwarding label. If the customer has no forwarding address, you're prompted to add one.
* Their **Plan**, the **Delivery type** and their **Handling preferences**.
* Their **PO Box** and **Delivery instructions**.
* An **Overdue charges** warning, if they have unpaid invoices.
## Work through the steps
Open the delivery to see its steps. Every delivery starts with **Receive**. The next steps depend on the handling preference:
| Handling preference | Steps |
| - | - |
| **Store for collection** | Receive → Store for collection → Collect |
| **Forward** | Receive → Forward |
| **Open, scan & forward** | Receive → Scan → Forward |
| **Open, scan & store for collection** | Receive → Scan → Store for collection → Collect |
| **Open, scan & recycle** | Receive → Scan → Recycle |
| **Open, scan & shred** | Receive → Scan → Shred |
| **Recycle** | Receive → Recycle |
| **Shred** | Receive → Shred |
| **Return to sender** | Receive → Return to sender |
| **Deposit a check** | Receive → Deposit check |
Under **Customer delivery handling preferences**, choose a **Handling preference** for each type. You can also add **Customer notes** with delivery instructions, and their **PO box number**.
When you register a delivery for the customer:
* It takes the customer's preference for that delivery type. If they haven't set one, it's stored for collection.
* It's sent to their default forwarding address, if they have one.
## Register and identify the recipient
When you search for the recipient, you can find a virtual office customer by the name of any of their [nominated recipients](/platform/virtual-offices/onboarding-and-compliance#the-contracts-virtual-office-tabs), as well as the customer's own name. Virtual office customers and recipients are marked with a badge in the results. The delivery is assigned to the customer who pays for the virtual office.
Before you save, the delivery shows the customer's details:
* The **Recipient name** and **Forwarding address**, with buttons to copy them for a forwarding label. If the customer has no forwarding address, you're prompted to add one.
* Their **Plan**, the **Delivery type** and their **Handling preferences**.
* Their **PO Box** and **Delivery instructions**.
* An **Overdue charges** warning, if they have unpaid invoices.
## Work through the steps
Open the delivery to see its steps. Every delivery starts with **Receive**. The next steps depend on the handling preference:
| Handling preference | Steps |
| - | - |
| **Store for collection** | Receive → Store for collection → Collect |
| **Forward** | Receive → Forward |
| **Open, scan & forward** | Receive → Scan → Forward |
| **Open, scan & store for collection** | Receive → Scan → Store for collection → Collect |
| **Open, scan & recycle** | Receive → Scan → Recycle |
| **Open, scan & shred** | Receive → Scan → Shred |
| **Recycle** | Receive → Recycle |
| **Shred** | Receive → Shred |
| **Return to sender** | Receive → Return to sender |
| **Deposit a check** | Receive → Deposit check |
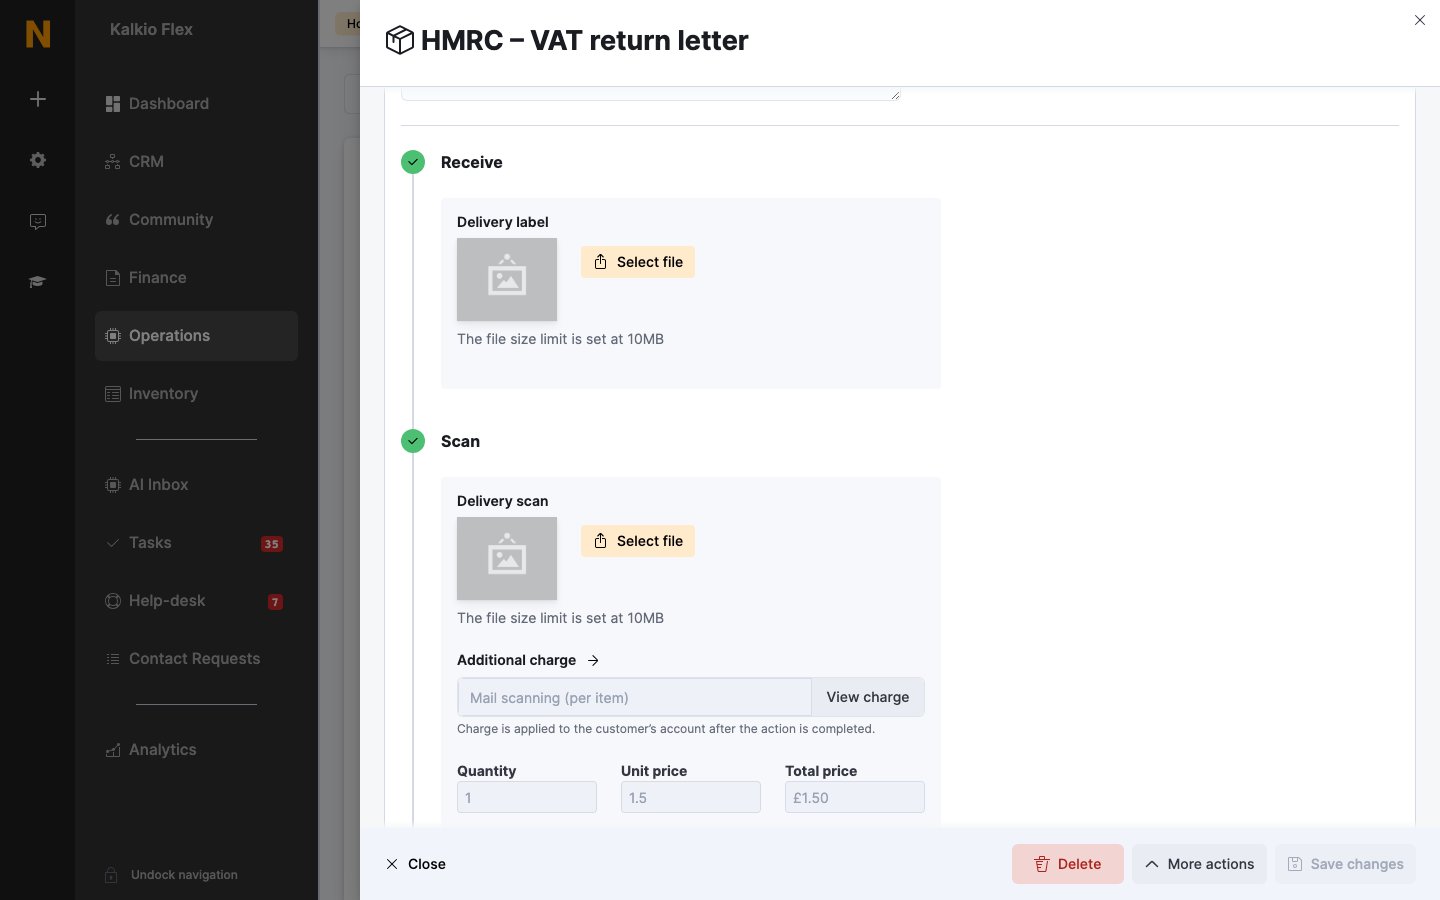 Complete each step with its button, for example **Mark as scanned** or **Mark as forwarded**. You can also complete the next step straight from the deliveries list, with the button at the end of each row. Some steps let you attach a file:
| Step | File |
| - | - |
| **Receive** | **Delivery label** |
| **Scan** | **Delivery scan**, for example a PDF of the letter |
| **Forward** | **Forwarded receipt**, for example proof of postage |
| **Collect** | **Collection signature** |
The delivery's status shows the next step, for example **Pending scanning** or **Pending forwarding**, until the last step is done.
## Charges
If the customer's plan links products to a step, you can add an **Additional charge** when you complete it. Choose the product and check the **Quantity** and **Unit price**. The charge is applied to the customer's account when you mark the step as done, and is invoiced with their next invoice.
On the **Collect** step, the quantity is suggested from how long the item was stored: one for each day after the plan's free storage days. For example, with 7 free days, an item collected after 10 days suggests a quantity of 3.
Each step shows the **Charge status**: **Not invoiced**, **Invoiced** or **Paid**. Select **View charge** to open it.
## Related
* [Deliveries](/platform/operations/deliveries)
* [Virtual office plans](/platform/virtual-offices/plans)
* [Onboarding and compliance](/platform/virtual-offices/onboarding-and-compliance)
This documentation is built and hosted on [Mintlify](https://mintlify.com), a developer documentation platform.
Complete each step with its button, for example **Mark as scanned** or **Mark as forwarded**. You can also complete the next step straight from the deliveries list, with the button at the end of each row. Some steps let you attach a file:
| Step | File |
| - | - |
| **Receive** | **Delivery label** |
| **Scan** | **Delivery scan**, for example a PDF of the letter |
| **Forward** | **Forwarded receipt**, for example proof of postage |
| **Collect** | **Collection signature** |
The delivery's status shows the next step, for example **Pending scanning** or **Pending forwarding**, until the last step is done.
## Charges
If the customer's plan links products to a step, you can add an **Additional charge** when you complete it. Choose the product and check the **Quantity** and **Unit price**. The charge is applied to the customer's account when you mark the step as done, and is invoiced with their next invoice.
On the **Collect** step, the quantity is suggested from how long the item was stored: one for each day after the plan's free storage days. For example, with 7 free days, an item collected after 10 days suggests a quantity of 3.
Each step shows the **Charge status**: **Not invoiced**, **Invoiced** or **Paid**. Select **View charge** to open it.
## Related
* [Deliveries](/platform/operations/deliveries)
* [Virtual office plans](/platform/virtual-offices/plans)
* [Onboarding and compliance](/platform/virtual-offices/onboarding-and-compliance)
This documentation is built and hosted on [Mintlify](https://mintlify.com), a developer documentation platform.