Documentation Index

Fetch the complete documentation index at: https://learn.nexudus.com/llms.txt

Use this file to discover all available pages before exploring further.

Overview

The Members & Contacts page is your customer database. Every person or company registered in your system lives here — whether they have an active plan (members) or not (contacts). From this page you can create new customers, view their profiles, manage access and billing, assign them to teams and locations, and track their activity across bookings, invoices, and check-ins.

How to access

Navigate to Operations → Members & contacts in the left sidebar.
Requires the coworker role. The list is sorted by registration date (newest first) by default. If your location has the Finance module enabled, the list initially shows only customers with an active plan — clear the filter to see all customers.

Members vs contacts

The distinction between members and contacts is automatic:
  • A member is a customer with at least one active contract.
  • A contact is a customer without any active contracts.
You don’t set this manually. When you assign a contract to a customer, they become a member. When all contracts end, they revert to a contact.
Both members and contacts appear in the same list. Use the plan filter to show only members (those with a plan) or clear it to see everyone.

The customer list

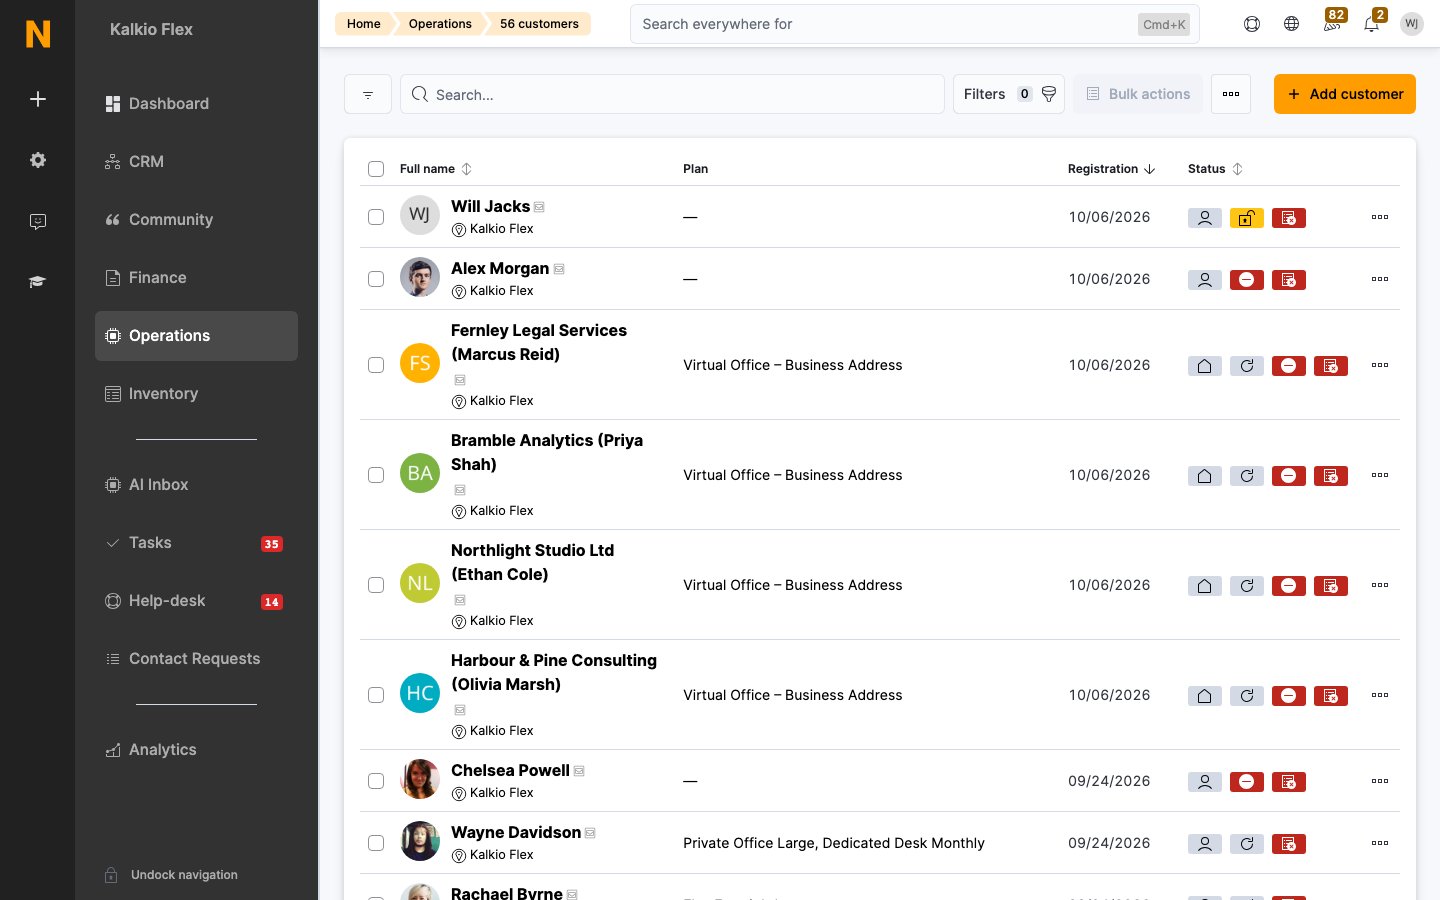
The list shows key information at a glance:
ColumnDetails
NameFull name (individuals) or company name (companies), plus avatar and team names
PlanThe names of any active plans (contracts)
RegistrationDate the customer was added
StatusBadges indicate: Individual/Company, Member (has plan), Administrator, Suspended/Archived, No portal access

Status badges

  • Individual / Company — customer type
  • Member (refresh icon) — has at least one active contract
  • Administrator (lock icon) — is a full platform administrator
  • Suspended (red, pause icon) — account is suspended (Active = false)
  • Archived (red) — account has been archived
  • No portal access (grey) — no user account, cannot log in

Creating a customer

1

Click Add customer

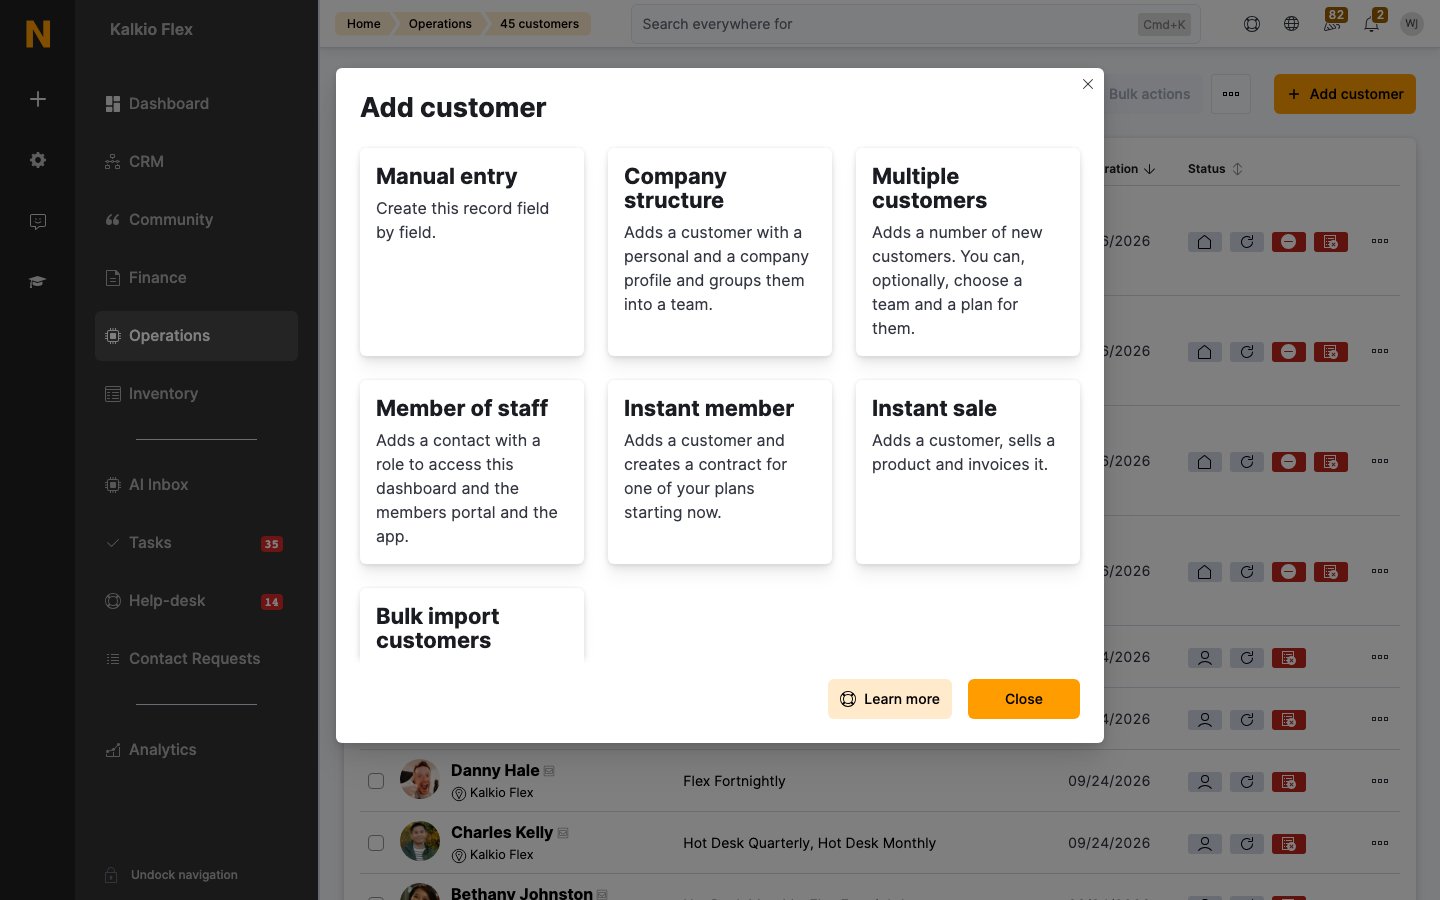
From the Members list, click the Add customer button. You can also use one of the available quick-start wizards:
  • Quick member — create a customer and assign a plan in one flow
  • Quick contact (sale) — create a contact with sale opportunity
  • Company with employees — create a company and add team members
  • Member of staff — add a staff member to your location
  • Import customers — bulk import from CSV
2

Choose the customer type

Select Individual or Company. For companies, the primary field is the company name. For individuals, it’s the full name.
3

Fill in required fields

The minimum required fields are:
  • Full name (or Company name)
  • Email address
  • Country
  • Timezone
The country and timezone default to your current location’s settings.
4

Grant online access (optional)

Enable Create user account to give the customer login access to the Members Portal and mobile app. This sends them a welcome email with sign-in instructions.
Once a customer is created without a user account, you can grant access later using the Grant online access command on their profile. However, the CreateUser option is only available during initial creation.
5

Assign a plan (optional)

During creation, you can immediately assign a plan (contract). This is the fastest way to onboard a member.
6

Save

Click Save to create the customer record. The system validates all required fields and, if a user account was requested, creates the login and sends the welcome email.

Customer profile structure

When you open a customer, the profile is organized into top-level tabs. The tabs visible depend on your modules and role.

Dashboard tab

A summary view showing:
  • Key metrics (revenue generated, bookings made, check-ins since last renewal)
  • Summary charts (activity over time)
  • Key events timeline (recent actions and milestones)
The Dashboard tab only appears for existing customers and requires the Invoices module.

Account tab

The main configuration area, organized into sub-sections:

Account details

Core identity and contact information:
FieldDescription
Customer typeIndividual or Company
Full nameRequired. For individuals, the full name. For companies, the primary contact name.
Company nameRequired for Company type. The organization’s name.
SalutationHow to address this customer in communications (auto-populated from first name)
EmailRequired. Used for login (if user account exists), invoices, and notifications.
AvatarProfile photo (uploaded to blob storage)
Banner imageHeader image for their profile page
NotesPrivate admin notes (not visible to the customer)

Locations

FieldDescription
Home locationThe primary location for invoicing. Determines which location bills this customer.
Registered locationsAll locations this customer can access. A customer can belong to multiple locations without creating duplicate profiles.

Teams

Assign this customer to one or more teams. Teams can represent companies, departments, or any logical grouping. Team membership is bidirectional — adding here also adds the customer to the team’s member list.

Contact and billing

Address fields for correspondence and invoicing:
  • Contact address — street, city, postcode, state, country
  • Billing address — separate billing details if they differ (billing name, email, address). Used on all generated invoices.
  • Phone numbers — mobile and landline

Professional profile

Public-facing information shown in the Members Portal directory:
FieldDescription
Profile summaryA short bio shown in the directory
Profile websiteLink to their website or portfolio
Profile tagsSkills or interests used for networking and discovery
Profile is publicToggle visibility in the member directory
Social linksLinkedIn, Twitter, Instagram, GitHub, Facebook, Telegram, Skype, Pinterest, Flickr, Vimeo, Tumblr, Blogger, Google
If your location has AI features enabled, you can use the Generate profile button to auto-generate a profile summary and tags based on the customer’s information.

Attendance

Expected on-site schedule for each day of the week (Monday through Sunday). Used for occupancy planning and reporting.

Demographics

Categorical information:
  • Gender — Not set, Male, Female, Other, Rather not say
  • Date of birth — used for birthday automations and age calculation
  • Business area — industry or sector

Identifiers

FieldDescription
TagShort labels to categorize this customer (supports multiple tags)
Unique reference numberYour own internal ID for this customer across all locations
Show alert on check-inWhen enabled, displays a custom message to staff whenever this customer checks in
Alert messageThe message to display

Notifications

Control which automated emails this customer receives:
SettingEffect
Send new invoices by emailAutomatically emails new invoices
Send payment receipts by emailSends confirmation when a payment is recorded
Send failed payment notificationsAlerts the customer when automatic payment fails
Notify team on deliveriesNotifies the entire team when a delivery arrives
Delivery notification emailOverride email address for delivery notifications

Access rights

Controls what the customer can do in the portal and on-site:
PermissionWhat it controls
Can connect to IT networkWhether they can authenticate for WiFi / network access
Can make bookingsWhether they can book resources in the portal (requires user account)
Can book for team membersWhether they can create bookings on behalf of their team (requires bookings permission)
Can purchase productsWhether they can buy add-on products (requires user account)
Can purchase eventsWhether they can buy event tickets (requires user account)
Can post community messagesWhether they can participate in community forums (requires user account)
Can access team invoicesWhether they can view invoices for their team’s paying member
Physical access credentials:
FieldDescription
PIN codeUsed for internet access, check-in terminals, and printing services
Access cardsOne or more card IDs linked to door access systems (supports multiple values)
Access fobsOne or more RFID fob numbers (supports multiple values)
Permissions that require a user account are automatically disabled if the customer has no online access. You’ll see a warning banner and a Grant online access button if this is the case.
You can also Revoke online access from this section to remove a customer’s ability to log in without deleting their record.

Integrations & Services

Per-customer configuration for external services:
  • PaperCut — free printing quota, pay-as-you-print toggle
  • Ezeep / Ezeep Blue — cloud printing enablement and free printing flag

Payments tab

Payment gateway configuration and financial settings for this customer. Requires the Finance module.
FieldDescription
Payment providerWhich gateway processes this customer’s automatic payments (Stripe, GoCardless, etc.)
Tax rate typeDefault, Reduced, or Exempt
Tax ID numberVAT number or tax exemption reference
Invoice due date periodNumber of days after issue before an invoice is overdue
Do not process invoices automaticallyPrevents the system from attempting automatic payment collection
Bank detailsBank name, account, branch — for manual payment or direct debit setups
Gateway-specific sub-sections (Stripe BACS, GoCardless, Spreedly) appear based on which integrations your location has enabled.

Sales tab

A consolidated view of all commercial activity:
  • Invoices — full invoice history with status and amounts
  • Contracts — active and past plan subscriptions
  • Bookings — booking history
  • Event tickets — purchased event registrations
  • Charges — one-off charges and credits
Requires the Finance and Products modules.

Benefits tab

Tracks credits, passes, and discounts assigned to this customer:
  • Booking credits — time-based or count-based booking allowances
  • Passes — pre-purchased access passes
  • Time credits and printing credits — usage-based credits active on their account
  • Discount codes — assigned promotional codes
Requires the BookingCredits, AccessCredit, TimeCredit, or DiscountCodes module.

CRM tab

Relationship management data for this customer:
  • Notes and activity history
  • Tasks assigned to or about this customer
  • Messages and communications
  • Documents and files
  • Proposals sent
  • Opportunities (sales pipeline)
  • Visitor history
Requires the Crm, Tasks, Messages, Proposals, or Opportunities module.

Invoices tab

Dedicated invoice list filtered to this customer. Shows unpaid invoice count as a badge on the tab. Requires the Invoices module.

Ledger tab

Financial transaction ledger for this customer. Shows the current balance as a badge:
  • A positive balance means the customer has credit.
  • A negative balance means the customer owes you.
Requires the Invoices module.

Suspending and archiving

Customers have two independent status flags:
StatusEffect
Suspended (Active = false)The customer’s account is deactivated. Access may be restricted depending on your configuration. The customer still appears in lists with a red “Suspended” badge.
Archived (Archived = true)Marks the customer as no longer active. Used for former members you want to keep on record but hide from daily operations. Shows a red “Archived” badge.
Both can be set via the customer’s profile or through bulk commands. Neither deletes the customer record — all history and data is preserved.
Suspending a customer does not automatically cancel their contracts or stop billing. You must manage contracts separately if you want to stop charges.

Granting and revoking online access

A customer needs a user account to log in to the Members Portal and mobile app. Granting access:
  • During creation: enable Create user account — sends a welcome email automatically.
  • On an existing customer: use the Grant online access command from the Access rights section. This creates the user account and sends the welcome email.
Revoking access:
  • Use the Revoke online access button in the Access rights section. This removes the user account but preserves the customer record and all associated data.

Filtering and searching

The customer list supports:
  • Global search — searches across name, email, company, billing name, and team names
  • Plan filter — show only customers on a specific plan (or those without any plan)
  • Team filter — customers belonging to a specific team
  • Active/Archived status — filter by account status
  • Location filter — show customers at a specific location or across all locations
  • Custom fields — filter by any custom field value
  • Date range — filter by registration date or date of birth
  • Tags — filter by assigned tags
  • Customer type — Individual or Company

Bulk commands

From the list view, select multiple customers and use the Run command action to perform bulk operations such as:
  • Suspend or reactivate accounts
  • Archive accounts
  • Send bulk emails
  • Assign tags
  • Create contracts
  • Grant or revoke online access
Commands have eligibility rules — only customers in the correct state for a given action will be affected.

Multi-location behaviour

  • A customer can be registered at multiple locations without duplication.
  • The home location (Invoicing Business) determines which location handles their billing.
  • When viewing the customer list, you can switch between seeing only the current location’s customers or all customers across your network.
  • Adding or removing location associations requires edit access to the customer and the relevant location.

Best practices

Keep customer profiles complete — accurate email addresses ensure invoices and notifications reach them, and correct billing addresses keep your invoices compliant.
  • Grant online access if the customer needs to use the portal or app. Without a user account, they cannot log in, make bookings, or pay invoices online.
  • Use tags to segment customers (e.g., “Enterprise”, “Freelancer”, “Trial”) for targeted communication, filtering, and reporting.
  • Set up billing details early — configuring the payment provider and tax settings before the first invoice avoids manual corrections later.
  • Review access permissions when onboarding — by default all permissions are enabled, but you can restrict specific capabilities per customer.
  • Set check-in alerts for important situations (outstanding balances, VIP guests, special access needs) so front-desk staff are always informed.
  • Use attendance tracking to plan occupancy and understand which days your space is busiest.

Teams

Group customers into teams for shared billing and access.

Contracts

Assign plans to customers to activate membership.

Plans

Configure the plans your customers can subscribe to.

Access Control

Set up physical access systems linked to customer credentials.