Documentation Index

Fetch the complete documentation index at: https://learn.nexudus.com/llms.txt

Use this file to discover all available pages before exploring further.

Overview

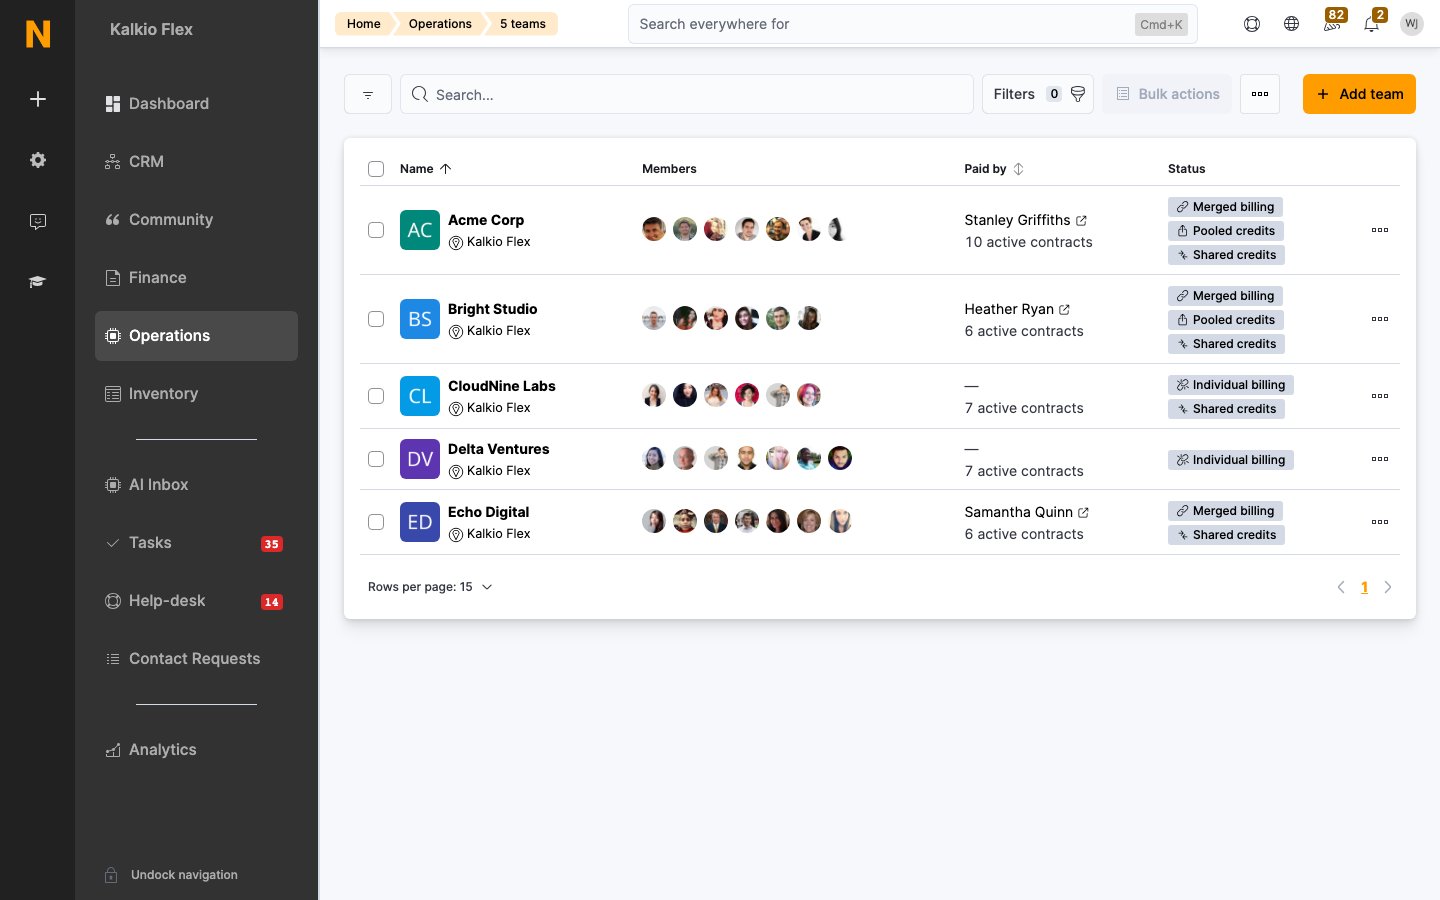
Teams let you group customers into logical units — typically companies, departments, or project groups. Teams unlock shared billing, pooled benefits, consolidated invoices, and a team profile visible in your members directory.

How to access

Navigate to Operations → Teams in the left sidebar.
Requires the team role.

Key concepts

TermMeaning
TeamA named group of customers. Can represent a company, department, or any logical grouping.
Team memberA customer who belongs to the team. A customer can belong to multiple teams.
Team administratorA customer who can manage the team from the Members Portal (invite members, view team details).
Paying memberThe customer whose account is charged for consolidated team invoices.
Merged invoicingWhen enabled, all team members’ charges are consolidated into a single invoice to the paying member.
Sign-up linkA unique URL that new or existing customers can use to join the team directly.

Creating a team

1

Click Add team

From the Teams list, click Add team.
2

Select the location

Choose which location this team belongs to.
3

Enter the team name

Give the team a descriptive name (e.g., “Acme Corp” or “Marketing Department”). This is the only required field.
4

Add a description (optional)

Provide context about the team for your staff.
5

Save

Click Save to create the team. You can then add members, configure billing, and set up benefits.

Team profile tabs

Details

Core team information and sign-up configuration:
FieldDescription
LocationThe location this team belongs to (required)
Team nameThe team’s display name (required, max 254 characters)
DescriptionInternal description for your staff
Once the team is saved, additional sign-up options appear:
FieldDescription
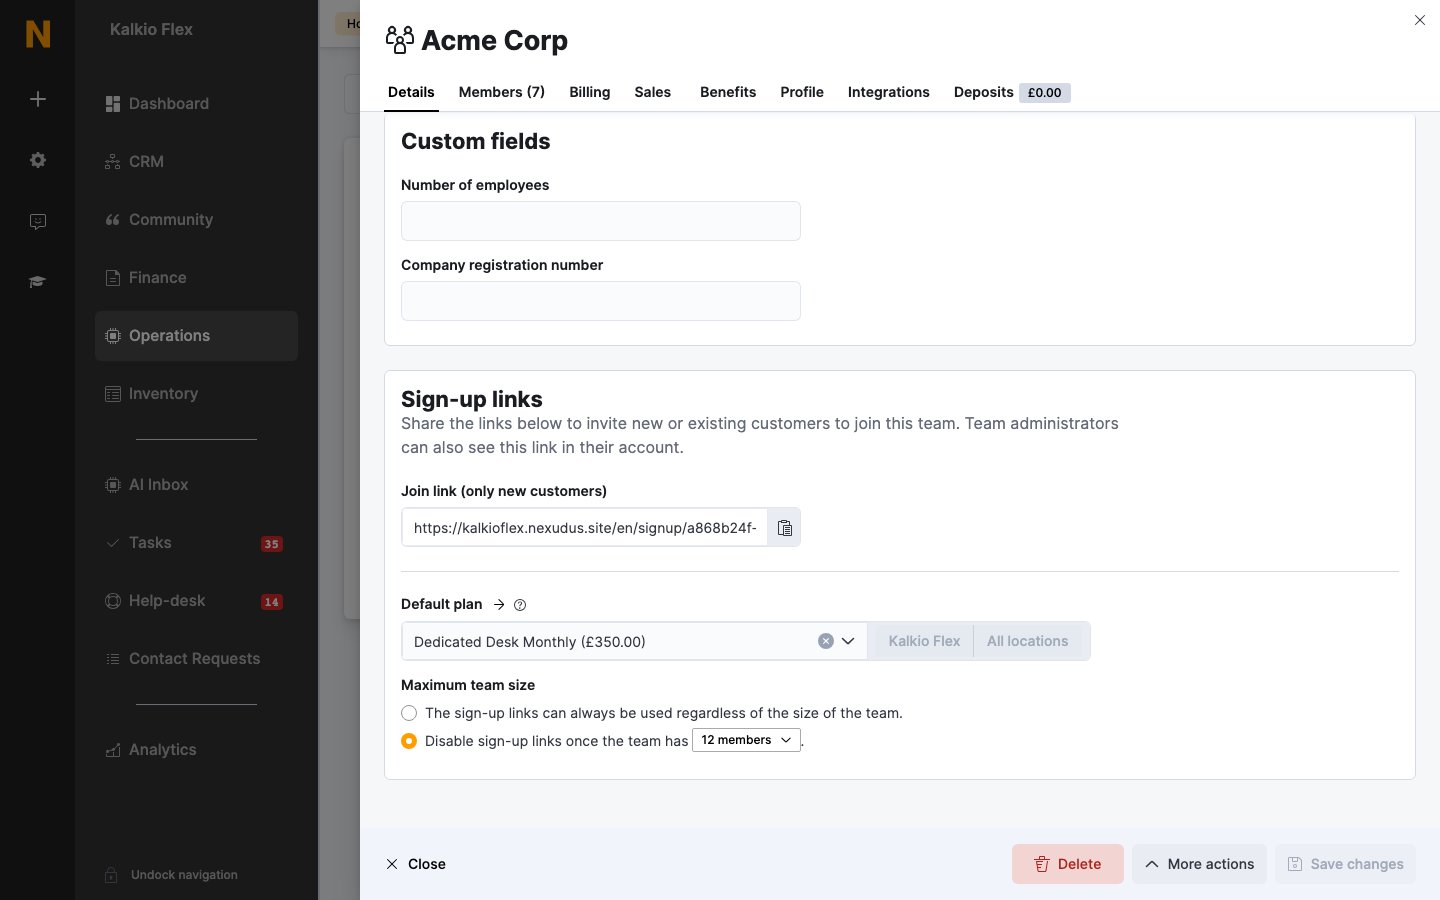
Sign-up linkA unique URL customers can use to join this team. Share with new customers for self-service onboarding.
Default planThe plan automatically assigned when a customer joins via the sign-up link
Maximum team sizeLimits how many members can join the team. Leave blank for unlimited.
The sign-up link works for both new customers (who create an account) and existing customers (who log in and join the team). This is useful for companies onboarding their own staff.

Members

An embedded customer list filtered to this team’s members. From here you can:
  • View all current team members with their profiles and plan status
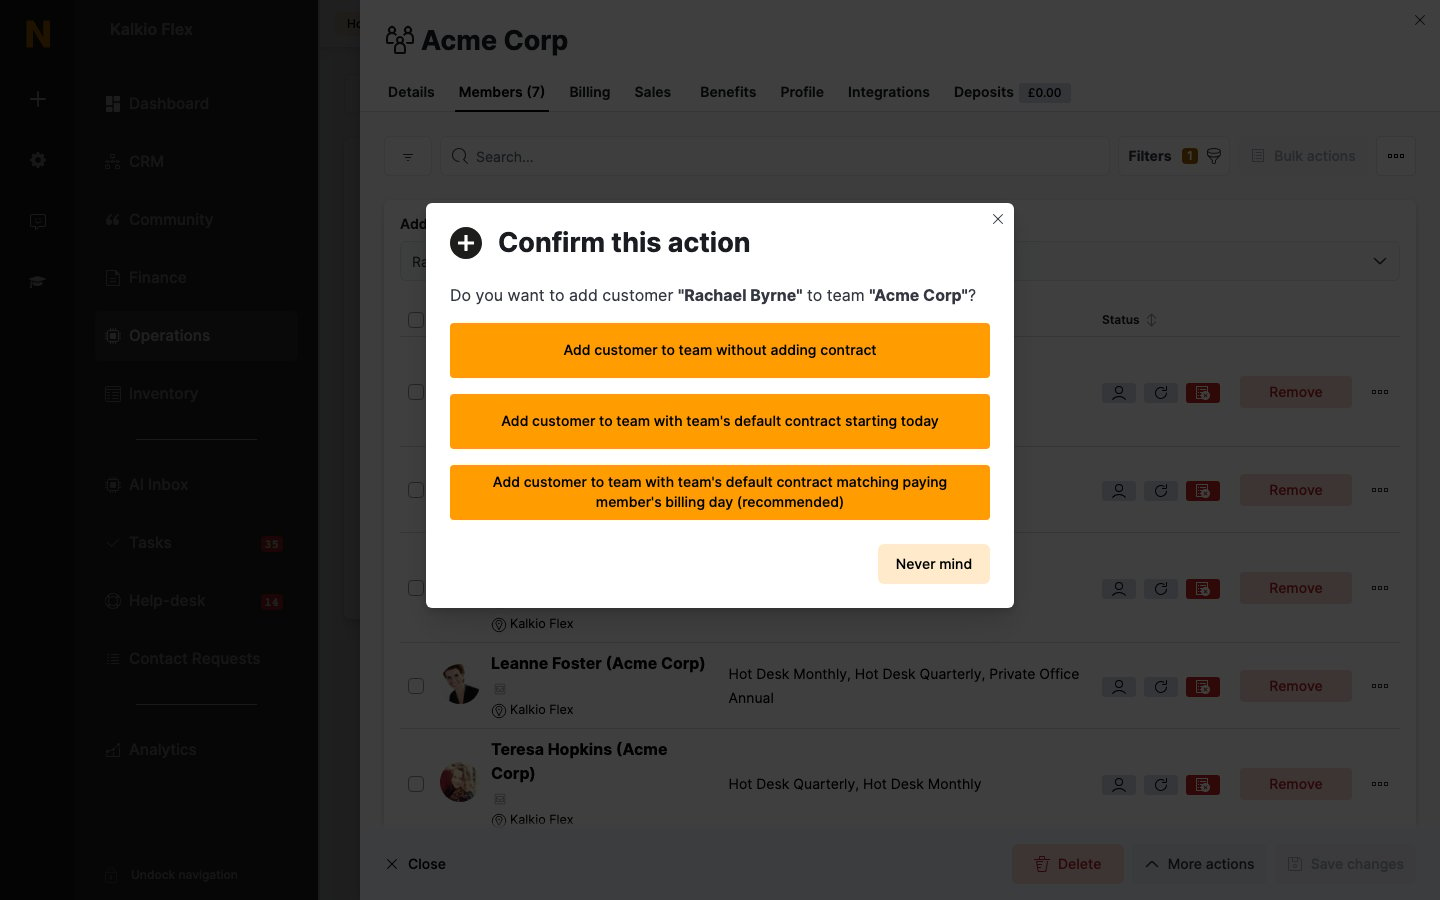
  • Add existing customers to the team
  • Remove customers from the team
Adding or removing members is bidirectional — the change is reflected on both the team and the customer’s profile.

Billing

Configure how the team is billed:
FieldDescription
Team paying customerThe customer whose account receives consolidated charges. Select a team member, or leave blank for individual billing.
Create single invoice for teamWhen enabled, all team members’ charges are merged into one invoice issued to the paying member. Requires a paying member to be set.
Merged invoicing consolidates all team members’ charges (plan fees, bookings, products) onto the paying member’s invoice at each billing cycle. All team members must share the same billing day for this to work correctly.
What happens when you clear the paying member: Removing the paying member automatically resets all shared billing options:
  • Create single invoice → disabled
  • Transfer credits to paying member → disabled
  • Share booking credit → disabled
  • Share passes → disabled
  • Share time credits → disabled

Benefits

Configure discounts and shared credits for team members.

Discounts

Apply percentage discounts that apply to all team members:
FieldDescription
Bookings discountPercentage discount on resource bookings
Passes discountPercentage discount on passes
Time credits discountPercentage discount on time and printing credits
Charges discountPercentage discount on one-off charges
Plans discountPercentage discount on plan fees

Credit and benefit sharing

SettingDescription
Transfer credits to paying memberMoves all team members’ credits to the paying member’s balance
Share passesTeam members share a pooled set of passes
Share time creditsTeam members share a pooled set of time and printing credits
Share booking creditTeam members share a common booking credit balance
Benefit sharing requires a paying member to be set. When credits are shared, any team member can consume from the same pool — useful for companies that purchase credits centrally.
The Benefits tab also shows:
  • Team time credits and their usage
  • Team passes
  • Team booking credits
  • Team printing credits
  • A benefits summary
  • Usage history

Sales

A consolidated view of all commercial activity across team members:
  • Contracts — all active and past contracts for team members
  • Products — one-off or recurring purchases
  • Bookings — aggregated booking history
  • Event attendees — event registrations
  • Charges — financial charges applied
  • Invoices — all invoices (individual or merged)

Profile

Public-facing team information shown in the Members Portal directory:
FieldDescription
Team administratorsCustomers who can manage the team from the portal (invite members, edit team details)
SummaryA description shown in the directory (supports rich text)
Skills/industriesTags for discovery and networking
Publish to directoryToggle visibility in the Members Portal community directory
WebsiteTeam’s external website URL
Google Maps linkLocation pin for the team’s office
Team logoLogo image shown in the directory and team profile
Team imagesUp to 3 gallery images for the team profile

Integrations

Per-team integration settings:
FieldDescription
Create a secure network for membersEnables a dedicated VLAN for team members via Radius/WiFi integration
VLAN identifierThe VLAN ID to assign. Type “AUTO” to generate automatically.

Access control inheritance

When a team has a paying member, access control is handled at the team level. If the paying member’s contract is connected to plans or resources that grant physical access (door access, check-in rights, floor access), all team members automatically inherit that access. This means:
  • You only need to configure access on the paying member’s contract — individual team members don’t need their own access-granting contracts.
  • When the paying member’s contract includes access to specific doors, floors, or time slots, every member of the team receives the same access rights.
  • If the paying member’s contract ends or is suspended, all team members lose the inherited access.
This makes teams the primary unit for access control in company setups. The Company customer record holds the contract that grants access, and all employees in the team benefit from it automatically.
Using the recommended company structure:
  1. The Company customer record (paying member) has a contract on a plan that grants 24/7 door access.
  2. All Individual customer records in the team inherit that door access — they can check in and open doors without needing their own access-granting contract.
  3. When a new employee joins the team, they immediately get access. When someone leaves the team, their access is revoked.

What team members still need

While access rights are inherited from the paying member, each individual team member still needs:
  • Their own access card, PIN code, or access fob configured on their customer profile (under Access rights) — these are the physical credentials used to identify them at doors and terminals.
  • Online access (a user account) if they need to check in via the portal or mobile app.
This model simplifies access management for companies: manage the access entitlement centrally on the Company record’s contract, and manage physical credentials individually on each person’s profile.

Managing team members

Adding members

You can add customers to a team in two ways:
  1. From the team: Open the team → Members tab → add customers from the list.
  2. From the customer: Open a customer profile → Account → Teams section → assign teams.
Both methods create the same bidirectional relationship.

Removing members

Remove a customer from the Members tab or from their individual profile. Removing a team member does not delete their customer record or cancel their contracts.

Team administrators

Team administrators are members with management permissions in the portal. They can:
  • Invite new members to the team
  • View team member information
  • Manage team settings (depending on portal configuration)
Set administrators from the Profile tab.
Each team has a unique sign-up URL in the format:
{your-portal-url}/signup/{team-unique-id}
When a customer uses this link:
  1. New customers create an account and are automatically added to the team.
  2. Existing customers log in and join the team.
  3. If a default plan is set, the customer is assigned that plan automatically.
  4. If a maximum team size is set, the link stops accepting new members once the limit is reached.
Share sign-up links with companies to let them self-onboard their staff. Combined with a default plan, this creates a fully automated onboarding flow.

The recommended way to set up a company in Nexudus is to separate the billing entity (the company) from the individuals (the people who use the space). This keeps invoicing clean and lets you manage people independently from the company’s financial relationship.

Structure

Team: "Acme Corp"
├── Paying member: "Acme Corp" (Company customer record)
├── Member: "Jane Smith" (Individual customer record)
├── Member: "Tom Brown" (Individual customer record)
└── Member: "Sara Lee" (Individual customer record)

Step-by-step setup

1

Create a Company customer record

Go to Operations → Members & contacts and create a new customer:
  • Set Customer type to Company
  • Enter the company name (e.g., “Acme Corp”)
  • Fill in the company’s billing email, billing address, and tax ID
  • You do not need to create a user account for this record — it exists purely for billing purposes
2

Create Individual customer records for each employee

Create a separate customer record for each person who will use the space:
  • Set Customer type to Individual
  • Enter their personal name and email
  • Enable Create user account so they can log in to the portal
  • Assign their plan (contract) to their individual record
3

Create the team

Go to Operations → Teams and create a new team with the company name.
4

Add all customers to the team

Add both the Company record and all Individual records as team members.
5

Set the Company record as the paying member

In the team’s Billing tab, select the Company customer record as the Team paying customer.
6

Enable merged invoicing

Check Create single invoice for team. All charges for every team member (plans, bookings, products) will now be consolidated into a single invoice issued to the Company record.
If the person responsible for paying is also a user of the space (e.g., the company founder works from a desk), create two customer records: one Company record for billing and one Individual record for their personal use. This keeps their personal bookings and check-ins separate from the company’s billing entity.

Why this approach works

  • Clean invoices — the company receives one invoice with all charges, addressed to the company name and billing details.
  • Individual tracking — each person’s bookings, check-ins, and portal activity are tracked under their own profile.
  • Flexible contracts — each team member can be on a different plan, yet all charges roll up to one invoice.
  • No login needed for the company record — it exists solely as the billing entity. Only the individuals need portal access.
  • Easy staff changes — when an employee leaves, remove them from the team. The company record and remaining members are unaffected.

Merged invoicing in detail

When Create single invoice for team is enabled:
  1. At each billing cycle, the system generates a single invoice addressed to the paying member (the Company record).
  2. All charges from every team member are included — plan fees, bookings, product purchases, and one-off charges.
  3. Each line item on the invoice identifies which team member incurred the charge.
  4. The paying member’s payment provider is used to collect payment automatically (if configured).

Requirements

  • A paying member must be set on the team.
  • All team members should share the same billing day for charges to align correctly on the merged invoice.
  • The paying member’s billing address and tax settings are used on the consolidated invoice.

What is not merged

  • Invoices that were already generated before enabling merged billing remain on individual accounts.
  • If a team member also belongs to another team with its own paying member, the charge goes to whichever team has merged invoicing enabled.
Enabling merged invoicing does not retroactively move existing unpaid invoices. It only affects invoices generated from that point forward. Make sure to enable it before the next billing cycle.

Other team billing scenarios

  1. Set the Company record as the paying member.
  2. Enable Share booking credit and/or Share passes in the Benefits tab.
  3. Purchase credits or passes on the Company record’s account.
  4. All team members can now consume from the shared pool.
  1. Set discount percentages in the Benefits tab (e.g., 10% bookings discount).
  2. All team members automatically receive the discount when making bookings or purchasing products.
  3. No paying member is required for discounts — they apply individually to each member’s invoices.
Leave the paying member blank. Each team member is billed individually. The team serves as an organizational grouping for filtering, communication, and access management — no billing consolidation occurs.

Best practices

  • Use a Company customer record as the paying member rather than an individual person. This keeps invoices addressed correctly and avoids confusion when personnel changes occur.
  • Create separate Individual records for each person using the space, even if one of them is also the company owner — this ensures their personal activity is tracked properly.
  • Use sign-up links for company onboarding — it saves you from manually adding each employee.
  • Set a maximum team size when the company has a fixed number of seats in their contract.
  • Assign team administrators so the company’s point of contact can manage their own members without needing your help.
  • Use the Profile tab to make teams visible in the directory, helping members discover companies in your space for networking.
  • Enable merged invoicing before the billing cycle — it only affects future invoices, not existing ones.

Members & Contacts

Manage individual customer profiles and assign them to teams.

Plans

Configure the plans that team members can be assigned to.

Invoices

View and manage team invoices, including merged billing.

Contracts

Manage plan subscriptions for team members.