Documentation Index

Fetch the complete documentation index at: https://learn.nexudus.com/llms.txt

Use this file to discover all available pages before exploring further.

Overview

The Visitors page lets you track everyone coming into your space who isn’t a member — guests visiting your customers, people touring your space, or attendees of meetings booked by your members. You can register visitors in advance, check them in on arrival, notify hosts, and manage approval workflows. Visitors can also be linked to specific bookings as guests, which connects them to the resource, time slot, and host for that meeting.

How to access

Navigate to Operations → Visitors in the left sidebar.
Requires the visitor role.

Key concepts

TermMeaning
VisitorA person coming to your space who is not a member — a guest, prospect, or meeting attendee.
HostThe customer (member or contact) who the visitor is coming to see.
Booking visitorA visitor linked to a specific booking. This connects the visitor to a resource reservation (e.g., “Guest for Jane’s meeting in Room A at 2pm”).
TourA visit specifically for someone interested in your space. Tours have a separate confirmation workflow.
Host approvalA workflow where the host must approve or reject a visitor before they are granted access.
Visitor codeAn auto-generated unique code the visitor can use to check in at your front desk or kiosk.

Visitor types

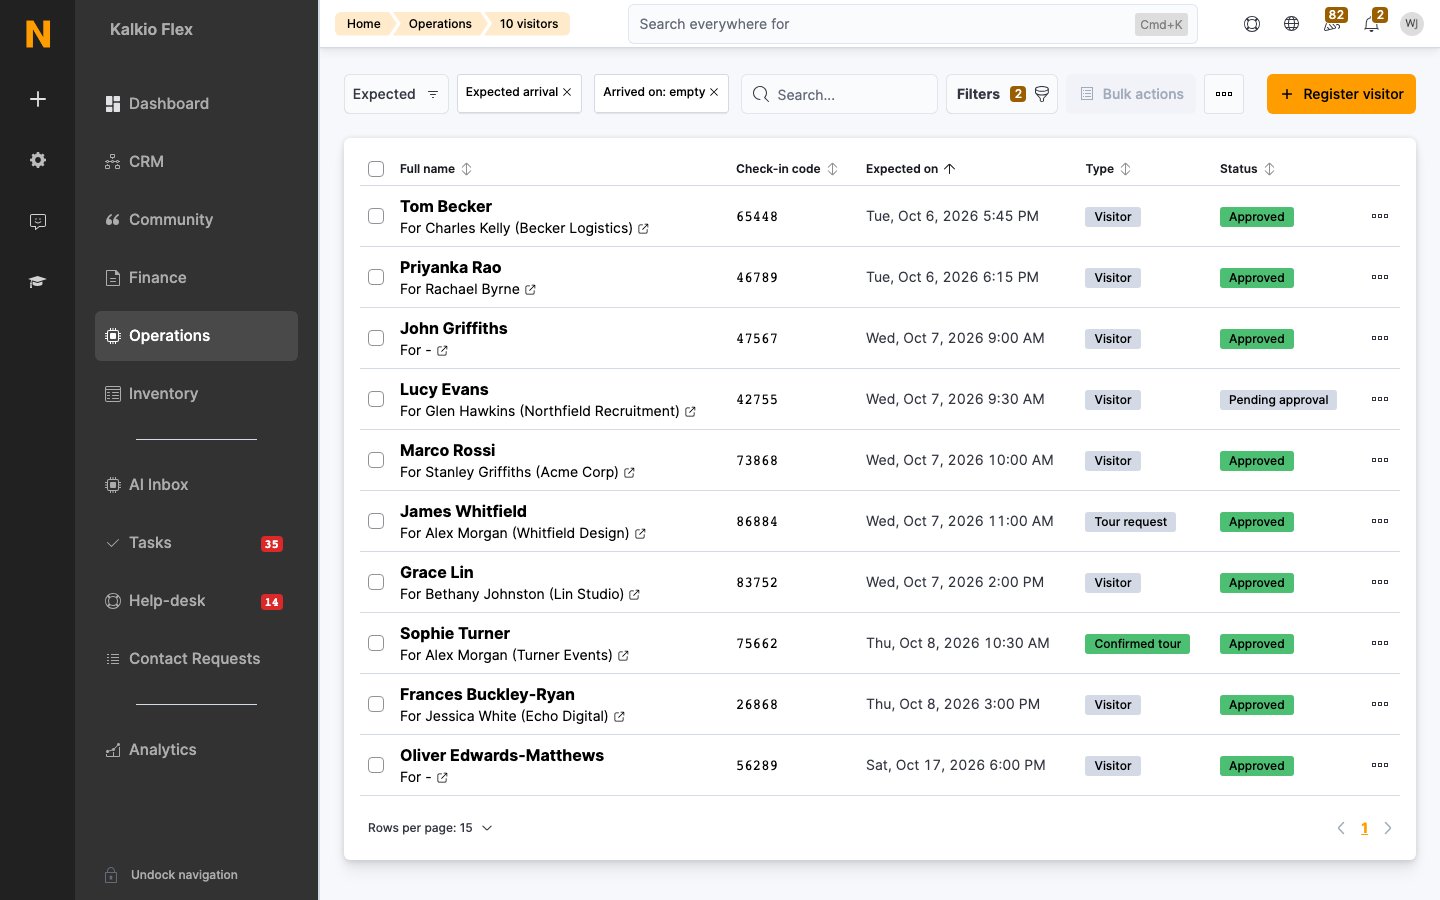
The list view shows each visitor’s type as a badge:
TypeMeaning
VisitorA standard guest visiting a customer
Booking guestA visitor linked to a specific resource booking
Tour requestSomeone requesting a tour of your space (not yet confirmed)
Confirmed tourA tour that has been confirmed by your team

Creating a visitor

1

Click Add visitor

From the Visitors list, click the Add button.
2

Enter visitor details

Fill in the required fields:
  • Full name (required)
  • Email (required)
  • Expected arrival (required — date and time in 15-minute intervals)
Optional fields:
  • Phone number
  • Company name
  • Reason for the visit
  • Internal notes (visible only to your staff)
3

Assign a host (optional)

Select the customer this visitor is coming to see. This enables host notifications and the approval workflow.
4

Mark as tour (optional)

Check This visitor is coming for a tour if they are a prospective customer touring your space rather than visiting an existing member.
5

Check in immediately (optional)

Enable Check this visitor in now if the visitor is already at your front desk. This sets their arrival time to now.
6

Save

Click Save. The visitor receives a check-in code automatically, and the host is notified if applicable.

Visitor form fields

Details tab

Visitor information

FieldDescription
LocationWhich location this visitor is expected at (required)
Full nameVisitor’s full name (required)
EmailVisitor’s email address (required)
Phone numberContact phone number
Company nameThe visitor’s company
Customer notesNotes from the host/customer about this visit (read-only in admin)
Internal notesPrivate notes for your staff (not visible to the visitor or host)
Reason for the visitWhy the visitor is coming

Arrival and departure

FieldDescription
Check this visitor in nowImmediately marks the visitor as arrived (only available during creation)
Expected arrivalDate and time the visitor is expected (required; locked once arrived)
Arrived onActual arrival date and time (set automatically on check-in; read-only)
Left onDeparture date and time (read-only)

Host

FieldDescription
HostThe customer this visitor is coming to see (optional)
This visitor is coming for a tourMarks the visit as a prospective space tour

Customers tab

If the visitor’s email matches an existing customer record, this tab shows the linked customer profiles. This helps you identify return visitors who may already be in your system.

Host approval workflow

When visitors walk in without being pre-registered, you can require the host to approve the visit before granting access. This is especially useful for secure spaces or locations with a staffed front desk.

Approval statuses

StatusMeaning
Not requiredNo approval needed — visitor is expected and accepted (default)
RequestedApproval has been requested from the host; waiting for response
RejectedHost has rejected the visitor
Accepted — hold for collectionHost approved; visitor should wait at reception for the host to collect them
Accepted — grant accessHost approved; visitor can be directed to the host’s desk or unit

Configuring host approval

Host approval settings are found under Settings → Apps and integrations → Companion apps → NexIO.
SettingEffect
Require host approval for walk-in visitorsEnables the approval flow. Walk-in visitors registered via NexIO receive a “Requested” status instead of “Not required”.
Automatically check approved visitors inWhen enabled, an approved visitor is immediately checked in without staff intervention.
Host can choose to collect visitors at receptionShows the “Accept — hold for collection” option in the approval email so the host can come to reception.
Host can choose to send visitors to their unit or deskShows the “Accept — grant access” option in the approval email so the visitor can proceed without escort.
You can disable either the “collect at reception” or the “grant access” response option to simplify the host’s decision. If you disable both, only the reject option remains available.

When approval is triggered

Host approval is only triggered when all of the following are true:
  1. The “Require host approval” setting is enabled for your location.
  2. The visitor is registered via NexIO (walk-in self-registration at a kiosk or front-desk tablet).
  3. A host (customer) is assigned to the visitor.
Visitors created by staff in the Dashboard or by customers from the Members Portal always receive a “Not required” status — they are considered pre-approved by nature of who registered them.

How the approval flow works

1

Visitor self-registers at NexIO

The visitor enters their details and selects a host at the NexIO kiosk. The visitor’s status is set to Requested.
2

Host receives approval email

The system sends the host an email with the visitor’s details and action buttons to approve or reject. The available actions depend on your settings:
  • Accept — collect at reception: Host will come to get the visitor.
  • Accept — grant access: Visitor can proceed to the host’s desk.
  • Reject: Visitor is turned away.
3

Host responds

The host clicks one of the action links in the email. The visitor’s approval status is updated immediately.
4

Staff and host are notified

Staff members subscribed to visitor notifications receive a system message indicating the visitor was accepted or rejected. If “Automatically check approved visitors in” is enabled, the visitor is also checked in automatically.

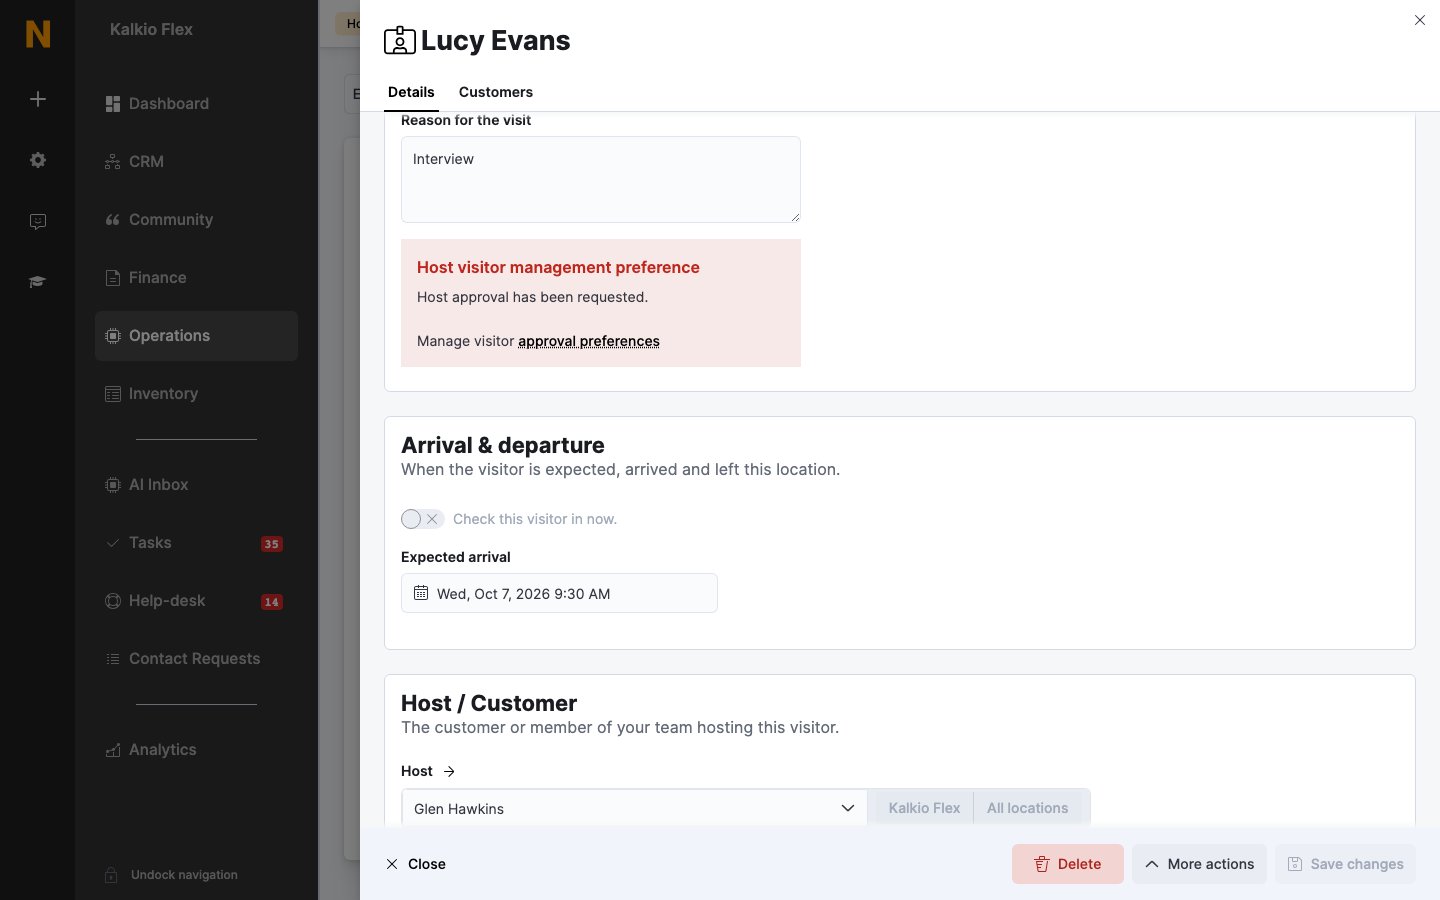
The approval callout on the visitor form

When you open a visitor record in the Dashboard, a callout displays the current approval status with a description:
  • Not required — “Host approval is not required.”
  • Requested — “Host approval has been requested.”
  • Rejected — “Host approval has been rejected.”
  • Accepted — hold — “Host approval has been accepted and visitor should be held to be collected.”
  • Accepted — grant — “Host approval has been accepted and visitor should be granted access to the host’s unit/desk.”
A link in the callout takes you directly to the approval preferences in NexIO settings.

Visitor limits on plans

You can restrict how many visitors a customer can invite per day, week, or month by setting limits on their pricing plan. These limits are defined on each plan and enforced at the time a visitor is created:
Plan settingEnforced when
Visitors per dayVisitor’s expected arrival falls on the same calendar day as the limit
Visitors per weekVisitor’s expected arrival falls in the same calendar week
Visitors per monthVisitor’s expected arrival falls in the same calendar month
If the customer exceeds the limit for their active plan(s), the visitor cannot be created and an error is displayed.
Visitor limits are cumulative across all active contracts — if a customer has two plans that both include visitor limits, the totals are summed.

Visitors and bookings (booking guests)

Visitors can be linked to specific resource bookings through the booking visitor relationship. This is how you track guests attending a meeting booked by one of your members.

How it works

  • When a customer books a meeting room, they can add visitors (guests) to that booking.
  • Each guest becomes a booking visitor — a link between the visitor record and the booking record.
  • The visitor list shows these as “Booking guest” with the resource name (e.g., “For Jane Smith at Meeting Room A”).
  • A single visitor can be a guest at multiple bookings, and a single booking can have multiple visitors.

Who can add booking visitors

Visitors can only be added to bookings that have a host (a customer associated with the booking). Bookings without a customer cannot have visitors.

Where booking visitors appear

  • On the Visitors list — shown with a purple “Booking guest” badge and the resource name
  • On the Booking detail — listed as guests for that reservation
  • The visitor’s check-in code can be used by the guest to self-identify at reception

Notifications

When a visitor is added to a booking, the system can send:
  • A booking confirmation email to the customer who made the booking
  • A visitor invite email to the visitor with details about the visit
These notifications depend on your location’s email settings.
If the “Do not register known customers as visitors” setting is enabled, existing customers added as booking guests will not generate a new visitor record.

Visitor lifecycle

A visitor moves through these stages:
Expected → Arrived (checked in) → Departed (checked out)

Check-in

A visitor can be checked in by:
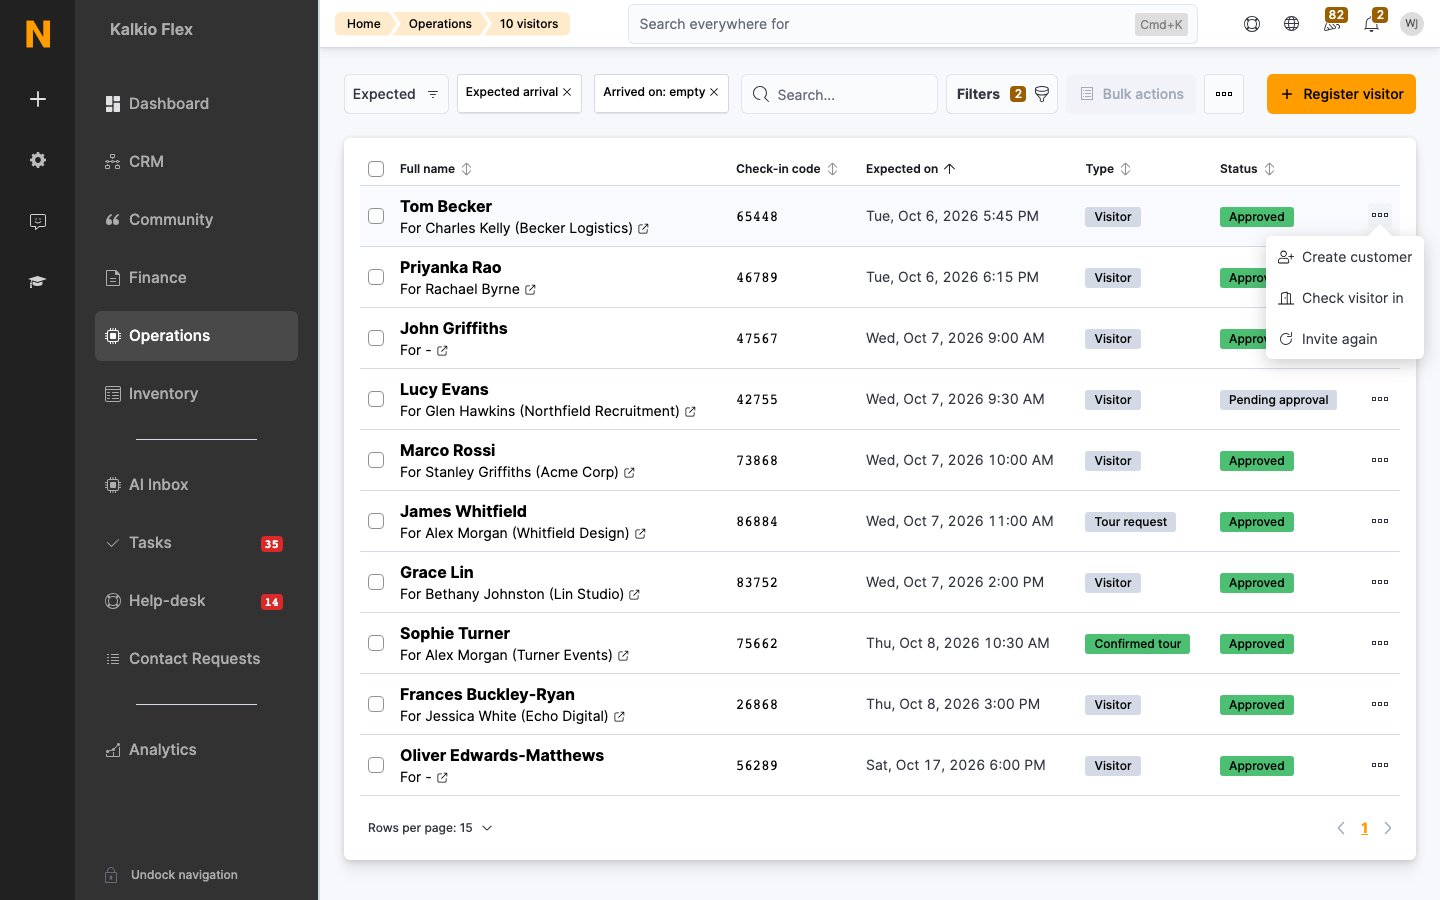
  • Staff at front desk — set the arrival date on the visitor record or use the “Check in now” flag on creation
  • Self-check-in — the visitor uses their unique visitor code at a kiosk or NexIO terminal
  • AI agent — visitors can register through an AI-powered channel and be checked in automatically

Check-out

Set the departure date on the visitor record when they leave. This moves their status to “Departed”.

Visitor sources

Each visitor record tracks how it was created:
SourceDescription
AdministratorCreated manually by a staff member in the Dashboard
CustomerCreated by the host customer from the Members Portal (pre-registering their own guest)
NexIOCreated via self-registration at a kiosk, public booking portal, or AI agent

The visitor list

Default view

The list initially shows visitors expected from today onwards who have not yet arrived — your upcoming visitor schedule.

Quick filter segments

SegmentShows
Expected todayVisitors expected today who haven’t arrived yet
ExpectedAll future expected visitors (not yet arrived)
Requested toursTour requests that haven’t been confirmed
Expected toursConfirmed tours with upcoming expected arrival
On siteVisitors who arrived today and haven’t departed
ArrivedAll visitors who have arrived (regardless of departure)

List columns

ColumnDetails
Full nameVisitor name with host information (e.g., “For Jane Smith” or “For Jane Smith at Meeting Room A”)
Check-in codeThe visitor’s unique code for self-check-in
Expected onExpected arrival time; shows actual arrival/departure times once checked in
TypeBadge: Visitor, Booking guest, Tour request, or Confirmed tour
StatusApproval status (Approved, Pending, Rejected, Grant access, Hold for collection) or check-in status (Checked in, Departed)

Filtering

You can filter the visitor list by:
  • Host customer or team
  • Location
  • Visitor source (Administrator, Customer, NexIO)
  • Approval status
  • Tour status (tour vs. regular visit, confirmed vs. unconfirmed)
  • Arrival status
  • Resource name (for booking guests)
  • Date ranges (expected arrival, actual arrival, departure)

Tours

Tours are a special type of visitor for prospective customers evaluating your space.

Tour workflow

1

Tour request received

A tour can be requested by the prospect (via the portal or AI agent) or created by your staff. It appears as a “Tour request” in the list.
2

Confirm the tour

Set Tour confirmed to schedule the tour. The visitor moves to “Confirmed tour” status.
3

Visitor arrives

Check the visitor in on arrival. You can then give them the tour.
4

Follow up

After the tour, the visitor record remains for your team to follow up — you can convert them into a customer if they decide to join.
Use the “Requested tours” and “Expected tours” quick filters to keep track of your tour pipeline separately from regular visitor traffic.

Notifications and emails

The system sends different notifications depending on the visitor’s type, source, and approval status.

Visitor emails

EmailSent toWhen
Visitor registeredVisitorWhen the visitor is created and either no approval is required, or approval has been granted. If a future expected arrival is set and scheduled notifications are enabled, the email is sent 24 hours before arrival instead.
Visitor approval requestHost (customer)When the visitor is created via NexIO and host approval is required. Contains approve/reject action links.
Visitor check-inHost (customer)When the visitor arrives and checks in (only if the host has approved or no approval is required).

Staff notifications

NotificationSent toWhen
Visitor registeredStaff members with “Visitor registration” notifications enabledWhen any visitor is created
Visitor acceptedStaff members with “Visitor registration” notifications enabledWhen a host accepts a visitor via the approval email
Visitor rejectedStaff members with “Visitor registration” notifications enabledWhen a host rejects a visitor via the approval email

Push notifications

When a visitor checks in and the host has a mobile device registered, the system sends a push notification saying “You have a visitor: [visitor name]”.

Webhooks

WebhookTriggered when
VisitorRegisteredA new visitor is created
VisitorCheckedinA visitor checks in
VisitorNotificationA scheduled notification is sent to a visitor
VisitorDeletedA visitor record is deleted
To receive staff notifications for visitor events, go to your user profile and enable the Visitor registration notification preference.

Access control for visitors

Visitors can be integrated with your access control system:
  • When a visitor’s host approval status is set to Accepted — grant access, the system can schedule access control jobs to unlock doors or grant temporary credentials.
  • The AccessControlScheduledJobId tracks automated access grants for the visitor’s expected time window.
  • Access is scoped to the visit duration (from expected arrival to expected departure or check-out).

AI agent registration

If your location has AI channels configured, visitors can self-register through a conversational AI agent. When this happens:
  • The visitor record is created with source NexIO
  • The conversation history between the visitor and the AI agent is stored and displayed on the visitor’s form in the admin Dashboard
  • Staff can review the full conversation to understand what the visitor needs

Best practices

  • Pre-register visitors whenever possible — it speeds up the check-in process and ensures the host is notified in advance.
  • Use the host approval workflow for secure spaces where you need the member’s explicit permission before allowing a guest in.
  • Link visitors to bookings for meeting room guests — this provides full context (who, where, when) and enables the right notifications.
  • Review the “Expected today” segment each morning to prepare for the day’s visitors.
  • Track tours separately using the tour flag so your sales pipeline is visible alongside daily visitor traffic.
  • Encourage customers to pre-register their own visitors from the Members Portal — this reduces your front-desk workload and ensures accurate host assignment.

Bookings

Manage resource bookings that visitors may be attending as guests.

Check-ins

Monitor who is currently on site, including visitors.

Members & Contacts

Manage the customers who host visitors.

Access Control

Configure how visitors are granted physical access.